Friday, June 15, 2012

Song of Blades & Heroes Campaign, Session 1 - Coming Ashore on the Iron Isle


Last night we began our Song of Blades & Heroes fantasy campaign with a couple of games situated on territories on The Iron Isle, our homebrew fantasy setting. The idea was that each faction had just made landfall on the island and were cautiously expanding their respective beachheads. As such, our games took place two coastal territories: the Windward Valley and Balthus Province.


The games were both quite decisive, with the losing warband opting to quit the field to avoid an outright slaughter. It's really fascinating how campaigns alter our play style. If this had been a typical kill-em-all meatgrinder game with no consequences or warband advancement, we wouldn't have hesitated to fight to the last man. Now, with each loss having an impact on a player's overall presence in the campaign, everyone is playing more prudently.

Game 1 - Skara Search Party (Tim) vs. Emperor's Vengeance Mercenary Warband (Jon)
Location: Balthus Province, farmland
Scenario: Treasure Hunt

Shortly after making landfall on The Iron Isle, both warbands encountered each other while exploring an abandoned farm looking for a stash of treasure. Balthus Province is located on the northeastern coast of The Iron Isle, near the point of origin for both of these factions.

Here is Jon's squad, the Emperor's Vengeance Mercenary Warband


And here is Tim's group, the Skara Search Party


The battlefield featured a small barn and two plots of agricultural land bordered by overgrown hedges, plus a few stray trees. Three treasure chests were placed on the battlefield, their contents unknown, leaving Tim and Jon to uncover which one holds the treasure.


The antagonists advanced slowly — until Tim's raiders found the treasure, prompting a full-on attack by Jon's mercenaries. The tide turned in Jon's favor until he made the mistake of killing Tim's skinchanger — the human figure died and was replaced with a fierce werewolf!


Faced with that — and watching his losses mount — Jon wisely decided to retreat.


After the game, we awarded experience, and then both players rolled on a big table from Song of Deeds & Glory to explore Balthus Province and see what might be hidden over the next knoll.

Jon's mercenaries found a keg of ale, and Tim's raiders found (and seized!) a roadside tavern! So now Tim owns an actual asset in the game. He can sell the ale produced by his tavern for cash, or keep it to fuel his warband. Of course, now that the other players know there is a medieval pub on the table...well, Tim's tenure as a small business owner might be brief indeed.

Game 2 - Elderroot Glade Patrol (Karl) vs. Lady Marie's Entourage (Mike)
Location: Windward Valley
Scenario: Burn Them Out!

Mike's good-guy warband, led by the mighty angel Lady Marie, was exploring the secluded valley on the northwestern coast of The Iron Isle when they discovered some strongboxes of supplies being guarded by Karl's elven patrol.


Quickly lighting torches, Mike's soldiers decided to seize the opportunity and set fire to the vital supply cache. Karl's elves would have none of it, so the combatants moved quickly to engage each other.


After a series of fierce clashes, two of Karl's elves lay dead. The scenario's victory conditions called for Mike to use his three torch-bearing figures to set fire to the barrels (using the "set stuff on fire" rules from Song of Wind & Water), so Karl tried to focus his effort on killing those warriors. Alas, it was not to be, and he chose to quit the field after losing two elves. Again, the nature of our campaign forced Karl to behave carefully with his warband and end the game to avoid a bloodbath.


Both players rolled to explore the Windward Valley after the skirmish. Mike found a keg of ale (continuing the beer theme) and Karl uncovered a roadside shrine! His pious elves left a small offering at the shrine and attempted to secure a blessing, but were unsuccessful. Karl needed to roll a 6 on a d6 to get blessed. However, the shrine remains on the map now and can be visited by other warbands.

All in all it was a fun evening of games. I wasn't able to play, but I served as photographer and battle scribe (and rules judge when needed). In two weeks, though, my undead warband will begin its unholy rampage across The Iron Isle. Stay tuned!

— Patrick, Chicago Skirmish Wargames member

Monday, June 11, 2012

Summer fantasy campaign: Song of Blades & Heroes on The Iron Isle


For our summer campaign, we decided to do a map-based story game set on The Iron Isle, a small landmass developed during Tim's Dawn of Worlds session last summer. (Dawn of Worlds is a collaborative worldbuilding game where players create their own unique fantasy world. It's also a free download if you'd like to check it out.)

We're using Song of Blades & Heroes for our games, along with the excellent campaign rules in Song of Deeds and Glory. The idea is to use the map to guide the narrative flow of our game, rather than to get bogged down with fiddly campaign mechanics. The spirit of Song of Blades & Heroes is very much focused on casual, character-based story gaming, rather than min/max powergaming, and that fits well with our club's play style.

Each player will begin with a 1,500 point Song of Blades & Heroes army. From that roster, players will assemble 300 or 400 point warbands for individual games. Losses are deducted from army lists, while survivors will gain experience.

Click here to read a synopsis of our campaign setting. Posted below you'll find individual battle reports for our games. We played about 20 individual games over the course of 7 separate game sessions. Most sessions saw multiple games being played over the course of several hours.

Wednesday, June 6, 2012

Post-Apocalyptic Cars and Motorcycles


Though Chicago Skirmish Wargames is preparing for our summer Song of Blades and Heroes campaign, I would like to dedicate two last blog entries to post-apocalyptic gaming, which has occupied a good deal of our time and energy over the last six months. In this post I'll review a few recent finds that the penny-pinching gamer will find appealing. On the docket today we have 1/43 diecast cars from Bburago, as well as Hot Wheels motorcycles.

Bburago "Street Fire" 1/43 Die Cast Cars 

Following up a tip from the Post-Apocalyptic Wargames forum, I headed over to my local Dollar General and found what may be the cheapest 1/43 cars ever! At about $2.50 each, these cars are about half the price of cars from affordable brands like Kinsmart, Motormax and Welly and Maisto. As you'll see below, these cars hold up well against those brands. Here's the armada I came home with after my first visit; I've since purchased a couple more.


Pictured are: Mini Cooper, Ford Mustang GT, Hummer HX Concept, Chrysler 300, Dodge Magnum, Ford F150, and Dodge Charger. Also available were a Porsche, Lamborgini, Dodge Viper, Corvette, and one or two other sports cars, but as high-performance sports cars don't fit into my vision of post-apoc, I didn't purchase them.

A few more visits to Dollar Generals seemed to confirm that is the extent of the available selection. For those on the hunt, the boxes they come in look like this:


I was curious how these cars would measure up to other diecast in scale. The picture below shows the Dodge Magnum next to a Welly 1/43 Crown Victoria (nice little cars — see my brief review of them here).


Though the Crown Vic seems unusually large, checking the comparative measurements of these two cars, the scales are very close. The Magnum is only a smidge short compared to the 90's Crown Vic, which is a very large car compared to most contemporary autos.

Like Hot Wheels cars, the Bburago are box-scale cars for which the size of the car has been adjusted to fit the box in which they will be sold. This resulted the cars being of a fairly uniform scale, except that the Mini and Mustang are a bit large and the F150 and H3 a touch small. As the pictures below show, the differences in scale are minor and should be no problem for most 28mm gamers. The miniature in this picture is 29mm from boot sole to eye and 37mm from bottom of base to top of his hat.

Chrysler 300


Dodge Charger


Mini Cooper


Hummer HX (Never put into production, this concept vehicle deserves special mention as the car in the series that has real potential as a sci-fi vehicle)


Ford F-150


 Ford Mustang GT


And here's one more pic of the Welly Crown Vic for comparison.


Quality observations
On balance these cars are quite nice. They have good detailing, even extending to small brand names and colored edges around windows. The interiors are nice, and there are none of the annoying pull-back motors that every other cheap die-cast car seems to come with.

All is not perfect, however. The cars suffer from one-piece, mostly untreaded tires that look cheap. Also, most are mounted high in the wheel wells so the car can ride low. The low-rider phenomenon affects lots of brands of toys these days, so I am not surprised, but it's wholly unsuited for the rough roads of a dark future.

The cars have a rather unique assembly system. There are no screws holding the car together. Usually this would mean that they would be difficult to disassemble, but these cars are held together with a clips — usually attached to bumpers or front grills — that can be easily released or cut away from the bottom of the car for easy disassembly. The picture below shows the clips attached to the bumpers that hold the car together. (Also note that the wheels are attached directly to studs on the body, and once the body and chassis are separated, they can simply be pulled off without too much effort.)

 
In the final assessment, I am quite pleased with these cars. The scale variation is minor enough that it doesn't bother me, and the issues with the wheels can be dealt with through repositioning and repainting or replacement. I have nothing but good things to say about the usefulness of the selection, overall quality, detail and ease of disassembly, and of course the phenomenal value. I have not found diecast cars anywhere that approach the quality of these cars at anywhere near this price.

Hot Wheels Motorcycles 
Though most Hot Wheels toy cars are far to small to be useful in 28mm scale gaming, many of their motorcycles are spot-on. The choppers in particular scale very well with 28mm, as their longer shape means they are often designed to be a bit smaller to fit inside the standard Hot Wheels packaging. They also tend to be a bit narrower than other bikes and thus easier to fit a rider on.

The figures on the bikes are a mix of Games Workshop parts, primarily GorkaMorka Ork arms and legs and Imperial Guard Catachan torsos and heads with a mix of weapons. I've put the official Hot Wheels names in "quotes."

"OCC Splitback" Chopper


"Blast Lane" Chopper


I've got three of these assembled, although there is still some detailing, positioning and green-stuffing of the seat areas to be done. The metallic sections and wheels will likely be repainted, but I'm going to try and keep the body paintjobs mostly intact with a bit of weathering added. For a few more pics of similar bikes and a potential cheap rider figure for these bikes, check out Lucky Joe's Place.

Here are two more bikes that will probably be incorporated into my biker gang. The blue "Boss Hog Cycles" trike is very well sized. The white "Scorchin' Shooter" is too wide to easy put a figure in the saddle, but I'm going to take a Dremel to it and see what I can do.


These three may also see use, though not likely with my biker gang. I have 3 each of the tri-wheel "Tri and Stop Me" and "Snow Ride" snowmobile. They might end up with police or military riders. The orange "Hyper Mite" (shown with canopy removed) will end up with a gang someday when I find a suitable replacement for the tiny front wheels.


I found the "HW450F" dirt bike and "Canyon Carver" to be unsuitable for my use, but I include them as scale references for those who may be interested.


Though the project isn't finished, I'm very happy with the Hot Wheels choppers. The size is right, and the detailing is as good or better than you'd find on comparably sized gaming models. At about a buck each, you can pick a few up to experiment with with no real risk to the gaming budget.

— Karl, Chicago Skirmish Wargames member

Wednesday, May 30, 2012

Naval Thunder report: Battle of the Denmark Strait


A few months ago four of us made the long trek out to Games Plus in Mt. Prospect to play our club's first naval game. With only a few people attending, it made sense to play a battle with a small number of ships. The one I picked happened to also be one of the classic battles of WWII.

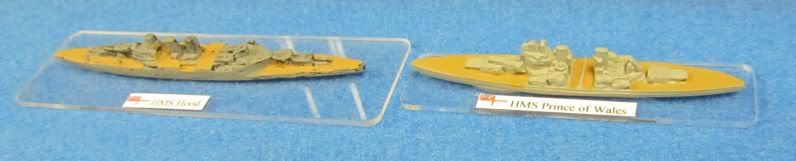
In late May, 1941, the German battleship Bismarck tried to break out into the North Atlantic. Accompanied by a heavy cruiser, the Prinz Eugen, the two German ships set a course for the Denmark Strait. They were met by the Royal Navy's newest battleship and the pride of the fleet, HMS Hood. HMS Prince of Wales was so new that she hadn't even gone through her trials yet and still had civilian dockworkers on board. Hood was a ship built at the end of WWI and was considered at the time to be the most powerful in the world, at least by the British.

The miniatures we used were all 1/3000-scale ships from a variety of manufacturers. That scale is getting quite rare in the US and can really only be found in England. All the miniatures except Hood were made by Skytrex. Hood was brought from a fellow named Mick Yarrow, who makes these ships in his basement. He makes some odd ships like German carriers, and I have dealt with him many times.


The rules we used for this skirmish are called Naval Thunder: Battleship Row and the expansion, Bitterest Rivals. It is a very well-polished rule system that I have used many times for naval games. It covers time periods from the Spanish-American War of 1898 to WWII.

There were a handful of specific rules for this scenario, mostly to accurately reflect the conditions of the ships during this particular battle — and they all affected the British. Prince of Wales had to roll each turret separately and any ones rolled would negate that turret's fire, reflecting the poor state of affairs aboard that new ship.

In addition, the British would have to roll a command check if either ship was sunk. I had Hood, Tim had Prince of Wales, Karl had the powerful Bismarck, and Kevin was stuck with Prinz Eugen, a ship which was totally outclassed in the battle. Here are the British ships:


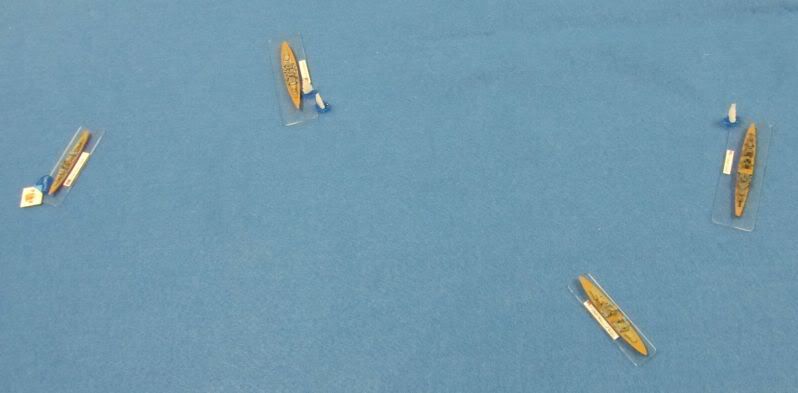
After a short explanation of the rules, we were off. Turn one had Hood and Prince of Wales, turning to starboard (right). The Germans moved toward their exit point, still unsure about the rules. Hood fired at Prinz Eugen and missed. Bismarck hit Prince of Wales, as did Prinz Eugen. However, the smaller guns on Prinz Eugen did no damage at all.

Turn 2 had the British continuing their turn to cut off the Germans and uncover all their guns. Bismarck and Prinz Eugen continued on course, as the British shooting hadn't done much the previous turn. Hood fired on Prinz Eugen again and hit, penetrating the weak armor and causing the cruiser to begin flooding. Bismarck and Prince of Wales exchanged fire, both hitting but not causing major damage. Prinz Eugen failed to fix her flooding and took more damage.


In Turn 3, the Germans changed tactics. Realizing that they were being overwhelmed, Bismarck turned to port (left) to unmask all her guns. Prinz Eugen continued on course while the British continued on their previous course to keep the Germans from their objective. Bismarck fired on Hood for a change and hit, but didn't penetrate Hood's moderate armor. Prince of Wales hit Bismarck and did some hull damage, but not a lot. Hood smashed Prinz Eugen's engine room, reducing the cruiser's speed while Prinz Eugen managed to hit Hood and do some damage, but nothing critical.

On Turn 4 Bismarck continued to turn while all the other ships remained on their previous course. Hood switched fire to Bismarck and did some damage. Bismarck replied and did some damage to Hood, while Prince of Wales caused a fire to start on the beleaguered Prinz Eugen. But Prinz Eugen hit Hood again and damaged the large ship's engines.

During Turn 5 Bismarck reversed course now headed to starboard while the British continued on their course. Hood blew up after a devastating barrage from Bismarck, while Prince of Wales smashed one of Bismarck's main battery turrets. Prinz Eugen sank as a result of fires and flooding.


Turn 6 started with only half the remaining ships in the fight. The loss of Hood had not scared the British, and they continued to fight. Both ships moved in close, blasting away with everything they had. While Bismarck did some damage to Prince of Wales, she took a lot of damage in return. Her bridge was smashed and she was on fire.

 On Turn 7 it was all over. Prince of Wales crossed the T of Bismarck and raked her with a well-aimed round of fire, causing the Bismarck to slip under the waves and vanish into the pages of history.


Everyone had a lot of fun playing and all agreed to try it again in the future. Our results differed greatly from those of history, and yet some things remained the same. In reality, Bismarck and Prinz Eugen briefly exchanged fire with the British before Hood blew up and Prince of Wales turned around and sailed away, having accomplished nothing in the battle. Bismarck sailed on and was damaged a few days later, making her attempt to return to Brest in occupied France for repairs. She was attacked and sunk by the Royal Navy on her way there.

— Mike, Chicago Skirmish Wargames club member

Thursday, May 24, 2012

The Medieval Village Grows


I recently finished a few more buildings, bridges and fences for my medieval town. These pieces were made from old porcelain Christmas village buildings and accessories — a great source of material for cheap conversions!


The bridges were a bit of a problem: they weren't wide enough for 25mm bases. I fixed this by using a hammer to break one side out of each bridge section. The smaller bridge broke completely apart, but this kind of hard porcelain breaks in large parts and it was easy to reassemble with superglue.

I then filled the hollow cavities with newspaper, hardened the top with a bit of superglue and applied the construction sand.


I can't say enough good things about construction sand. Sold in bags to be used as ballast, it has all kinds of bits in it that add some irregularity to the texture. My batch had strange red and white stones and some pieces of what appeared to be pottery!


The steps for finishing were as follows for the bridges and buildings.

  • Paint for touchups and brown where the flock will go.
  • A nice brushing of Minwax Polyshades Tudor — I use this as a brush-dip for many of my figures, but on buildings I call it "instant grimdark!" 
  • Drybrush over the ballasted areas. 
  • Flocking — This time I used the coarse foliage flock, and the results are more dramatic than the finer variety used previously. 
  • Seal the flock with hardware store matte spray. 
  • Apply a couple of layers of brush-on matte varnish to all non-flocked surfaces to get rid of the shine.

Here are the finished bridges.


I also did a set of stone walls. The green tint on one is the results of accidentally grabbing the green spray paint instead of the matte spray. Oh well, it doesn't look too bad!


I also finished three more buildings. This farmhouse illustrates one of the nice things about porcelain houses. They have many different angles and sections that would take a long time to scratchbuild.


 This blue house was a cheap find at a resale shop.


It was quite cheap becuase it had a broken top on the widows perch. However, a little card and some flocking and no one will be the wiser!


This last townhouse is not bad from the front, but looks a bit more fantasy/medieval from the back where I pasted a plastic warhammer castle door over the light bulb hole.


Here is my entire village is arranged for a potential game.


One reason I won't be adding any more buildings is that, right now, they all fit nicely into one Rubbermaid tub. Six of them fit into the bottom, which has been sectioned off with double thick corrugated cardboard.


This top section made from a bit of flexible foam and the cover for a printing paper box holds the last two buildings as well as the bridges and fences.


Now my town is complete! I will be adding a few city walls made from a toy castle, but that will be all. It's likely that this town get some use soon — starting in a few weeks, Chicago Skirmish Wargames will be spending a few months playing an extended fantasy campaign using the Song of Blades and Heroes ruleset. Look for lots of great battle reports this summer!

— Karl, Chicago Skirmish Wargames member