A few months ago four of us made the long trek out to Games Plus in Mt.
Prospect to play our club's first naval game. With only a few people attending, it made sense to
play a battle with a small number of ships. The one I picked happened to also be one of
the classic battles of WWII.
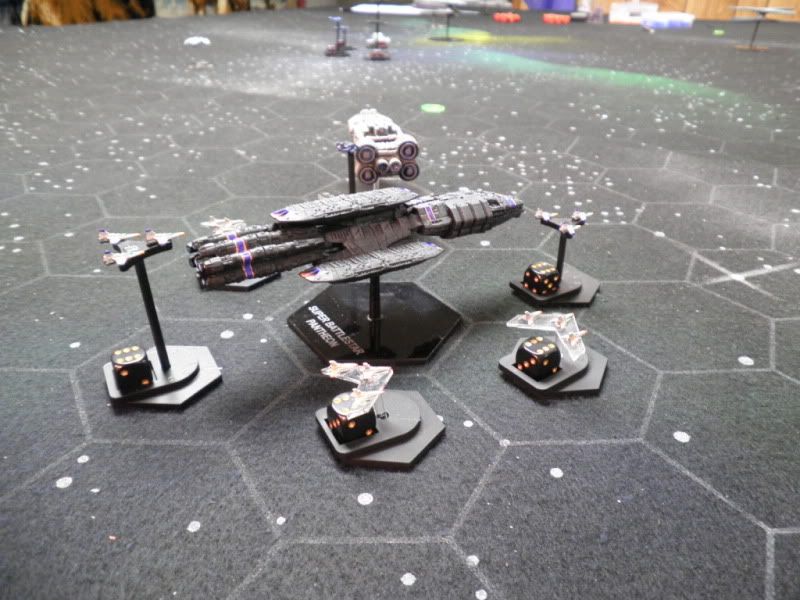
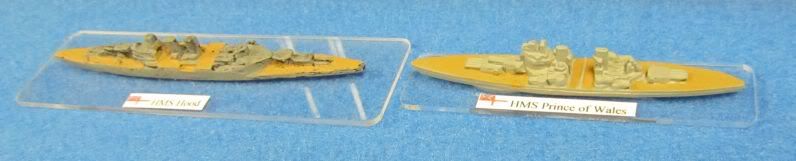
In late May, 1941, the German battleship Bismarck tried to break out into the
North Atlantic. Accompanied by a heavy cruiser, the Prinz Eugen, the two German ships
set a course for the Denmark Strait. They were met by the Royal Navy's newest
battleship and the pride of the fleet, HMS Hood. HMS Prince of Wales was so new that
she hadn't even gone through her trials yet and still had civilian dockworkers on board.
Hood was a ship built at the end of WWI and was considered at the time to be the most
powerful in the world, at least by the British.
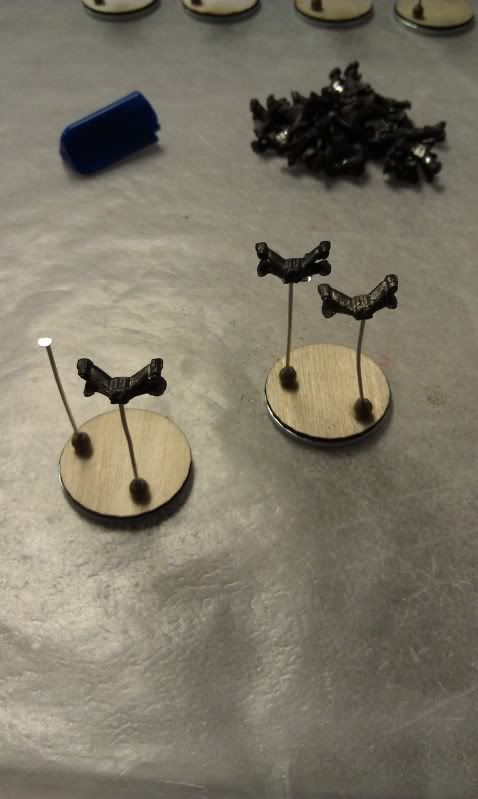
The miniatures we used were all 1/3000-scale ships from a variety of
manufacturers. That scale is getting quite rare in the US and can really only be found in
England. All the miniatures except Hood were made by Skytrex. Hood was brought
from a fellow named Mick Yarrow, who makes these ships in his basement. He makes
some odd ships like German carriers, and I have dealt with him many times.
The rules we used for this skirmish are called Naval Thunder: Battleship Row and
the expansion, Bitterest Rivals. It is a very well-polished rule system that I have used
many times for naval games. It covers time periods from the Spanish-American War of
1898 to WWII.
There were a handful of specific rules for this scenario,
mostly to accurately reflect the conditions of the ships during this particular battle — and they
all affected the British. Prince of Wales had to roll each turret separately and any ones
rolled would negate that turret's fire, reflecting the poor state of affairs aboard that new
ship.
In addition, the British would have to roll a command check if either ship was sunk.
I had Hood, Tim had Prince of Wales, Karl had the powerful Bismarck, and Kevin was
stuck with Prinz Eugen, a ship which was totally outclassed in the battle. Here are the British ships:
After a short explanation of the rules, we were off. Turn one had Hood and Prince
of Wales, turning to starboard (right). The Germans moved toward their exit point, still
unsure about the rules. Hood fired at Prinz Eugen and missed. Bismarck hit Prince of
Wales, as did Prinz Eugen. However, the smaller guns on Prinz Eugen did no damage at
all.
Turn 2 had the British continuing their turn to cut off the Germans and uncover
all their guns. Bismarck and Prinz Eugen continued on course, as the British shooting
hadn't done much the previous turn. Hood fired on Prinz Eugen again and hit, penetrating
the weak armor and causing the cruiser to begin flooding. Bismarck and Prince of Wales
exchanged fire, both hitting but not causing major damage. Prinz Eugen failed to fix her
flooding and took more damage.
In Turn 3, the Germans changed tactics. Realizing that they were being
overwhelmed, Bismarck turned to port (left) to unmask all her guns. Prinz Eugen
continued on course while the British continued on their previous course to keep the
Germans from their objective. Bismarck fired on Hood for a change and hit, but didn't
penetrate Hood's moderate armor. Prince of Wales hit Bismarck and did some hull
damage, but not a lot. Hood smashed Prinz Eugen's engine room, reducing the cruiser's
speed while Prinz Eugen managed to hit Hood and do some damage, but nothing critical.
On Turn 4 Bismarck continued to turn while all the other ships remained on their
previous course. Hood switched fire to Bismarck and did some damage. Bismarck replied
and did some damage to Hood, while Prince of Wales caused a fire to start on the
beleaguered Prinz Eugen. But Prinz Eugen hit Hood again and damaged the large ship's
engines.
During Turn 5 Bismarck reversed course now headed to starboard while the
British continued on their course. Hood blew up after a devastating barrage from
Bismarck, while Prince of Wales smashed one of Bismarck's main battery turrets. Prinz
Eugen sank as a result of fires and flooding.
Turn 6 started with only half the remaining ships in the fight. The loss of Hood
had not scared the British, and they continued to fight. Both ships moved in close,
blasting away with everything they had. While Bismarck did some damage to Prince of
Wales, she took a lot of damage in return. Her bridge was smashed and she was on fire.
On Turn 7 it was all over. Prince of Wales crossed the T of Bismarck and raked
her with a well-aimed round of fire, causing the Bismarck to slip under the waves and
vanish into the pages of history.
Everyone had a lot of fun playing and all agreed to try it again in the future. Our
results differed greatly from those of history, and yet some things remained the same. In
reality, Bismarck and Prinz Eugen briefly exchanged fire with the British before Hood
blew up and Prince of Wales turned around and sailed away, having accomplished
nothing in the battle. Bismarck sailed on and was damaged a few days later, making her
attempt to return to Brest in occupied France for repairs. She was attacked and sunk by
the Royal Navy on her way there.
— Mike, Chicago Skirmish Wargames club member
Wednesday, May 30, 2012
Thursday, May 24, 2012
The Medieval Village Grows
I recently finished a few more buildings, bridges and fences for my medieval town. These pieces were made from old porcelain Christmas village buildings and accessories — a great source of material for cheap conversions!
The bridges were a bit of a problem: they weren't wide enough for 25mm bases. I fixed this by using a hammer to break one side out of each bridge section. The smaller bridge broke completely apart, but this kind of hard porcelain breaks in large parts and it was easy to reassemble with superglue.
I then filled the hollow cavities with newspaper, hardened the top with a bit of superglue and applied the construction sand.
I can't say enough good things about construction sand. Sold in bags to be used as ballast, it has all kinds of bits in it that add some irregularity to the texture. My batch had strange red and white stones and some pieces of what appeared to be pottery!
The steps for finishing were as follows for the bridges and buildings.
- Paint for touchups and brown where the flock will go.
- A nice brushing of Minwax Polyshades Tudor — I use this as a brush-dip for many of my figures, but on buildings I call it "instant grimdark!"
- Drybrush over the ballasted areas.
- Flocking — This time I used the coarse foliage flock, and the results are more dramatic than the finer variety used previously.
- Seal the flock with hardware store matte spray.
- Apply a couple of layers of brush-on matte varnish to all non-flocked surfaces to get rid of the shine.
Here are the finished bridges.
I also did a set of stone walls. The green tint on one is the results of accidentally grabbing the green spray paint instead of the matte spray. Oh well, it doesn't look too bad!
I also finished three more buildings. This farmhouse illustrates one of the nice things about porcelain houses. They have many different angles and sections that would take a long time to scratchbuild.
This blue house was a cheap find at a resale shop.
It was quite cheap becuase it had a broken top on the widows perch. However, a little card and some flocking and no one will be the wiser!
This last townhouse is not bad from the front, but looks a bit more fantasy/medieval from the back where I pasted a plastic warhammer castle door over the light bulb hole.
Here is my entire village is arranged for a potential game.
One reason I won't be adding any more buildings is that, right now, they all fit nicely into one Rubbermaid tub. Six of them fit into the bottom, which has been sectioned off with double thick corrugated cardboard.
This top section made from a bit of flexible foam and the cover for a printing paper box holds the last two buildings as well as the bridges and fences.
Now my town is complete! I will be adding a few city walls made from a toy castle, but that will be all. It's likely that this town get some use soon — starting in a few weeks, Chicago Skirmish Wargames will be spending a few months playing an extended fantasy campaign using the Song of Blades and Heroes ruleset. Look for lots of great battle reports this summer!
— Karl, Chicago Skirmish Wargames member
Tuesday, May 22, 2012
How to Base Fleet-scale Starfighters
I have been collecting miniature spaceships for over eight years now and finally
began painting them up recently. I had never really bothered with all my miniature starfighters,
but I finally decided to do something with them and I needed a way to base them up.
Because almost all of them came from England, I wanted to stretch them as far as I could. There are a number of methods for basing up fighters, and I combined a few of them to do it easily and cheaply.
One method I had been considering involves Litko bases. They are very durable and easy to use, but expensive. First you need a Litko flying base and then you add a chevron-shaped attachment to the top. They also make a three-pronged triangle that you can stick fighters on. Both work well and I have seen them used to great effect — but they weren't really what I was looking for, and I'd need a lot of them, so I kept looking.
The fighters are based using Litko products. These are not my miniatures!
Another great option was to base them up like the creator of Star-Ranger did. He took a one-inch wood disk and glued three pins to them. Then he drilled a small hole into each fighter and mounted the fighters on the pins. I had a hard time drilling the holes, though, so I had to think outside the box. What I ended up doing was flipping around the pin and using the flattened top to attach the fighters.
But how to get the pin on the base? To solve that problem, I found some 3.2mm brass beads from the same craft store. If I glued them to my wooden base, I could stick the pin into the bead, giving me a strong connection. It worked amazingly well.
For the bottom, I first used a 7/8" steel washer from Lowe's and then discovered that Litko sold plywood disks the exact same size. I ordered a few hundred of them at 0.8mm thick and started gluing. After gluing together the washers and plywood, I had a reasonably heavy base that was magnetic.
The next step was the glue down two beads, making sure to leave plenty of space between them. Some of my fighters were quite large and I didn't want any collisions!
After letting the glue set up a bit under the bead, I added more glue and stuck the pin into the bead. It wasn't an exact fit but using a very thick gel glue, it worked.
Attaching the fighters took some more work. Some of them were small enough that they went on very easily. Some took a bit more convincing. And for a handful, I needed to glue a bead to the bottom of the fighter, cut off the flat head of the pin, and use what was left of the pin to connect the two beads.
I put two fighters on each base, which leaves room for a small dice to track how many ships are left in the squadron, and for any identifying labels I might want to use.
For shuttles and larger craft I only put on per base, mainly because Ground Zero Games stopped making their small shuttles and similar craft, so I was stuck with whatever I had on hand.
After I based up over 100 squadrons I decided to see how much it cost me per base. Using Litko's three-peg base, it would cost 63 cents per base. Using their chevron base, it would cost 73 cents per base. My method took more time but only cost 17 cents per base.
One more method works well: Studio Bergstrom sells a Versi-Base, which is a piece of foam you can stick pins into for mounting fighters. I have heard very good things about them, but each one costs 20 cents, which still makes my similar method slightly cheaper.
— Mike, Chicago Skirmish Wargames member
Monday, May 14, 2012
The Battle for Addicks: A Mech Attack Battle Report
Despite now living in Kansas City, Chicago Skirmish Wargames founding member Ryan was in town a couple weeks ago to help with our Little Wars convention game.
While he was visiting, we also managed to play a round of Armor Grid: Mech Attack at my house. The scenario was set in the BattleTech universe: a fight for possession of a factory on the world of Addicks. The battle occurs in the year 3136 during a Trial of Annihilation.
Instigated by the visions of Nova Cat Mystic Kisho, this trial pitted Clan Nova Cat against their separated Spirit Cat kin. The attackers had 8 turns to get two of their mechs in contact with the factory. We had to fudge the minis a bit, but here are the forces involved. All are rebased Mechwarrior clix miniatures. No additional painting!
Ryan's Star of mechs from Clan Nova Cat landed with the intent of defeating the the Spirit Cats and bringing their remnants back into the Nova Cats.
My Star of Spirit Cat mechs must defend the factory.
The first two turns were mostly movement as the Spirit Cats took up defensive positions and the Nova Cats advanced.
The Nova cats advance, using the rocks to shield their movement.
By turn four we see first blood as concentrated Spirit Cat firepower brings down a Nova Cat mech. The Nova Cat Orion on the right flank will shortly temporarily lose a turn of firing due to heat overload, placing the Nova Cats in a very dangerous position.
By turn six, two more Nova Cat mechs have gone down. All Spirit Cat mechs are still operational, though many have sustained heavy damage.
Turn seven arrives with the destruction of a Spirit Cat light mech. The Nova Cat Orion has opened fire again, but it's too little, too late. The Spirit Cats concentrate all their firepower on the Nova Cat Maurader II (in the upper left in this photo) which goes down in turn eight.
Conclusion
This was a fun game, though it didn't have very much suspense since the battle went so dramatically against the Nova Cats by the end of turn five. Ryan and I enjoyed the game, and it made me wish I played Mech Attack a bit more. As well as playing more games with combined arms, at some point I'd like to stat out more mechs with exaggerated strengths and weaknesses (sort of like 3025-era BattleTech) to really challenge the players to get the most out of imperfect designs.
This game proved that focusing firepower on one mech at a time is a key part of Mech Attack's strategy — as well as guarding against rear shots, which almost always deal significant damage.
The game was typically short for Mech Attack, taking well under two hours to play, not counting setup. I don't have much experience with other mech games (having played a couple, read quite a few), but Mech Attack remains my favorite game of mech combat. It plays well with a combined arms strategy, too.
As I mentioned before, neither one of us was using optimized mechs. I built the game stats based on the appearance of each individual mech miniatures, with a nod to BattleTech fluff, and I didn't tweak them to create more devastating in-game combos. This seems to result in much more balanced and interesting games, as Ryan and I had to think of how best to use the tools we were given rather, than starting the game with perfectly designed mechs.
— Karl, Chicago Skirmish Wargames club member
Thursday, May 3, 2012
Atomic Highway: A Little Wars Battle Report
We've been hyping the game we've come up with for HMGS' Little Wars convention for some time now, and after a weekend of furious action, here are the results.
The Gangs
First, let's take a look at the gangs that took the field. We had 6 factions involved in this game.
The Settlement Survivors — These folks are not inherently violent, but are willing to do what it takes to defend their families and their fragile settlement on the outer wastes.
1. Gas Runner tribe — Nomads who specialize in the acquisition and transport of Black Gold. In this case they are working for the Settlement Survivors faction.
2. Settlement Scouts — These warriors are specially tasked with finding supplies (in this case Black Gold) for the settlement.
3. Settlement Defenders — These survivors have come along as extra muscle to ensure the safe delivery of the Black Gold
The Vandals — These villains survive not by their own efforts, but by raiding and stealing from others.
4. Butchers of Boozetown — Feared by all, these psychotic raiders are not known for leaving survivors... intact.
5. Rat Scavengers — Mostly comprised of former Settlement Survivors, the Rat Scavengers are raiders who prey on their former comrades.
6. Lone Skulls Biker Gang — No stranger to violence before the Great Catastrophe, the Lone Skulls now find their skills in violence and intimidation to be a valued commodity.
The Scenario
In our scenario, the survivors of a dark future have secured a tanker of Black Gold (gasoline, of course, using a term borrowed from "The Road Warrior") with the help of the Gas Runner tribe. In order to get it back to their settlement, they attempt a daring cross-country run, trying to avoid the Vandals by staying off the highway. The Survivors need to get the tank of fuel across the wastes to their settlement, while the Vandals' objective is to seize the truck.
We managed to set up a table featuring 14 feet of post-apocalyptic madness! The settlement objective is in the foreground. Notable areas include the Narrows and the Splits. This game used a very simplified version of the Wasteland Meltdown rules. Over the course of three separate playtest games, we tweaked the rules to create a fun, easy-to-learn scenario.
The Game
The game began with a roar of engines as the Gas Runners took off across the wastes, defended by the Settlement Survivors and pursued by the Vandals. Adrenaline and a sense of duty overpowered sound logi,c and early in the game the Settlement Defenders tried a suicidal blocking maneuver to slow their pursuers.
The Gas Runners and Settlement Scouts roared ahead into the Splits.
Unfortunately for the defenders, the massed firepower of the Vandals and the ramming power of their death trucks made short work of the blockers. The defenders' vehicles were crushed, smashed and crippled, with most occupants slaughtered.
With only one surviving figure, the Settlement Defender player opted to take advantage of a "respawn" rule we had created for just such a situation. The player received one vehicle and two passengers at a garage located further down the battlefield. The respawn option was available to any player who lost both of his vehicles.
Ambush! As the Gas Runners and Settlement Scouts come out of the Splits, they were ambushed by a Rat Scavenger sedan.
To represent their control of the wastelands, the Vandals were given the ability to begin the game deployed anywhere up to the last road section. Additionally, any Vandal vehicle ending its turn on a black asphalt road section was able to re-enter the board from another road section the following turn.
This ended up being a great mechanic for keeping the action fast, and keeping players whose vehicles were damaged from being completely left behind.
The ambush was largely ineffective, though a few of the Vandals managed to leap onto the Gas Truck just before it roared into the Narrows. Shortly after, the majority of the Vandals left at the table at a road section in order to ambush the truck after the Narrows.
As the Gas Truck left the Narrows, it was beset by several Vandal vehicles, which rammed it and poured on the firepower. More Vandal riders boarded the truck; absolute chaos ensued as it neared the settlement (and the end of the game)!
Though indestructible as part of the scenario, damage nonetheless took its toll on the Gas Truck. Every 20 points of damage meant a panic check, which meant friendly passengers might fall off!
At the settlement, the defenders rolled back the vehicles blocking the entrance...
.... meanwhile the attackers and defenders massacre each other until only the driver and one Vandal warrior remain aboard the Gas Truck as it rolls through the settlement gates.
Despite the loss of all the Gas Runner defenders, the Settlement Survivor faction won the major objective — and by only losing three vehicles, they secured a MAJOR VICTORY!
Conclusion
Overall, I couldn't have asked for a better game. The outcome actually became less sure as the game progressed, and it was in contention right up until the moment the Gas Truck rolled into the settlement.
Including briefing, the entire game of 14 turns took less than two and a half hours. Except for collision results and a few inevitable GM rulings, the players were able to handle almost all gameplay themselves within four turns. The respawn and road re-entry mechanics kept all players engaged through the entire scenario, and they all seemed to be having a great time.
Special thanks is due to Pat, who created and modified the scenario and would have run it if life hadn't intervened. Also, thanks go out to the Chicago Skirmish Wargames club members, who gave up three club nights (nearly two months of meetings) to heavily playtest this game. The playtests resulted in many, many changes, and when I think of what the rules first were, the game would have been a true disaster without the modifications.
Thoughts on Little Wars
Little Wars was a great venue for running the game. They were very friendly and more than willing to give us a double-long space for our 14-foot game boards. They also provided the GM (me) with a goodie bag of snacks and a medal to give to the best general. The award went to the gamer who had only lost one vehicle and two passengers.
Even though our event was sold out in pre-registration, only three players actually showed up! However, we were able to fill the three spots with two walk-ups and Ryan, our erstwhile club member who had come in from Kansas City to hang out for the weekend and help our with the game.
The convention sights were great as always. Little Wars consistently has a multitude of great battlefields and miniatures representing the entire historical spectrum of eras and scales. The flea market was small but excellently run and there were lots dealers. I made some great finds at both.
Though not having much interest in historical gaming, I had a good time looking over the tables and at the paint-and-take booth. Interestingly, there isn't free admission for GMs, and unlike Adepticon, there also isn't free admission for folks who want to come and shop, or just walk around and watch games in progress.
This is the second year that we've run an event at little Wars. We'll likely run another event at Little Wars next year, but we are considering other venues. It's very heavily weighted toward the historical side of the spectrum (as one would expect for an event run by HMGS). Aside from the Warmachine tournament (which had the distinction of being the only games featuring unpainted miniatures, haha), our game was one of only three non-historical games I saw. As most of our group does very little historical gaming, we are left wondering if we are reaching the right audience with our games. Moreover, if we didn't run a game at the convention, would we spend $20 to stroll around and shop?
We have plenty of time to discuss this question before next year's event. I'd urge the event organizers to consider free admission for GMs as well as a reduced rate for non-players who just want to browse and spend money in the vendor area. Anything to make the convention more accessible is a good thing!
As always, we'd love to hear your impressions of Little Wars. Post a comment below or (if you're in the Chicago area) join our mailing list!
— Karl, Chicago Skirmish Wargames club member