Wednesday, September 26, 2012

Do-It-Yourself: Paint Cases and Dropper Bottles


I use craft paints for most of my painting, but I had the chance to try out some dropper bottle paints recently. It inspired me to see about making my own, along with a paint case for storage and transport.

DIY Dropper Bottles
Craft paints work just fine for my painting. I realize they don't have all the qualities of model paints, but they are about one-tenth the price per ounce and are available in a dizzying array of colors. For an average painter like me, they are more than adequate.

For those considering craft paints, my favorite brand for flow quality and pigmentation is Delta Ceramcoat ($1.20 for 2 oz.), though I use others as well. The main drawbacks to craft paints are the size, which affects transport and storage, and ease of dispensing. Miniature painters don't need much paint as a time, but even the small openings on craft paint lids may give too much paint at once, resulting in waste.

After seeing other club members using Reaper and Vallejo paints with their nifty dropper bottles, I decided a change was in order. A bit of searching led to this eBay seller advertising 100 15ml-dropper bottles (same as Reaper and Vallejo) for $36 bucks shipped. They also have smaller quantities.


I jumped at the opportunity and a week later they arrived at my door from Hong Kong. Here's a comparison shot of the various types of bottles next to the dropper bottle I ordered (the one with the white cap).

 
The bottles are about the same size as Reaper bottles. These bottles are intended for retail, so they have a lock ring on them, so you'll have to screw the cap on and off to break off the lock ring.

When squeezing the craft paint into the bottles, I highly recommend holding the empty bottles a bit squished. That way when the inevitable clog happens in the neck (craft paint is quite thick), you can release the squish and it will suck the paint into the bottle. Having toothpicks on hand to clear any clogs is a good idea also.

I've only had them for a couple of weeks, but they seem to work well. They dispense the paint in very small amounts. I don't know if they will be prone to clogging over the long run, but the dropper ends are simple to remove for cleaning with a needle or toothpick. I've got all my bottles of craft paint in storage for when I will need to refill the droppers. Now all I need is a way to store them....

Make Your Own Paint Storage and Transportation System
After transferring all my craft paint into dropper bottles, I wanted a way to store them. Their small size means they will take up almost no space in a small box, but I also wanted a way to transport them, since the club has been having more painting nights. Here's what I came up with.

What you will need
1) Foam -- Either eggshell or flat top foam will do. The top of the flat foam or bottom of the depression in the eggshell should be no more than half the height of the paint bottle. I used some scrap eggshell for this project.

2) Plastic case -- I highly recommend heading to your local resale shop and reusing a case. The cases in this review cost me just $2 or $3 each! All that matters is the height of the case. It needs to match, or be only slightly taller than the paint bottles. Paint bottle heights are below:
  • Current or previous generation Games Workshop paint pots are 1.25 inches (4.5 cm) tall
  • Old style Games Workshop pots, and most half-ounce pots of model paint (Model Master, Polyscale, etc) are 2 inches tall. The small square glass bottles of hobby paint are just a bit shorter. 
  • Most dropper bottles are 3 inches tall. 
The two cases I found are below. The white case was completely empty and the other one had some loose foam that I removed. If you still can't find a case the right size, you can always add a bit of thin foam to the top of the case to make up the difference.


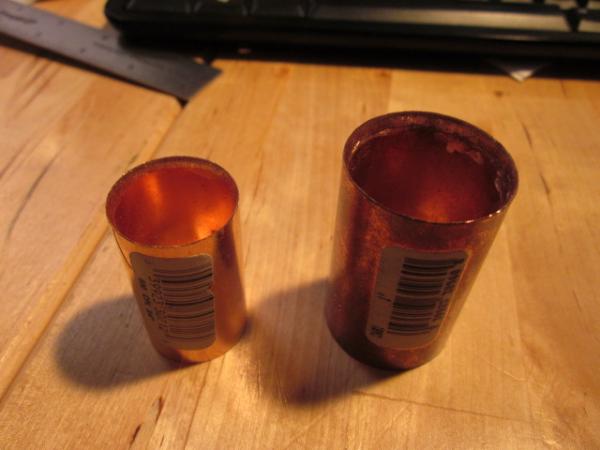
3) Foam cutters -- You can cut the foam with a knife, but it's a messy business. Instead, head to your hardware store and get 1 inch and 3/4 inch copper fittings. They will cost you about $1 each.


Then take a grinding wheel or a Dremel and grind out the inside edge of the fittings until they is nice and sharp. By twisting them into the foam with a slow rotating motion, these cutters will remove a nice round plug of foam. Note that the measurements given when you buy the fittings are not actual; the real interior or exterior diameters of the fittings are actually larger. The larger fitting will give you a cavity about 31 mm in diameter, perfect for larger paint pots and bottles. The smaller fitting will give a hole about 24mm in diameter which is ideal for dropper bottles.

4) Diamond-coated file, Dremel -- For making the foam cutters above. The diamond file is particularly useful for periodic sharpening as you start carving holes in your foam sheet.

5) Glue gun -- I find a glue gun is great when dealing with soft plastics and foams. Contact cement also works well, but it stinks to high heaven.

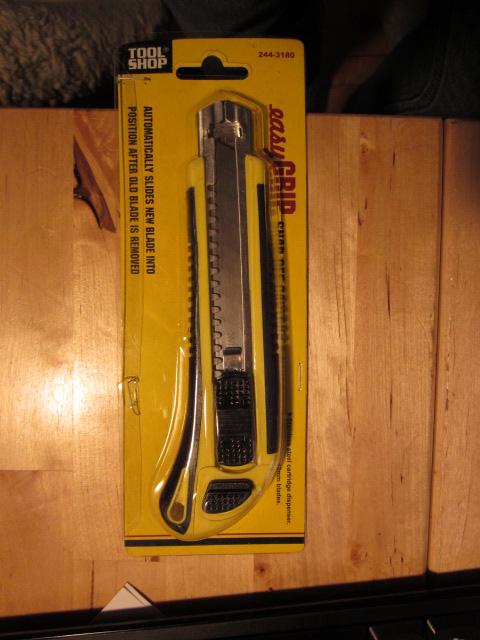
6) Knife -- For cutting the sheet of foam to fit. I have an electric carving knife that I picked up from a resale shop, but a razor knife, or even a serrated bread knife will work also. Here's a good cheap option.


How To Make the Case

1) Cut the foam to fit the case. Cut it about 1/4 inch wider than your measurements to ensure a nice tight fit.

2) Cut the cavities for the paint with your foam cutters. When using eggshell foam, just place the cutter in the depressions and you'll end up with evenly spaced holes. For regular foam, it's best to measure first to determine where the cuts should be. Briefly sharpen the cutter using your diamond file every 15 holes or so. Copper is a soft metal and foam blunts it quickly. For making larger holes, you may need to let the holes overlap. This is OK; the paint will be held in place just fine, like in this pic.


3) Glue the newly cut sheet into the case. Hot glue cools quickly, so start from one corner and glue down one row at a time diagonally, giving 20 seconds or so for it to dry before gluing the next line. The results should look something like this.

 Now you can add your paints. I made two cases: one for my dropper bottles, and one for the various larger paints I've acquired over the years. Feel free to leave a comment with any questions or feedback. Here are the finished products!


-- Karl, Chicago Skirmish Wargames club member

Wednesday, September 19, 2012

Two reviews: Inkwell Industries and Mega Minis' Salvage Crew

Today we'll review two groups of miniatures: resin bases, barrels and wheels by Inkwell Industries, and the Salvage Crew from Mega Miniatures.

Inkwell Industries: Bases, Barrels and Wheels
Inkwell Industries is a one-man side project that has some good quality resin products at remarkable prices. This review will showcase their bases, barrels and tires, all of which I purchased a few months ago.

At present the only way to buy Inkwell Industries products is through the Post-Apoc Wargames forum's Traders Shack, which is where I found them.

The 25mm round bases come in 9 designs and are sold in batches of 20 for $5. In the past I've tended to view cast resin bases as a bit of an extravagance. With most bases costing nearly the price of what I try to spend for miniatures ($1 to $2) I didn't see the point. At 25 cents each, however, I couldn't resist trying them, especially when I have a slew of post-apocalyptic figures that would look good on them.

The bases look like the pictures below, though they now all come in white.


The bases all seem well cast. Some of them are a touch uneven on the bottom, but nothing you can't fix with a bit of sandpaper.. A few of them had what might be very minor flaws in the casting detail on top, but since these are all modeled after broken ground, scrap and salvage, I wouldn't have noticed if I hadn't had two of each base to compare to each other, and I doubt anyone else would notice.

Most importantly, the sides all seemed nice and smooth, with no bubbles. The heights of terrain modeled on the bases do vary a bit. Inky informs me that he originally made the bases for himself to balance out the height of the various figures he was using for his own post-apocalyptic games. Differing heights don't bother me, but it's interesting to hear this perspective

My final observation is that while a wide variety of bases are great for post-apocalyptic figures, players seeking a more uniform look might not appreciate all the variation. I would love to see the selection expanded so there were 4 to 5 different sculpts for each "theme" that appears in the mix (gears, rocky terrain, wreckage, etc).

Be sure to read through the miniatures review below to see photos of these bases black-washed and attached to miniatures.

Inkwell also has a 40mm round base cast in a metal plate pattern. It's a nice design, and while the plates aren't perfectly level (I'm not sure if this is intentional or not), they're a steal at 50 cents each and would be a nice choice for basing Space Marine Terminators. I'll probably use the one I have to base up the Ape-X figure from the Reaper Bones Kickstarter.


Hint to Inkwell...If this metal-plate design was available in 25mm or 40mm, I'd buy a batch tomorrow!

I also purchased a pack of oil barrels. They are very simple, with basic rim detailing and a valve on top. The bottoms are a bit uneven on some, but that's to be expected on barrels cast from a one-piece mold, and it's easy to fix. They are entirely adequate, and at 10 for $3 they are quite a bargain.

 
Lastly, I bought some resin wheels. These are purchasable individually at 15 cents each, and I got 16 of them.


They are 16mm in diameter and size up well with the wheels on the bargain 1/43 Bburago cars I reviewed earlier. These cars were nicely made, but they had some really cheap-looking wheels.

While the diameter and detail of the wheels are all the same, the thickness of the wheels varies quite a bit. There seem to be 3 or so different thicknesses. For folks using these for terrain detailing, this is not a problem, but for those intending to put these on vehicles, it might be worthwhile to specifically request wheels of the same thickness.

I had no problem making a few sets of wheels out of the batch I purchased, though a few will need to be sanded down a bit. The resin is easy to cut and modify, so I have no doubt it will be easy to drill out holes to fit these onto the wheel posts of the Bburagao cars.


Overall, I'm quite pleased with the products received from Inkwell. They don't have quite the polish of some higher-priced resin products, but at a third of the cost or less they are more than adequate for my uses. I highly recommend them, and it's very likely that I will be purchasing more of the bases in the near future.

Salvage Crew Miniatures on Inkwell Bases
Last year I briefly reviewed the Salvage Crew miniatures from Mega Miniatures. They were originally produced by Alpha Forge for their Star Mogul game, and Mega Minis acquired the line last year (which includes many other great figures) and released the game as a free download on their website.

The purchase of the post-apocalyptic bases from Inkwell Industries seemed like a perfect excuse to assemble these figures and base them up. I've mounted them on the Inkwell bases and given them a quick-and-dirty black wash to bring out some of the details. Here's a group shot and another from above to show off the bases.


My observations from the initial review are largely unchanged. They are very nice figures with separate heads, though the quality of the heads are are hit-or-miss. The casting is good, with minimal flash and mold lines. For the most part, they are loaded with packs, tools, gear, etc. as befits the subject matter.

Be aware that each figure comes with two random heads, so you might not end up with the heads I used, or the heads pictured on the website. Also, some of the neck pegs are a bit skinny; a bit of putty or just some extra superglue will fix this. I've listed them with the names that Mega Minis has given them. For those looking to acquire these figures, they are available here.

Gang Member with Shotgun and Cutting Equipment 

Love the character of this figure, though he's the one figure I couldn't get to photograph well, so you'll have to take my word for it. Uniquely among this batch, he does not have a separate head. Also, he doesn't have any specifically futuristic gear. His main equipment is a double-barreled shotgun and a cutting torch on his back. His aviator cap and goggles, trenchcoat and lack of sci-fi equipment would make him a good fit for a steampunk setting as well as sci-fi, post-apocalyptic, etc.


Gang Member with Grinding Tool

This figure comes with a separate grinding tool with hands attached. He's unarmed, so I'll probably add a pistol holster. It's a nice find, though, as unarmed civilian sci-fi figures are fairly uncommon. The cutting tool could easily be modified into any number of tools by cutting away the blade and substituting some other techy bit.


Gang Member in Light Armor 

This is a female figure with a heavy automatic weapon. The head I chose for her is the best of the female heads available.


Gang Member in Trench Coat 

This is another one of my favorites. I gave him a Pig Iron Kolony Rebel head, though in retrospect that may have made him look a bit too bad-guy-ish, and he ended up resembling the most recent movie incarnation of the Batman villain Bane. He and the two following figures seem almost tailor-made to be Necromunda gangers, scum or bounty hunters.


Gang Member with Assault Rifle

Here's a nice pose -- and is that a bolter he's carrying? I particularly like the messenger bag laying across his chest.


Gang Member with Light Machinegun 

This is a typical shooting dude with an SMG.


Gang Member with Rocket Launcher

The rocket launcher is a separate piece, and as I already have various launcher-armed figures, I switched out the launcher for an assault rifle from Heresy Miniatures. I did have to reposition the left hand to be supporting the gun rather than steadying the rocket launcher. It's a nice figure, but unfortunately the original configuration with the rocket launcher isn't very balanced. Check out that huge tire on the base!


In conclusion, I'm very happy with the Salvage Crew figures. They're not state-of-the-art sculpts, but they fill a nice niche in my sci-fi collection. They would work well in most post-apocalyptic or sci-fi game setting and seem ripe for use in Necromunda. Also, at only $2.50 a piece for each 28mm figure, they are a great deal.

As a bonus, I give you Rosie, Cryotechnician. I had this Reaper Chronoscope miniature lying around for some time, so I decided to use her here. I think she's intended to be a "not" version of Kaylee from Firefly and Serenity. The figure comes with a wrench and gun options for her right hand, though I still haven't decided which to use. With the wrench option she is unarmed, and you can never have too many unarmed sci-fi figures in your collection.


Like most Chronoscope figures, she stands notably taller than other 28mm models. Using traditional sole-to-eye measurements, the Salvage Crew are a standard 28mm, while Rosie towers to a height of 32mm. Despite the height, she fits in well with the style of the Salvage crew figures, so I'm pretty happy with her. As with most Reaper miniatures, the detail is really well done, and she's a step up in overall quality from the others.

-- Karl, Chicago Skirmish Wargames club member

Thursday, September 6, 2012

Trying out Panzer 8 for quick-play sci-fi mass combat


And now, for something completely different -- after weeks and weeks of our Song of Blades & Heroes campaign, the club was itching to try something off the beaten path. Let's see ... what's about the farthest you can get from 28mm fantasy? Oh yeah, 10mm sci-fi!

For one of our earliest club projects, we rebased a whole bunch of cheaply purchased Mechwarrior clix to create several good-sized 10mm sci-fi armies. The prepainted figures required virtually no work at all -- just pop 'em off the clicky base, put 'em on a new base and add some quick and dirty scenic effects, and we were good to go.

These visually impressive armies took the field this week for two introductory games of Panzer 8, a brief, bare-bones sci-fi mass combat ruleset that's available for free on the web. When I say brief, I do mean brief -- Panzer 8 comes in at a mere two pages, but before our evening was over we'd already begun brainstorming ways to expand upon the basic toolbox provided in the rules.

Mike put together a pair of sci-fi scenarios inspired by Cold War Gone Hot. On the first table, a recon force had seized a bridgehead over a river and were tasked with holding it against a large, disorganized counterattack. Here's how the game looked at the outset, with Tim's defenders arrayed around the bridgehead.


Mike's counterattackers were distributed haphazardly around the city that you can see on the lower left side of that photo. Here's a closer look at Mike's force.


Those are N-scale paper buildings printed off from Dreampod 9 and based up by Karl. He went all out on these buildings...they're completely modular, and the upper levels have flat magnets on the bottom so you can easily create towering skyscrapers.

Across the table, Karl, Mike M.  and Jon gathered for the second scenario: a breakthrough pitting an attacking Neo-Soviet force against some entrenched American defenders. In this pic, Karl musters his forces and then sends an armored column snaking along the dusty, windswept highway toward Jon's defenders.


A few things to note before proceeding. Panzer 8 is a fast-play ruleset that sacrifices lot of small details in the name of just playing the game. In particular, there's not a wide variety of weapon ranges. The most powerful gun (called simple "heavy gun") shoots out to 18 inches. Because of this, Jon had two options on his side of the table: wait for the attackers to get within range of his guns (meaning they would have crossed almost half the table) or advance from his fortified desert stronghold to meet them in the open field.

Jon chose the latter option! Here's his initial mobilization.


Now let's jump back to the first game, with Tim defending the bridgehead. Turns out he had some help on the way -- a whole bunch of heavy walkers commanded by yours truly. They arrived on the edge of the table on Turn 2, just in time to catch Mike's scattered counterattackers unawares. Here they are, assembled for war.


Now, my forces and Tim's were classified as 'green' in the Panzer 8 rules, meaning they had a really hard time hitting anything, and an equally tough time rallying if they were struck by incoming fire. That said, my initial assault with my 9 heavy walkers turned one of Mike's mechs into a towering inferno.


Alas, I never really did much beyond that. A combination of factors severely limited my shooting, allowing Mike's entrenched AT guns to take repeated potshots at my advancing walkers. Here's another lucky shot, as my heavy walker showered an enemy mech with missiles.


One of the cool little details baked into Panzer 8 is the rule that destroyed vehicles and walkers are supposed to be left on the battlefield and treated as terrain for the rest of the game. Fine with me! It gave us a chance to use my oh-so-fun fire markers, made from colored wool fiber twisted together.

The battle for the bridgehead was a real grindfest, but my 9 heavy walkers -- intended to be a relief force for Tim's beleaguered defenders -- were chopped  to pieces. The fact that the heavy walkers were left on the board created some serious roadblocks for me as a I tried to relieve Tim's defenders. In this final photos, you can see 4 of my walkers, all burning, blocking off a big section of the battlefield.


Now let's zoom back to the other side of the room, to Karl, Mike M. and Jon's battle in the desert. Here's how we left things: Jon was cautiously heading out into the desert to meet Karl and Mike M.'s invading force. They clashed near the rubble of a long-forgotten fuel depot.


Here are Karl (left) and Mike M. plotting their next moves. Those are the same foam rocks that featured heavily into our recent Song of Blades & Heroes game. Karl also wrote up a nice tutorial on how he made them.


The game was shaping up to be quite the bloodbath, with Jon blazing away with his tanks, walkers and infantry against Karl and Mike M.'s combined invasion force. Here's how the battlefield looked. Bit of a traffic jam, eh?


What's that in the upper right? Why, it's a small assault craft going down in flames! MAN I love the look of that fire-wool stuff!


Here's the final shot from the desert game. Wrecked fighting machines everywhere, plumes of fire shooting into the air -- what a glorious battlefield.


We all unanimously agreed that Jon had accomplished his mission of holding back the attackers and defending the desert canyon pass.

After that, we spent some time discussing Panzer 8 as a ruleset. In the past, we've used these 10mm sci-fi armies to play Future War Commander and Mech Attack. The former is a full-blown wargame that does a good job simulating company-level command and control. The latter is a rules-lite BattleTech clone that is fun and fast-playing.

Panzer 8 falls somewhere in the middle. The basic rules engine is just crying out to be tinkered with. We discussed a number of house rules, including grafting some sort of command-and-control element on top of the existing system. It wouldn't take much effort at all to come up with something workable.

On the flip side, the game is not that granular. That's to be expected for a ruleset that's just two pages long. But all the same, I saw a huge difference between my 'green' troops and Mike's 'regular' troops. Namely, his guys could reliably do stuff, whereas mine couldn't.


There are some interesting areas of gameplay to explore with Panzer 8. As our game was entering the final few turns, Tim observed that the close combat rules seemed designed to favor low-quality 'green' troopers who couldn't otherwise hit the broadside of a barn. In Panzer 8, you auto-hit in close combat, so the quality of the attacker is moot. You just go straight to the damage roll. The flip side of this is that close combat is NOT simultaneous -- and the alternate-activation sequence ensures that the defender always gets to strike first if he is assaulted by an enemy unit. Still, I can see how you can use the close combat rules to your advantage as an attacker.

Anyway, we enjoyed the game and agreed to spend some time fiddling with the ruleset. Oh, and a word about our venue. As you can see, we're not playing in my basement. We're actually at Games Plus, a fantastic and ridiculously well-stocked game store in Mt. Prospect, Illinois, just outside Chicago. They've got plenty of game space, and we try to make an effort to host a game night at Games Plus every couple months to meet with some of our occasional followers who can't meet up with us in the city. Cheers to Games Plus for a fun game night!

-- Patrick, Chicago Skirmish Wargames club member