Friday, August 30, 2013

Dark Days of Qaarra, Session 5: Catastrophe at the Scrying Stones


This week we met for the fifth session of our Song of Blades & Heroes fantasy campaign, which is shaping up into quite a slugfest. Click here for an overview of the campaign and to see a map of the continent of Qaarra. In both games, we used a special campaign rule to represent the cloud of ash and dust that is slowly creeping across the continent, blanketing Qaarra in a grim smog. The rule makes ranged attacks more difficult and allows melee attackers to gain an ambush bonus in certain situations.

In the first game, I set up a narrative scenario to help push my dwarven warband toward the conclusion of its storyline. Faced with the doom that is sweeping across Qaarra, my dwarves are seeking Hearthspire, a fabled locale imbued with powerful magic that the dwarves seek to harness. In this game, their journeyman wizard set up a ritual high atop the Scrying Stones, a territory on our map, to divine the route to Hearthspire.


Here he is, preparing to conduct the ritual. The chest is filled with traditional the dwarven sacrifice -- not humans or animals, but gold, silver and precious gems!


Of course, Tim's kobolds were determined to stop me, and they swarmed across the table to engage the defenders scattered around the base of one tall stone pillar.


The battle was joined at the base of the pillar upon which stood my stout dwarven wizard, his brow furrowed in concentration as magical energy coursed and rippled around his perch.

Tragedy struck early on, as a botched dice roll from me meant Tim scored a "gruesome kill" on one of my dwarven fighters. Though none of my stunty fellows fled, several non-dwarf figures retreated, including a human knight and Rolf, the wise bear who had fought alongside the dwarves for the entire campaign.

Tim continued his onslaught and brought down several more dwarven defenders.


High atop the standing stone, my dwarven wizard struggled to control the powers he had tapped into. A lone kobold warrior scaled the stone bluff and prepared to confront him -- just as the wizard finally lost control of the mystical energy swirling around him! A huge, gnarled hand burst from the raw stone, crushing the wizard and casting his broken body down to the ground.


Quaking in fear, the lone kobold crept forward and seized the chest of gems -- but then the dark magic atop the stone pillar intensified, becoming a roiling maelstrom. The kobold's body was wracked by magic, its flesh peeling away as ... something ... emerged from within. It was a fearsome demon from another plane, and it stood alone atop the high bluff as the maelstrom raged around it!


In game terms, we were playing a scenario that featured a chaos portal that would open as my wizard conducted his ritual, with various unpredictable results. The huge hand and the demonic incursion were both results of a random table, and they injected a lot of unpredictable fun into the game! (Though my dead wizard might argue the point.)

Down on the ground, Tim's kobold necromancer proved his worth by reanimating a dead dwarf into a zombie -- albeit a slightly taller zombie, since I don't have any dwarven zombie models.


At this point, I knew defeat was at hand. I was technically unable to win the scenario, and I didn't want to risk any additional casualties in my warband. I quit the field and Tim claimed victory! Story-wise, my dwarves were unable to complete their ritual, thus imperiling their quest to find the fabled Hearthspire.

Across the room, Karl and Josh were having another go at Karl's caravan raid scenario. He created this repeatable scenario to offer a quick and easy game that we could put together on the fly. One warband gets a chance to raid the caravan crossing the Agamin Desert, possibly making off with some sweet loot, while the other player takes the role of the caravan defenders and tries to escort his team across the board to Dustcrag Oasis, the castle that guards the entrance to the desert.


Josh played the caravan defenders, and Karl fielded his chaos warband as the (very flavorful) raiders. As Karl's warband is fairly advanced at this point, he had been able to buy mounts for many of his warriors, which dramatically increased the speed and combat prowess of his warband.


Consequently, he ripped through Josh's caravan like wet tissue paper, making off with the loot and scoring a resounding victory. Here he is destroying the caravan guards while the mounted escorts flee into the wastes...


 It was a one-sided victory for Karl that showed how potent a warband can become after many sessions of earning experience points and warband advances.

Afterward, Karl and Josh played another game, just a skirmish this time, representing Karl's chaos warband trying to escape through the dangerous Hollowbone Mountains (another territory on our campaign map) with his newly liberated caravan loot. Because the doom-cloud rule made Josh's shooting fairly ineffective, he wisely decided to play it safe and wait for Karl to come to him.


 Karl obliged him in true chaos fashion, though his warriors were cut to pieces in the ensuing melee.


All in all it was another great game night. Our next club event will be a swap meet at Games Plus on Sept. 12 -- feel free to join the club mailing list for more details on this fun annual event.

-- Patrick, Chicago Skirmish Wargames club member

Tuesday, August 6, 2013

Dark Days of Qaarra, Session 4: Raiding the Camp


Last week saw an abbreviated campaign session, since a couple players were engaged in a Kings of War battle. Mike and I set up a small campaign skirmish between Prince Roland's Company (my warband) and a band of animal adventurers.

When the game opened, Prince Roland's Company was making their way through Brionbock Dale (a lush pastoral territory in the northeastern regions of Qaarra, our campaign setting) on the way to the Village of Plumshire. They saw the remains of a mercenary camp, likely abandoned in a hurry due to the marauding monsters that have plagued Qaarra in recent months. Sealed supply crates and chests were strewn about the area.


Prince Roland ordered his team to search for valuables and supplies. Unfortunately, a band of animal adventurers had the same idea, and both warbands pounced on the campsite at the same time!


The two warbands raced around the field recovering treasure and supplies. Each side found an equal amount of loot -- but the animal adventurers, led by their plucky echidnox leader, accepted no quarter. A fierce battle took place on the ancient, weatherbeaten stone altar at the center of the area.


Edlenor, the renowned elven archer, found himself surrounded by enemies. His friend and dwarf ally Odwin Fistsmasher rushed in to save him, but fell to the giant's brutal combat prowess. Only the timely arrival of Gandarf the wizard, who transfixed the giant with a ray of magic, allowed Lord Stryker to slay the giant.


After the game, we rolled on the exploration table, and my warband ended up recruiting a holy paladin to fight for us! Talk about good timing -- and it fit with the campaign narrative we had going, too. Upon their arrival in Plumshire, the villagers rejoiced! The animal warband had been terrorizing the village for months. Roland and his friends were heroes! The town's protector, Narcissus, a blessed paladin in shining gold armor, pledged his loyalty to Roland and his quest.

After the game, I wandered over to the Reaper Bones display at Games Plus and picked out a suitably arrogant paladin miniature to add to my growing warband. Look for him to make an appearance in the next battle!

-- Josh, Chicago Skirmish Wargames club member

Monday, August 5, 2013

Kings of War Battle Report and Game Review


It was inevitable -- after Karl and I split a huge box of random miniatures that we purchased at Little Wars earlier this year, we found ourselves awash in really cool fantasy miniatures. As we pawed through piles of old-school chaos warriors, Bob Olley dwarves and Ral Partha skeletons, we began sketching out ideas for playing some large-scale fantasy games. After considering a number of rulesets, we settled on Kings of War, which seemed to offer a fast-playing game that still allowed for pretty big, epic battles. The rulebook and army lists are available as free PDFs, but both Karl and I splurged for the nice hardcover rulebook.

We played our first game last week at Games Plus, our occasional game venue in suburban Chicago. The game might have taken place sooner, but Karl and I found that we needed a few extra weeks to paint and base our armies. As it was, we were able to muster armies of about 1,300 points -- basically medium-sized forces that were still below the 2,000-point threshold that Kings of War suggests for typical games.

We laid out a desert tabletop with a couple hills, a couple areas of scrub-brush and a small clump of barrels and crates near the center of the table. Kings of War is a mass battle game in 28mm, so it needs a big battlefield with less terrain that we typically use.


Karl arrayed his chaos forces along one table edge. A few of his guys are still shiny from the dip -- they were dry, but he hadn't sprayed them with matte sealer to take the shine off. Those are Confrontation werewolves in the foreground, from the prepainted plastic miniatures line by Rackham. They proved to be 1) very affordable and easy to get on the battlefield and 2) dead hard in the actual game! I fielded a block of 'em in my army, too.


I deployed my undead legions opposite him, trying to go for a tactical arrangement despite not really knowing how things would play out. I'm using custom movement trays from Litko, sized for the 25mm round circles that almost all of my undead guys use. In the background you can see my skeletal dragon. The rat swarm in front of the skeleton regiment is an actual unit upgrade in Kings of War!

We rolled for a scenario and got "Kill and Pillage," which is one of three very generic scenarios provided in the Kings of War rulebook. Basically we are both tasked with securing supplies (represented on the battlefield by oak barrels) and killing each other, with a six-turn time limit.

And then we were off! Karl's forces were much faster than my undead guys, so he surged forward and managed to get into combat in the second turn, when I was barely out of my deployment zone! Here his werewolves (the all-star unit for both of us in this game, as it turned out) and chaos lord crashed into my cavalry, which was attempting a sneaky flank move.


Shortly after this photo was taken, the cavalry took a big hit and then failed their Rout test and were removed from the table. Kings of War doesn't use individual figure removal to indicate damage to a unit -- rather, you just use a dice to track overall damage, and if the unit ever fails its Rout test, you just remove the entire block of troops from the table. This took some getting used too, since it was rather heartbreaking to remove 20 beautiful, handpainted skeletons from the table after a particularly brutal charge. But the game played fast, due in no small part to these rules!


After my cavalry evaporated into a fine red spray at the hands of Karl's werewolves, I knew I needed to get serious. I sent a block of skeleton archers charging into the flank of Karl's dragon, which suffered a bit of damage and then turned to face these bony aggressors.

Then I mobilized my own werewolves and charged them into Karl's main line of troops, eviscerating a block of chaos foot soldiers and threatening the chaos leader and standard bearer. My dragon brought up the rear in this assault.


Now, most of my photos show only the best, most decisive clashes in the game. But I left out the parts that showed how my flanks just collapsed under the combined weight of the werewolves, dragon and chaos cavalry that hit me from both sides. In both cases (again, not pictured due mostly to embarrassment) I had a 20-strong block of skeleton warriors that just fell to pieces after one or two rounds of combat. Oh look, turns out I did have a pic showing my skeletons getting turned into oversized toothpicks.


Yep, they're getting it from both ends in that photo. Victory was clearly Karl's in this game. However, it would have been interesting to play out a few more turns. I strongly suspect that our game would have devolved into "werewolves vs. werewolves," with both units (mostly unhurt) meeting in the middle of the battlefield to pound the crap out of each other. The werewolves were so potent on the battlefield (for both of us!) that before the game was even over we were already contemplating house rules or house limits on their use.

OK, now it's time for some closing thoughts from Karl and me.

Karl's Conclusion
So Kings Of War is exactly what I'd hoped it would be. The game was fast and didn't take much longer than a Song of Blades and Heroes game. The rules are really straightforward and there was comparatively little rulebook checking for a first-try of a new game.

Pat and I agreed that the game will probably balance and play much better at 2000 points. At our 1300-point limit, we didn't field quite enough units to really bring out the strategy of denying your opponent certain movements and supporting your own units through maneuvering.

My closing thoughts wouldn't be complete, however, without mentioning the mayhem that regiments of werewolves (equivalent in power to a "Horde" of most other units) can have in a game where almost all the other units are "Troop" level. My recommendation for games under 1500 points would be to limit the size of units to 20 for infantry, 3 for large infantry and 5 for cavalry. That would probably keep big units from smashing little ones too quickly as well as give each player enough units to really utilize strategy. All in all, a game I hope to play many more times. I'm painting more units for it now!

Pat's Conclusion
I had expected maneuvering to play a bigger role in Kings of War, since the unit footprints are really quite big and it's unrealistic to expect such big groups of figures to turn on a dime to face a flank threat. However, since each unit can rotate 90 degrees as part of its movement, and many units were able to rotate as many times as needed due to special rules, it never really felt like maneuvering was quite as important as it should have been.

Also, it was a big shock to play a game with such long move distances. Karl's cavalry and werewolves were charging from 18 inches away, which allowed him to reliably get into close combat on turn 2. That's a big increase from Song of Blades & Heroes, our go-to skirmish game, in which only a handful of figures can cover that much distance in a single turn.

I've concluded that I need more core foot troops like skeletons or zombies. Simply taking up space on the battlefield does not equate to combat prowess! My 20-man blocks of skeletons were dealt with easily by Karl's forces. Now, if I had another 20 or 40 skeletons waiting around to counter-charge....

Anyway, the games were fun and I think they'll be even more enjoyable once we can muster 2,000 points per player. Tim is already interested in basing up some of his miniatures for Kings of War, so look for more battle reports in the future.

 -- Patrick, Chicago Skirmish Wargames club member

Sunday, July 21, 2013

Dark Days of Qaarra, Session 3: Defense of Dustcrag Oasis


We played the third session of our fantasy campaign this past week, and the evening was dominated by one big 4-player game for Karl, Tim, Josh and me. The scenario was a continuation of the narrative established during Josh's ill-fated attempt at raiding the desert caravan in our last session. His battered warband retreated into the ancient, sand-pitted hulk of Dustcrag Oasis, located on the western edge of the great Agamin desert, to rest and heal his wounds.

Josh’s position, though, is threatened by the Black Crown’s servants (Karl's warband) and the Peak’s Top kobolds (Tim's warband), which have made temporary alliance. Only a desperate missive to Brynwulf’s dwarves (Pat's warband), encamped a few short leagues away, may stave off the impending slaughter at Dustcrag Oasis. As the cold-hearted raiders close in on the fortress, the dwarves rush aid the brave defenders...

So that lays it all out -- we played a fortress siege featuring two 700-point attacking warbands versus two 500-point defending warbands. Both of the attackers started in the rocky canyon in the center of the table, while Josh's resolute defenders took up positions in the fortress. I included a scenario handout detailing victory conditions and a handful of special rules, including rules for ladders, boiling oil, and two mountain passes that just might offer a back door to the besieged fortress.

Here's how the game looked at the outset, with Karl's chaos raiders and Tim's sneaky kobolds mustering in the canyon. My dwarves are arrayed atop the rocky cliffs in the foreground, while Josh's forces peer over the battlements of the fortress in the background.


Here's a closer look at the left flank, featuring Karl's chaos knights and warriors.


And here's the right flank, currently swarming with kobolds. That huge thing on the right is an undead samurai giant. Yes, it's part of Tim's warband. Yes, it can see over the fortress walls.


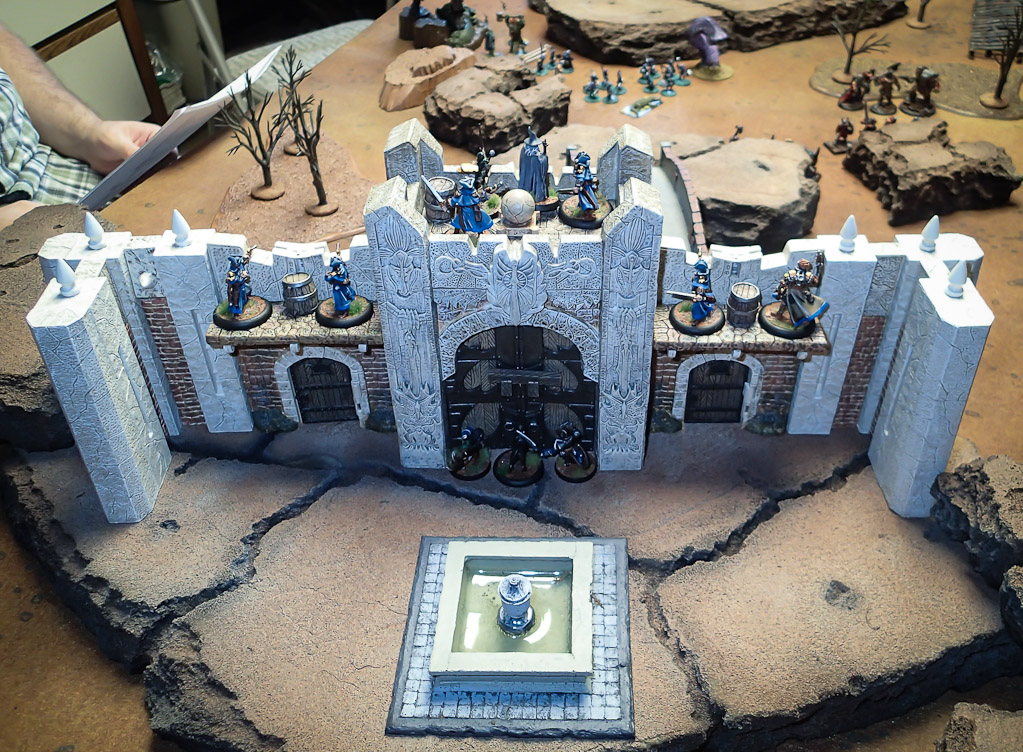
And here's what Josh saw from his position on the parapets of the fortress. The fountain in the foreground is the eponymous oasis from which this locale draws its name. Over the years, travelers erected stout stone walls to protect this vital water supply from raiders and brigands.


After a few minutes' discussion of the rules, we got underway! As attackers, Karl and Tim took the first turn, and they wasted little time sending their warriors surging toward the fortress. Karl's chaos warriors sought a path across the bridge toward the main gate, and Tim's kobolds made a beeline for one of the potential canyon passes that we had identified in the scenario rules.

My dwarves weren't technically on the battlefield at this point, but they arrived en masse on turn one. Here is the scene that greeted them as they appeared on the bluffs overlooking the valley.


So much evil contained in one valley! How can the forces of Good hope to stand against such a display of savagery? Grimly hefting their axes, the dwarves prepared to march down into the valley and meet the invaders in single combat. In fact, due to the vagaries of single-figure activation in SBH, combat was joined quite a bit sooner than I had anticipated, because one of my dwarves was caught out in the open, unsupported by his comrades, when my turn unexpectedly ended. Tim's kobolds, supported by a retinue of crocodile-men, fell upon this hapless dwarf.


Thankfully, the stout fighter beat back this assault and was soon joined by his comrades. By this point, Tim's kobolds were advancing through the valley toward the canyon pass, hoping to sneak around behind the defenders.

On the left flank, Karl's chaos warriors were making good progress toward the walls. Here are a couple photos showing how his men leapfrogged one another in their haste to get to the walls. His figures are carrying ladders, which will figure heavily into the remainder of the game.


Hoist the ladder! In fact, look closely and you can see that one warrior has already gained the battlements and is engaged in hand-to-hand combat atop the walls. That's so metal!


Up on the parapets, Josh's warband watched the attack unfold with a sense of grim fatalism. His team was extremely good at shooting, and he put these skills to good use throughout the first half of the game. Here's what he saw.


Gandarf the wizard directed the defense from the fortified gatehouse.


Back in the canyon, my dwarves were harrying the flanks of the attackers. Karl and Tim had both left behind a rearguard force that was making life quite difficult for the dwarves, though. It was about this time that Tim began a string of bad-luck dice rolls that effectively put him out of the game for three consecutive turns. It took the pressure off my dwarves and allowed them to advance into Karl's backfield, threatening his advancing chaos warriors.


Upon the walls, the fighting was savage and bloodthirsty. Chaos warriors clambered up the ladders and met the blackpowder pistols of Josh's warband, not to mention the fearsome magic of Gandarf the wizard.


Near the base of the castle walls, chaos knights mustered alongside Tim's great purple worm in an attempt to batter down the gates. The scenario rules allowed both attackers and defenders to "stack" figures against the main gate by pooling their Combat scores. If at any point the attackers' collective Combat score exceeded the defenders', then the gate would come crashing down. It took some careful maneuvering, but within a few turns the attackers managed to smash open the gates and jeopardize Josh's entire strategy.


By the time the gates gave way, however, the game was nearing its turn limit. Tim's kobolds had successfully exploited the hidden canyon pass and were racing around behind the fortress. Karl's chaos knights, bloodied and reeling from their headlong charge, rallied for another assault on the thinly defended gatehouse. My dwarves reached the edges of the main battle and began to carve through the kobold rearguard. The last few turns were tense indeed!


In the end, the defenders were able to hold out for a full 10 turns against the overwhelming onslaught, so Josh and I achieved victory! Given slightly more favorable dice rolls for Tim and Karl, the game could have easily gone against the defenders. As it was, Karl quipped that this was the most fun he's had getting his butt kicked in quite a long time! The game was fun and we agreed that the scenario was pretty good, with just a few tweaks needed if we decide to play it again.

From a narrative point of view, it was neat to create some flavor and backstory for the Dustcrag Oasis, which up until now had just been an icon on our campaign map. Now it will be remembered as the site of a great battle between the forces of Good and the tides of Evil!

-- Patrick, Chicago Skirmish Wargames club member