Friday, February 20, 2015
Six Dollar Sci-Fi Tanks from Russia
I've got a bargain on the desk today -- it's a 28mm "Bronekorpus" tank kit from Russia, made by Tehnnolog, the company best known for its Robogear line of mech kits.
Tim and I bought a pack of 10 of these kits on eBay. Shipping ranges from $1-$2 for each tank. As you'll see below, it's not a perfect product, but it's a solid model with a lot of options and a great bargain.
Here are the 19 parts that makeup the kit.
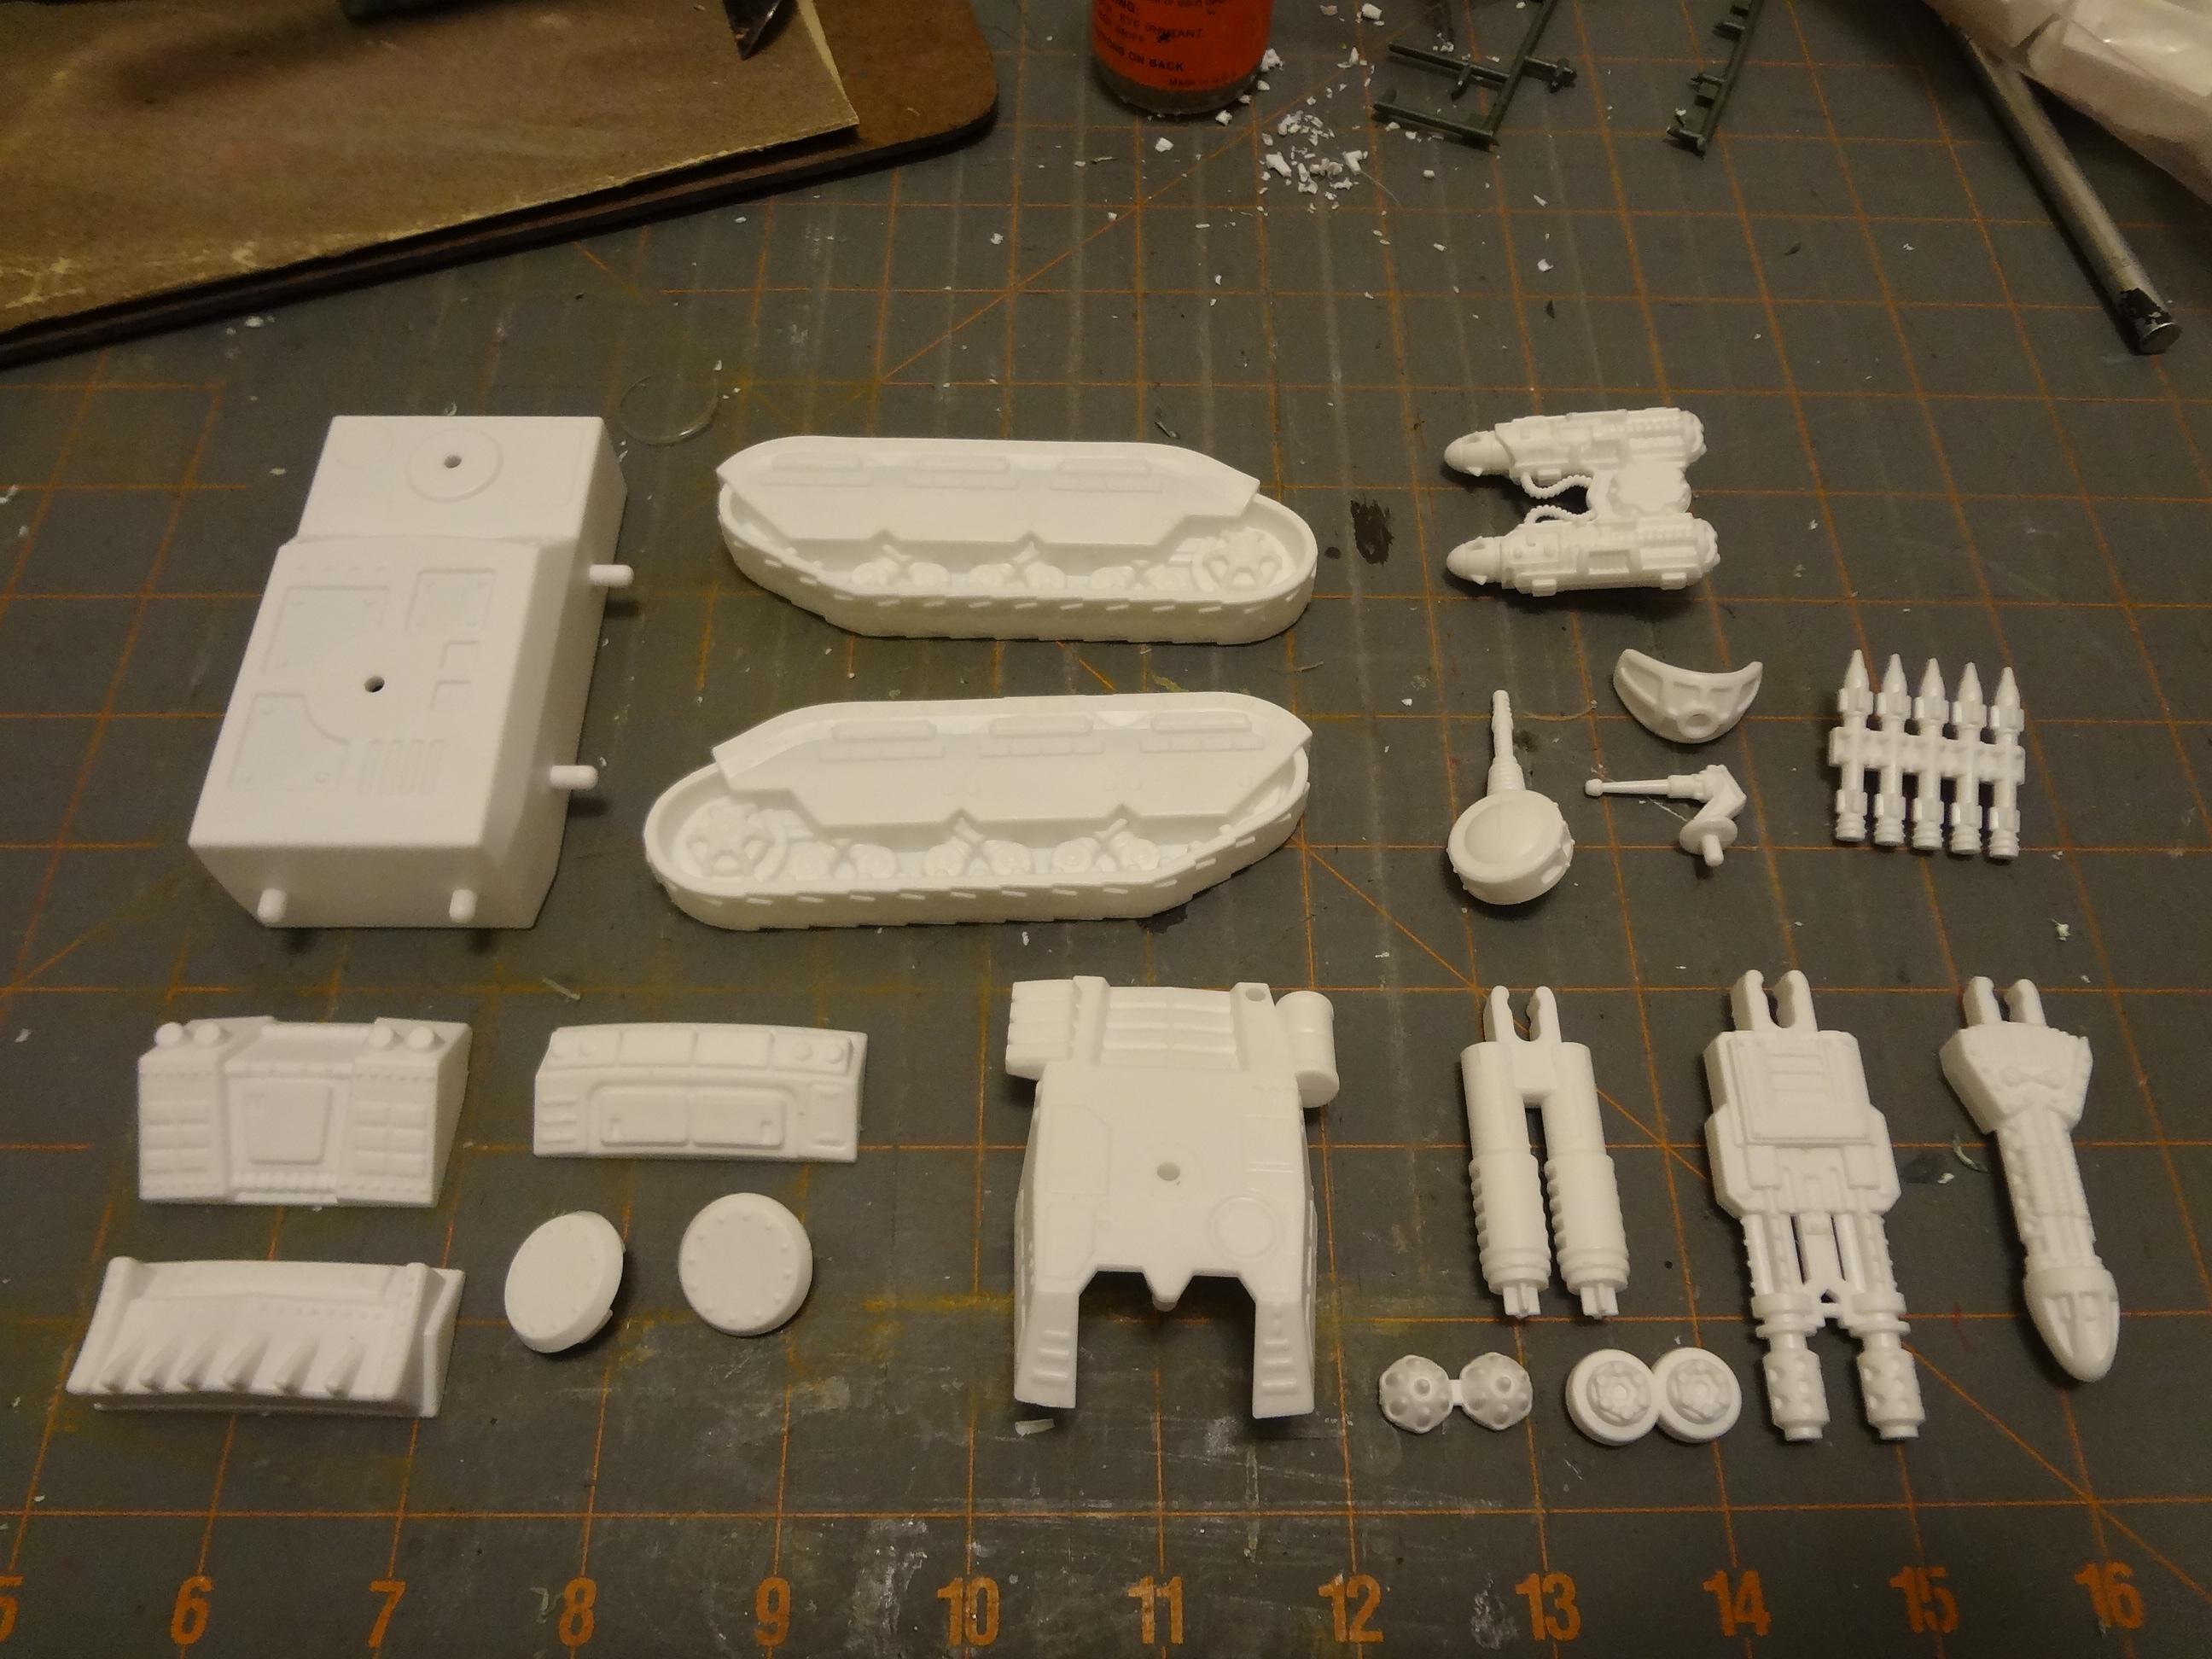
I don't know how they come from the factory, but mine arrived already off the sprue in a plastic bag. The casting is well done and the plastic is a polystyrene that feels very similar to that used by Games Workshop and other wargames companies. It's easy to clip, cut, scrape, file and glue.
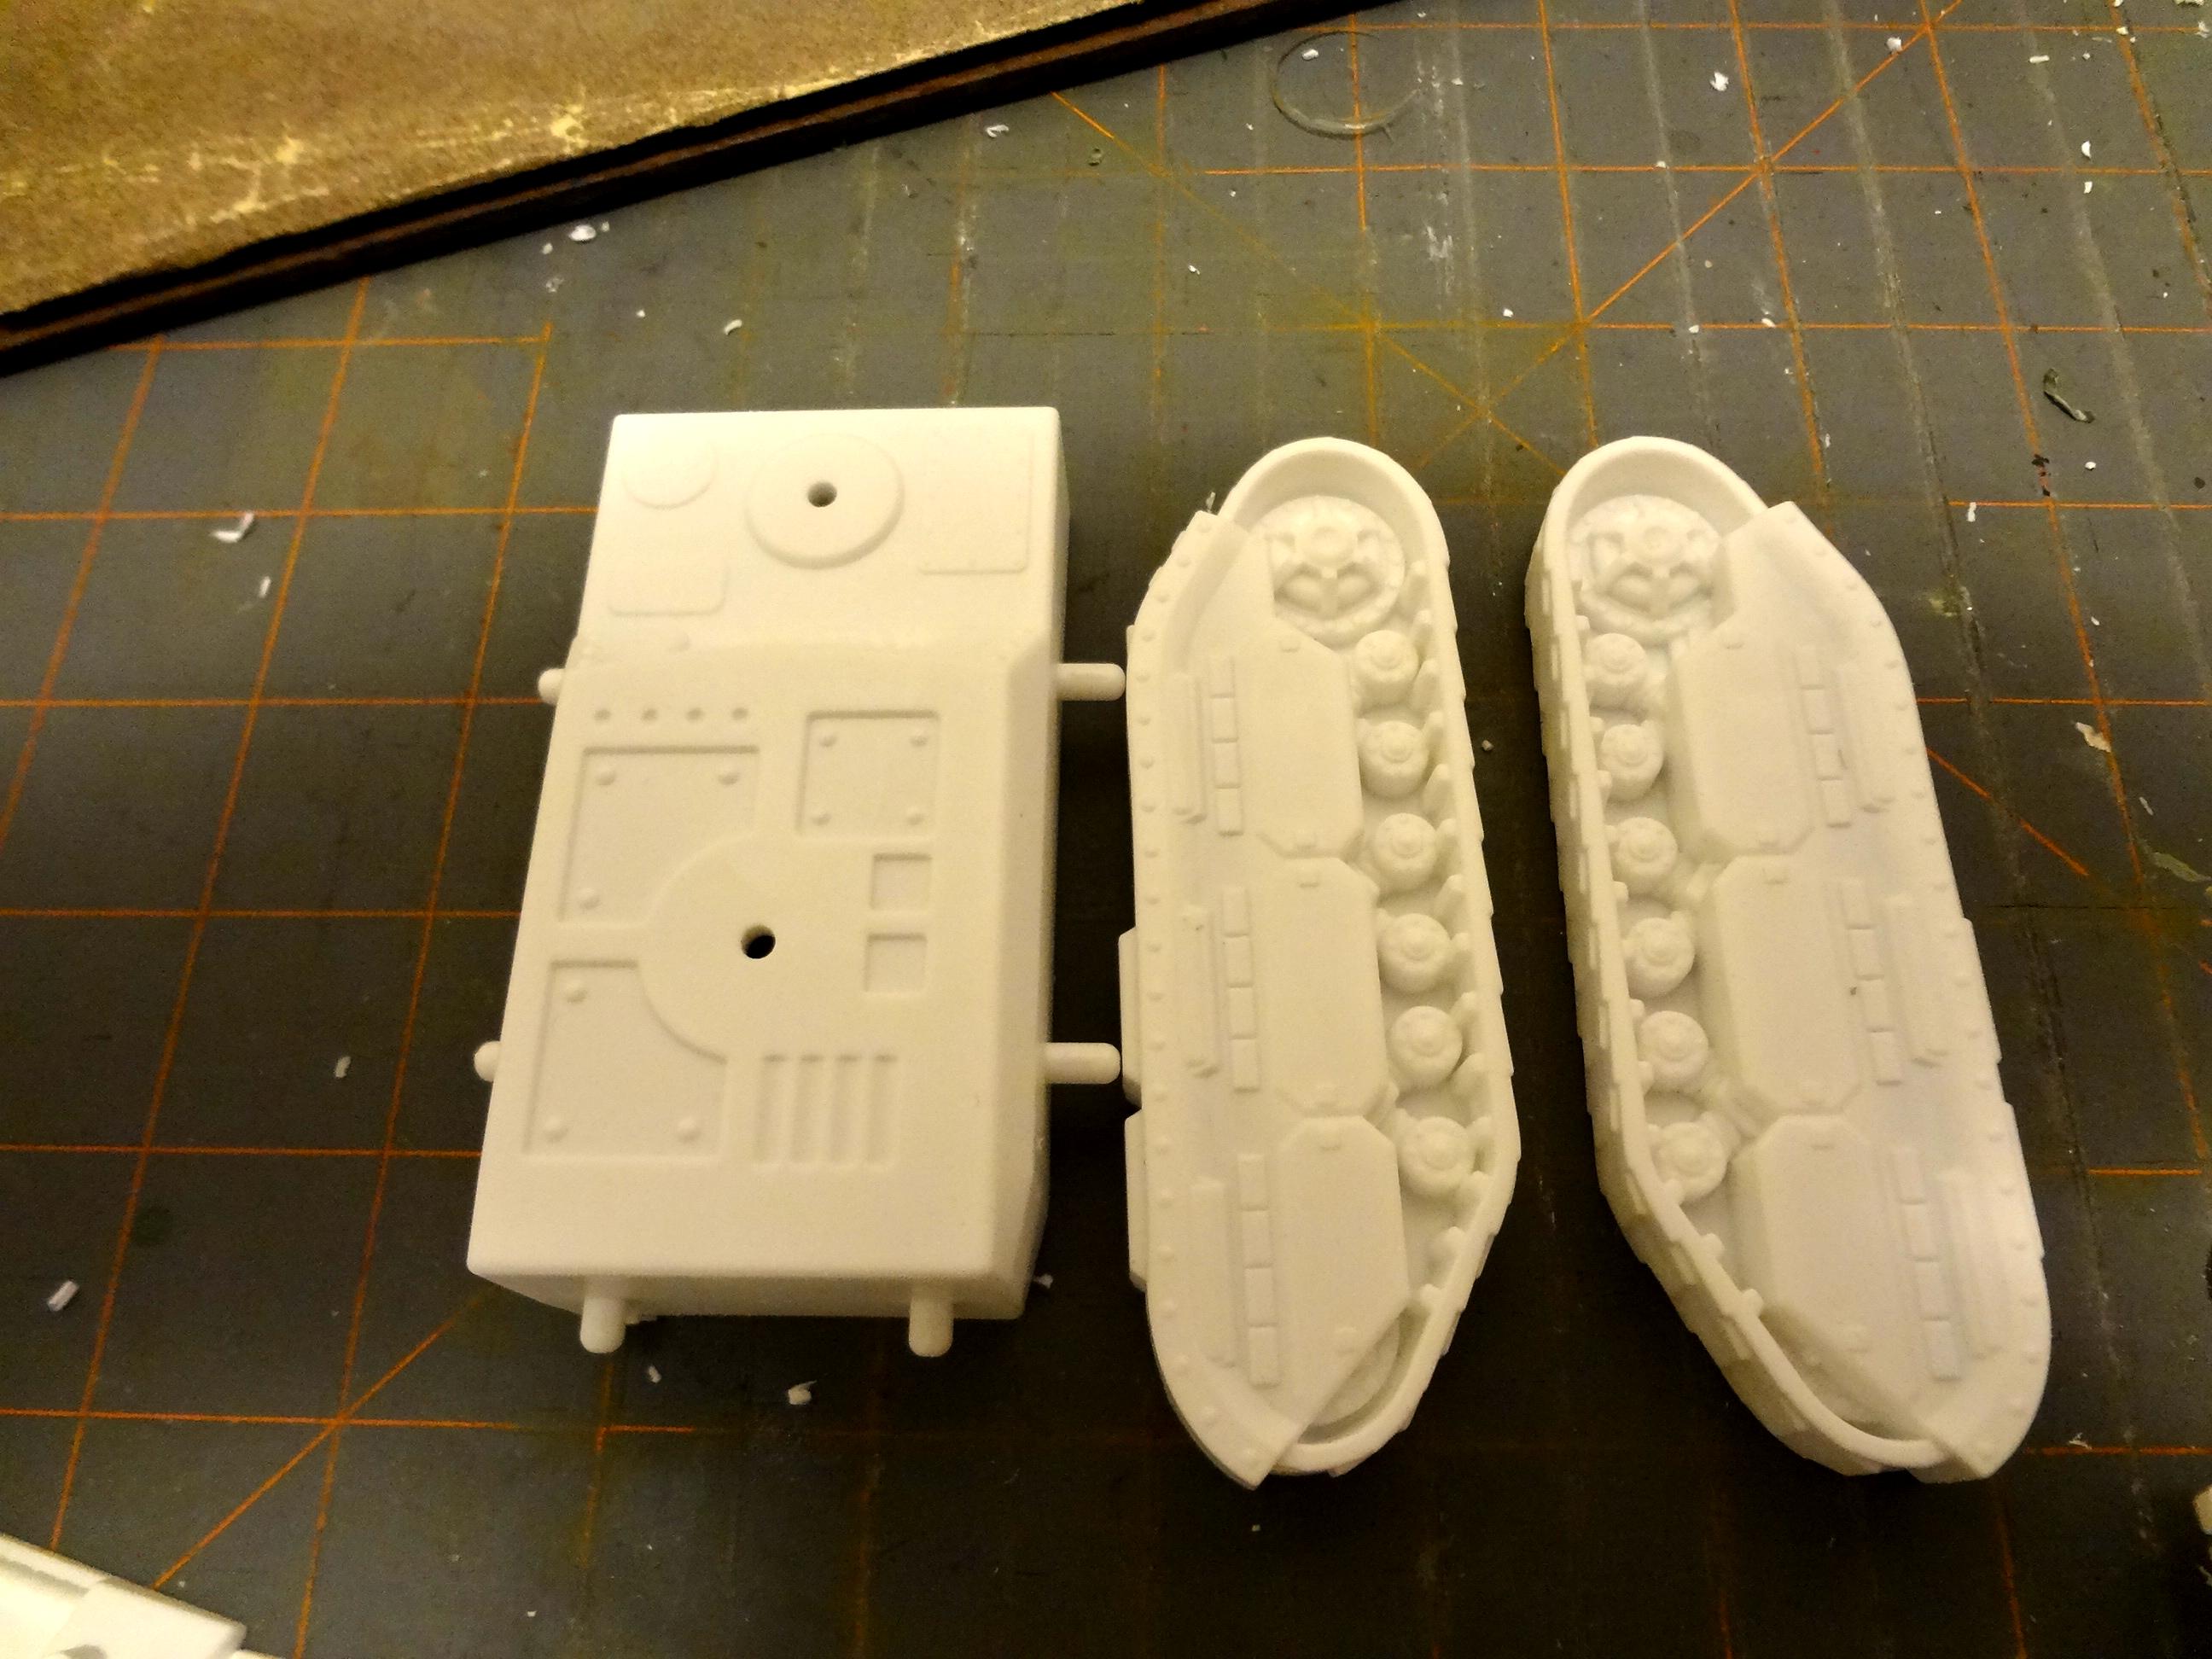
Here's the hull and treads:
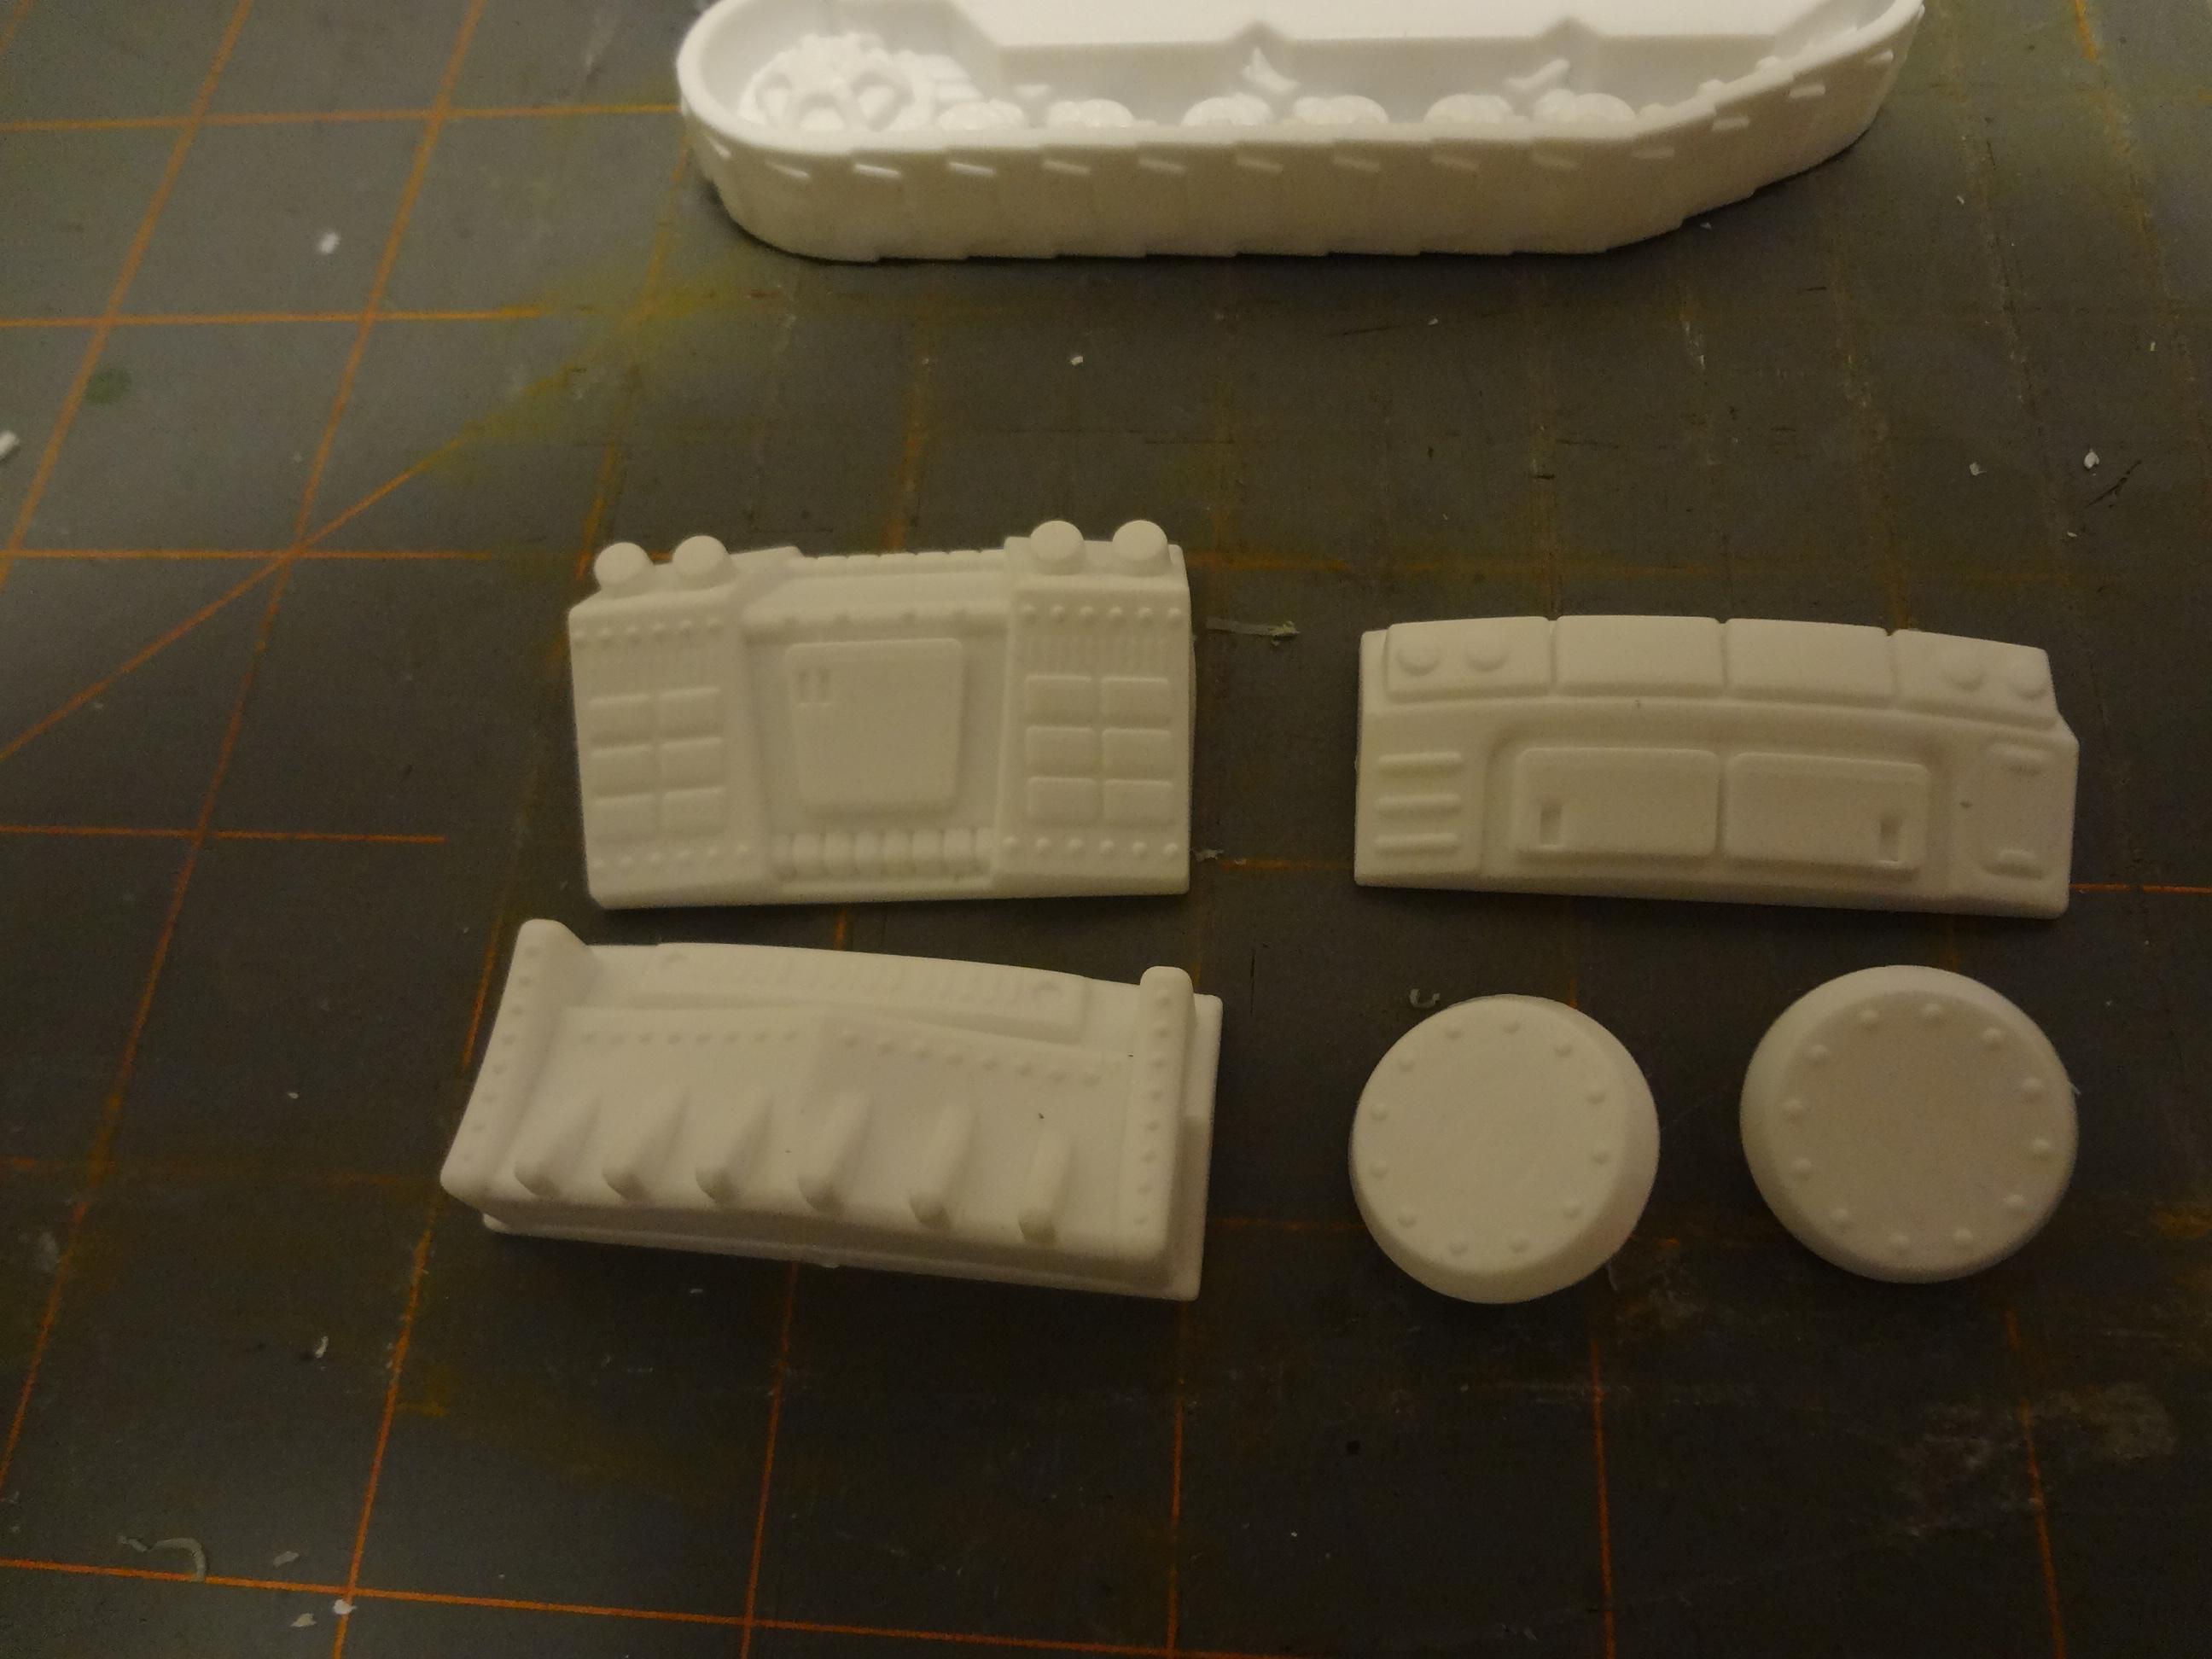
The front and back pieces and hatches:
The turret and turret weapons options:
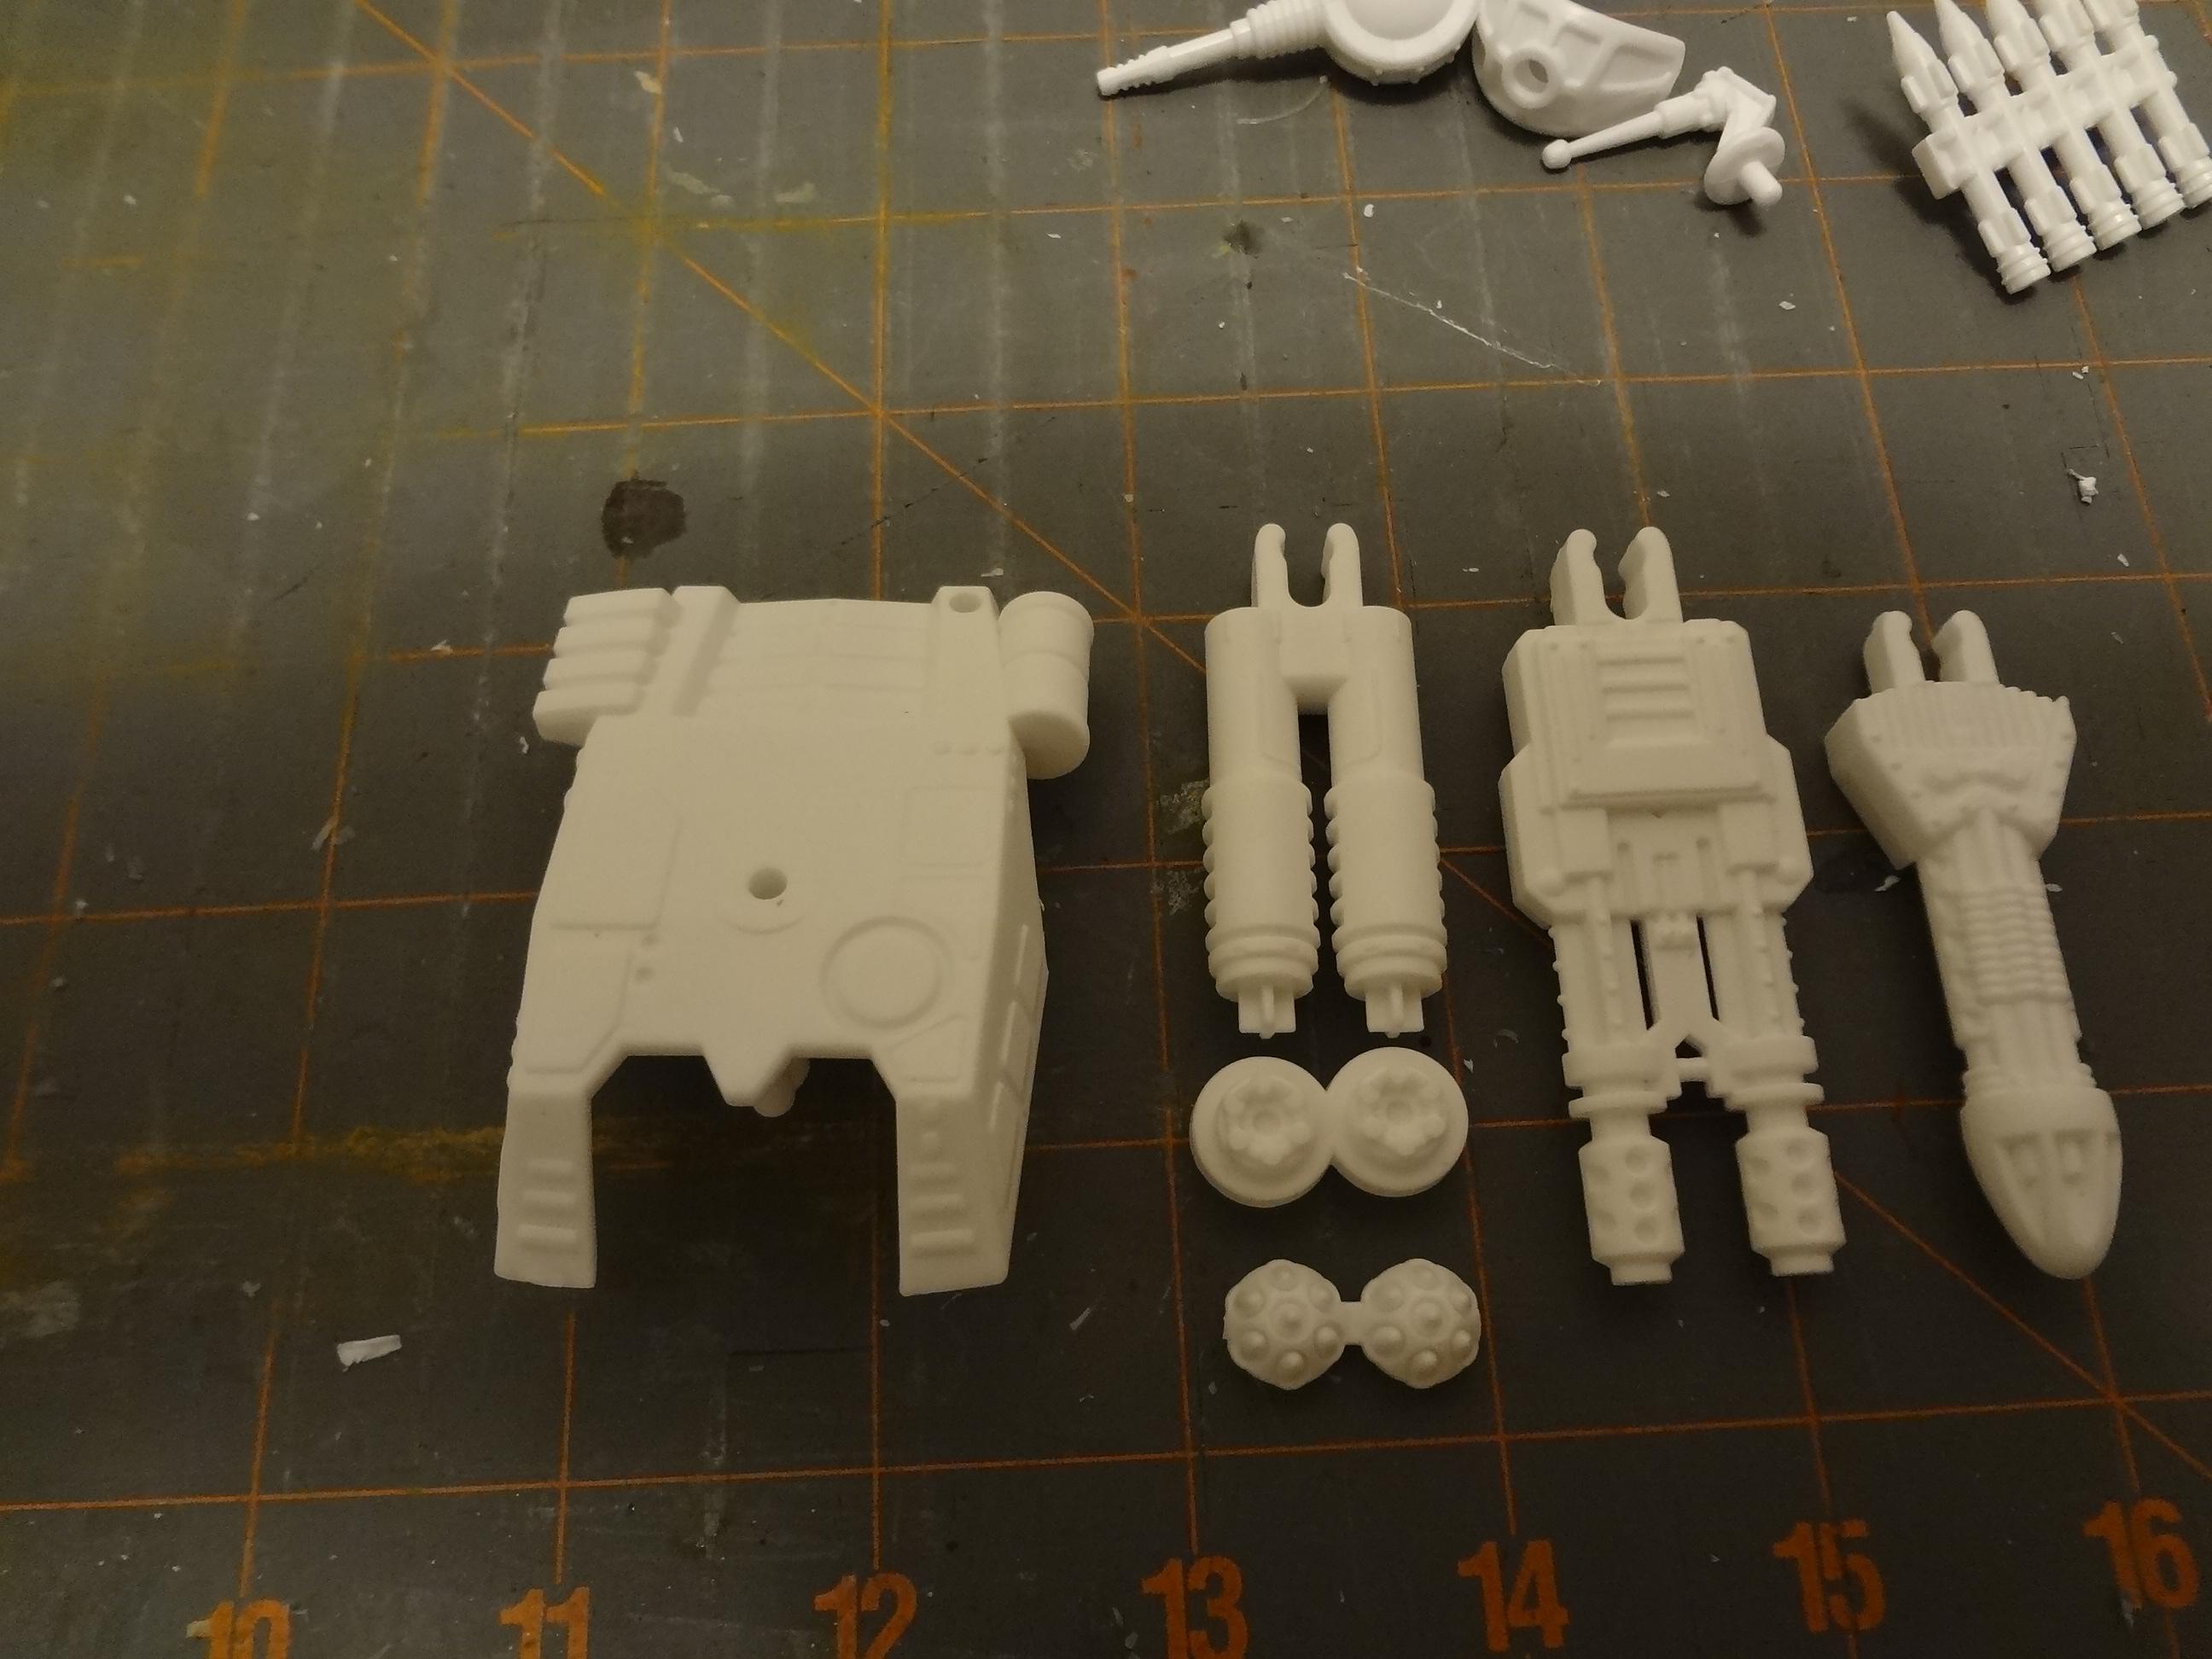
The first of the three weapons can either be left as is or given one of two muzzles. The third weapon is a plasma-type gun that will be familiar to those who have built Robogear kits.
Here is a selection of secondary weapons:
The dual missile launcher is a single cast piece of a Robogear weapon that was formerly 3 pieces (rack and two missiles).
The last item can be assembled as a small anti-personnel laser or as a radar array.
Construction Notes and the Flaws
Everything in this kit be pushed or snapped together. There's no reason to use glue if you don't want to, and some gamers might wish to leave the kit with as many options as possible. The turret weapons slide right on from the bottom when you take the turret off.
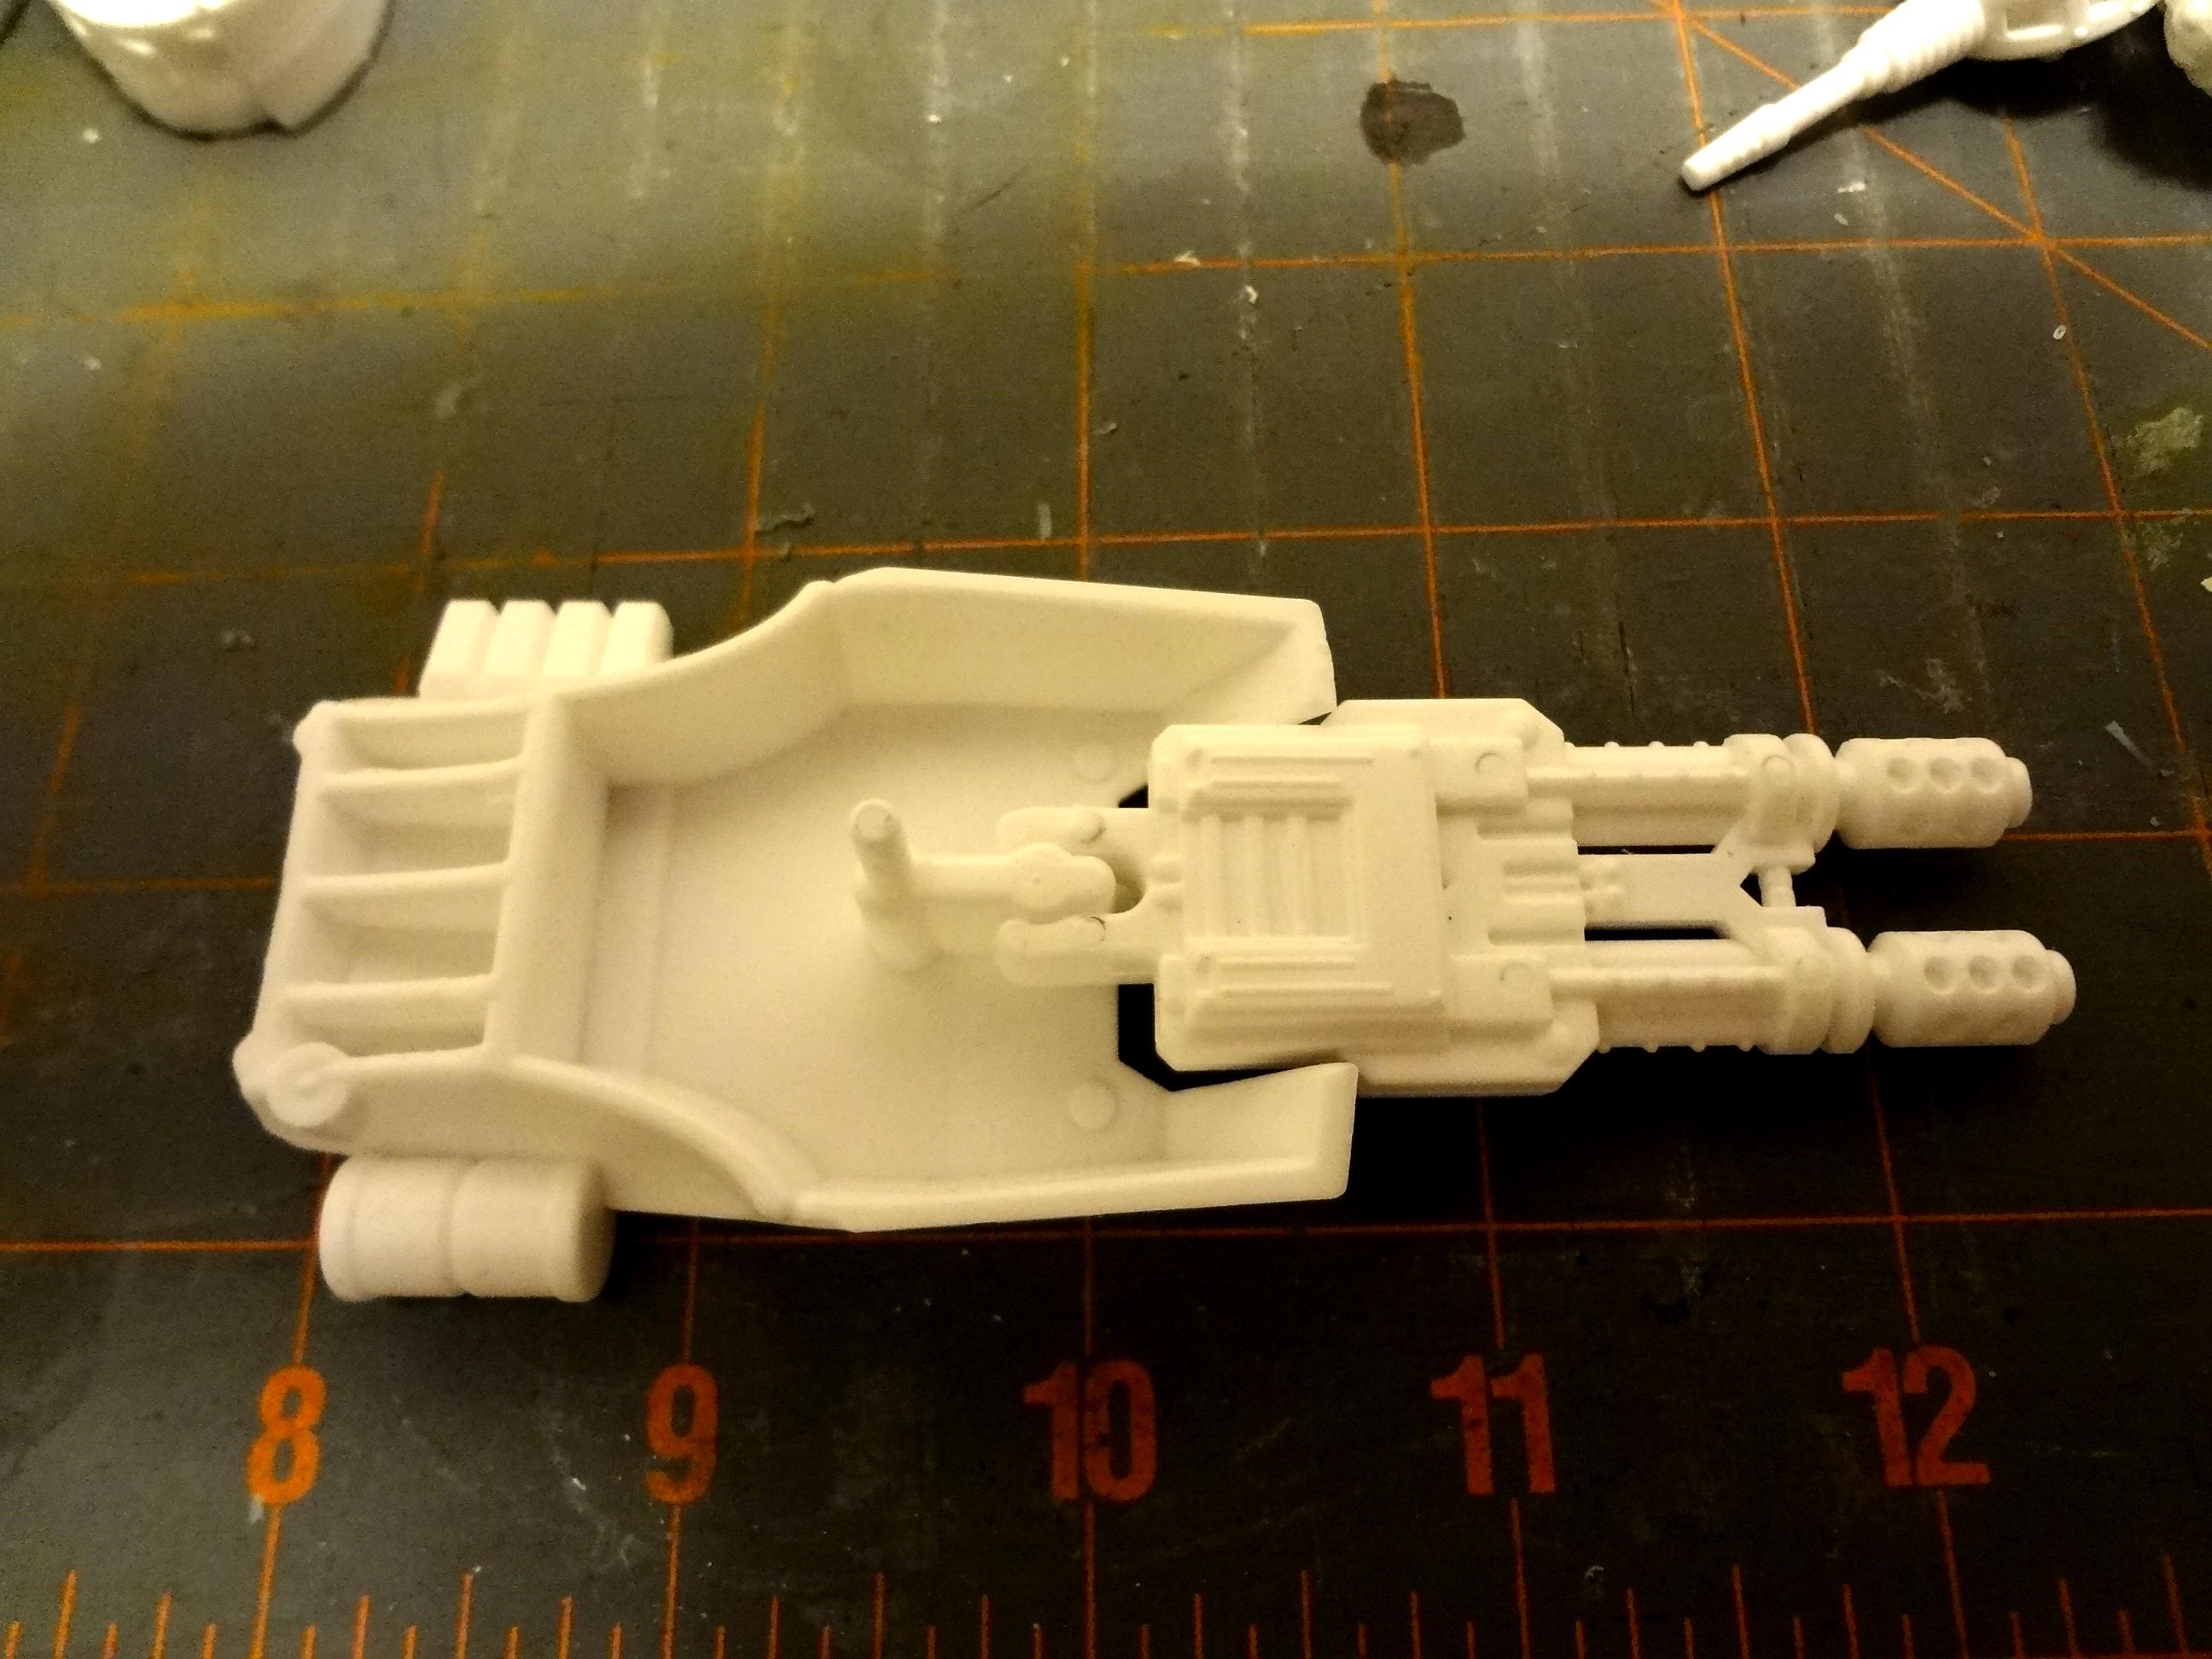
Rather clever, eh?
However there are a few design flaws, First, if you put the mini-turret on the lower hull surface, the main gun will hit it.
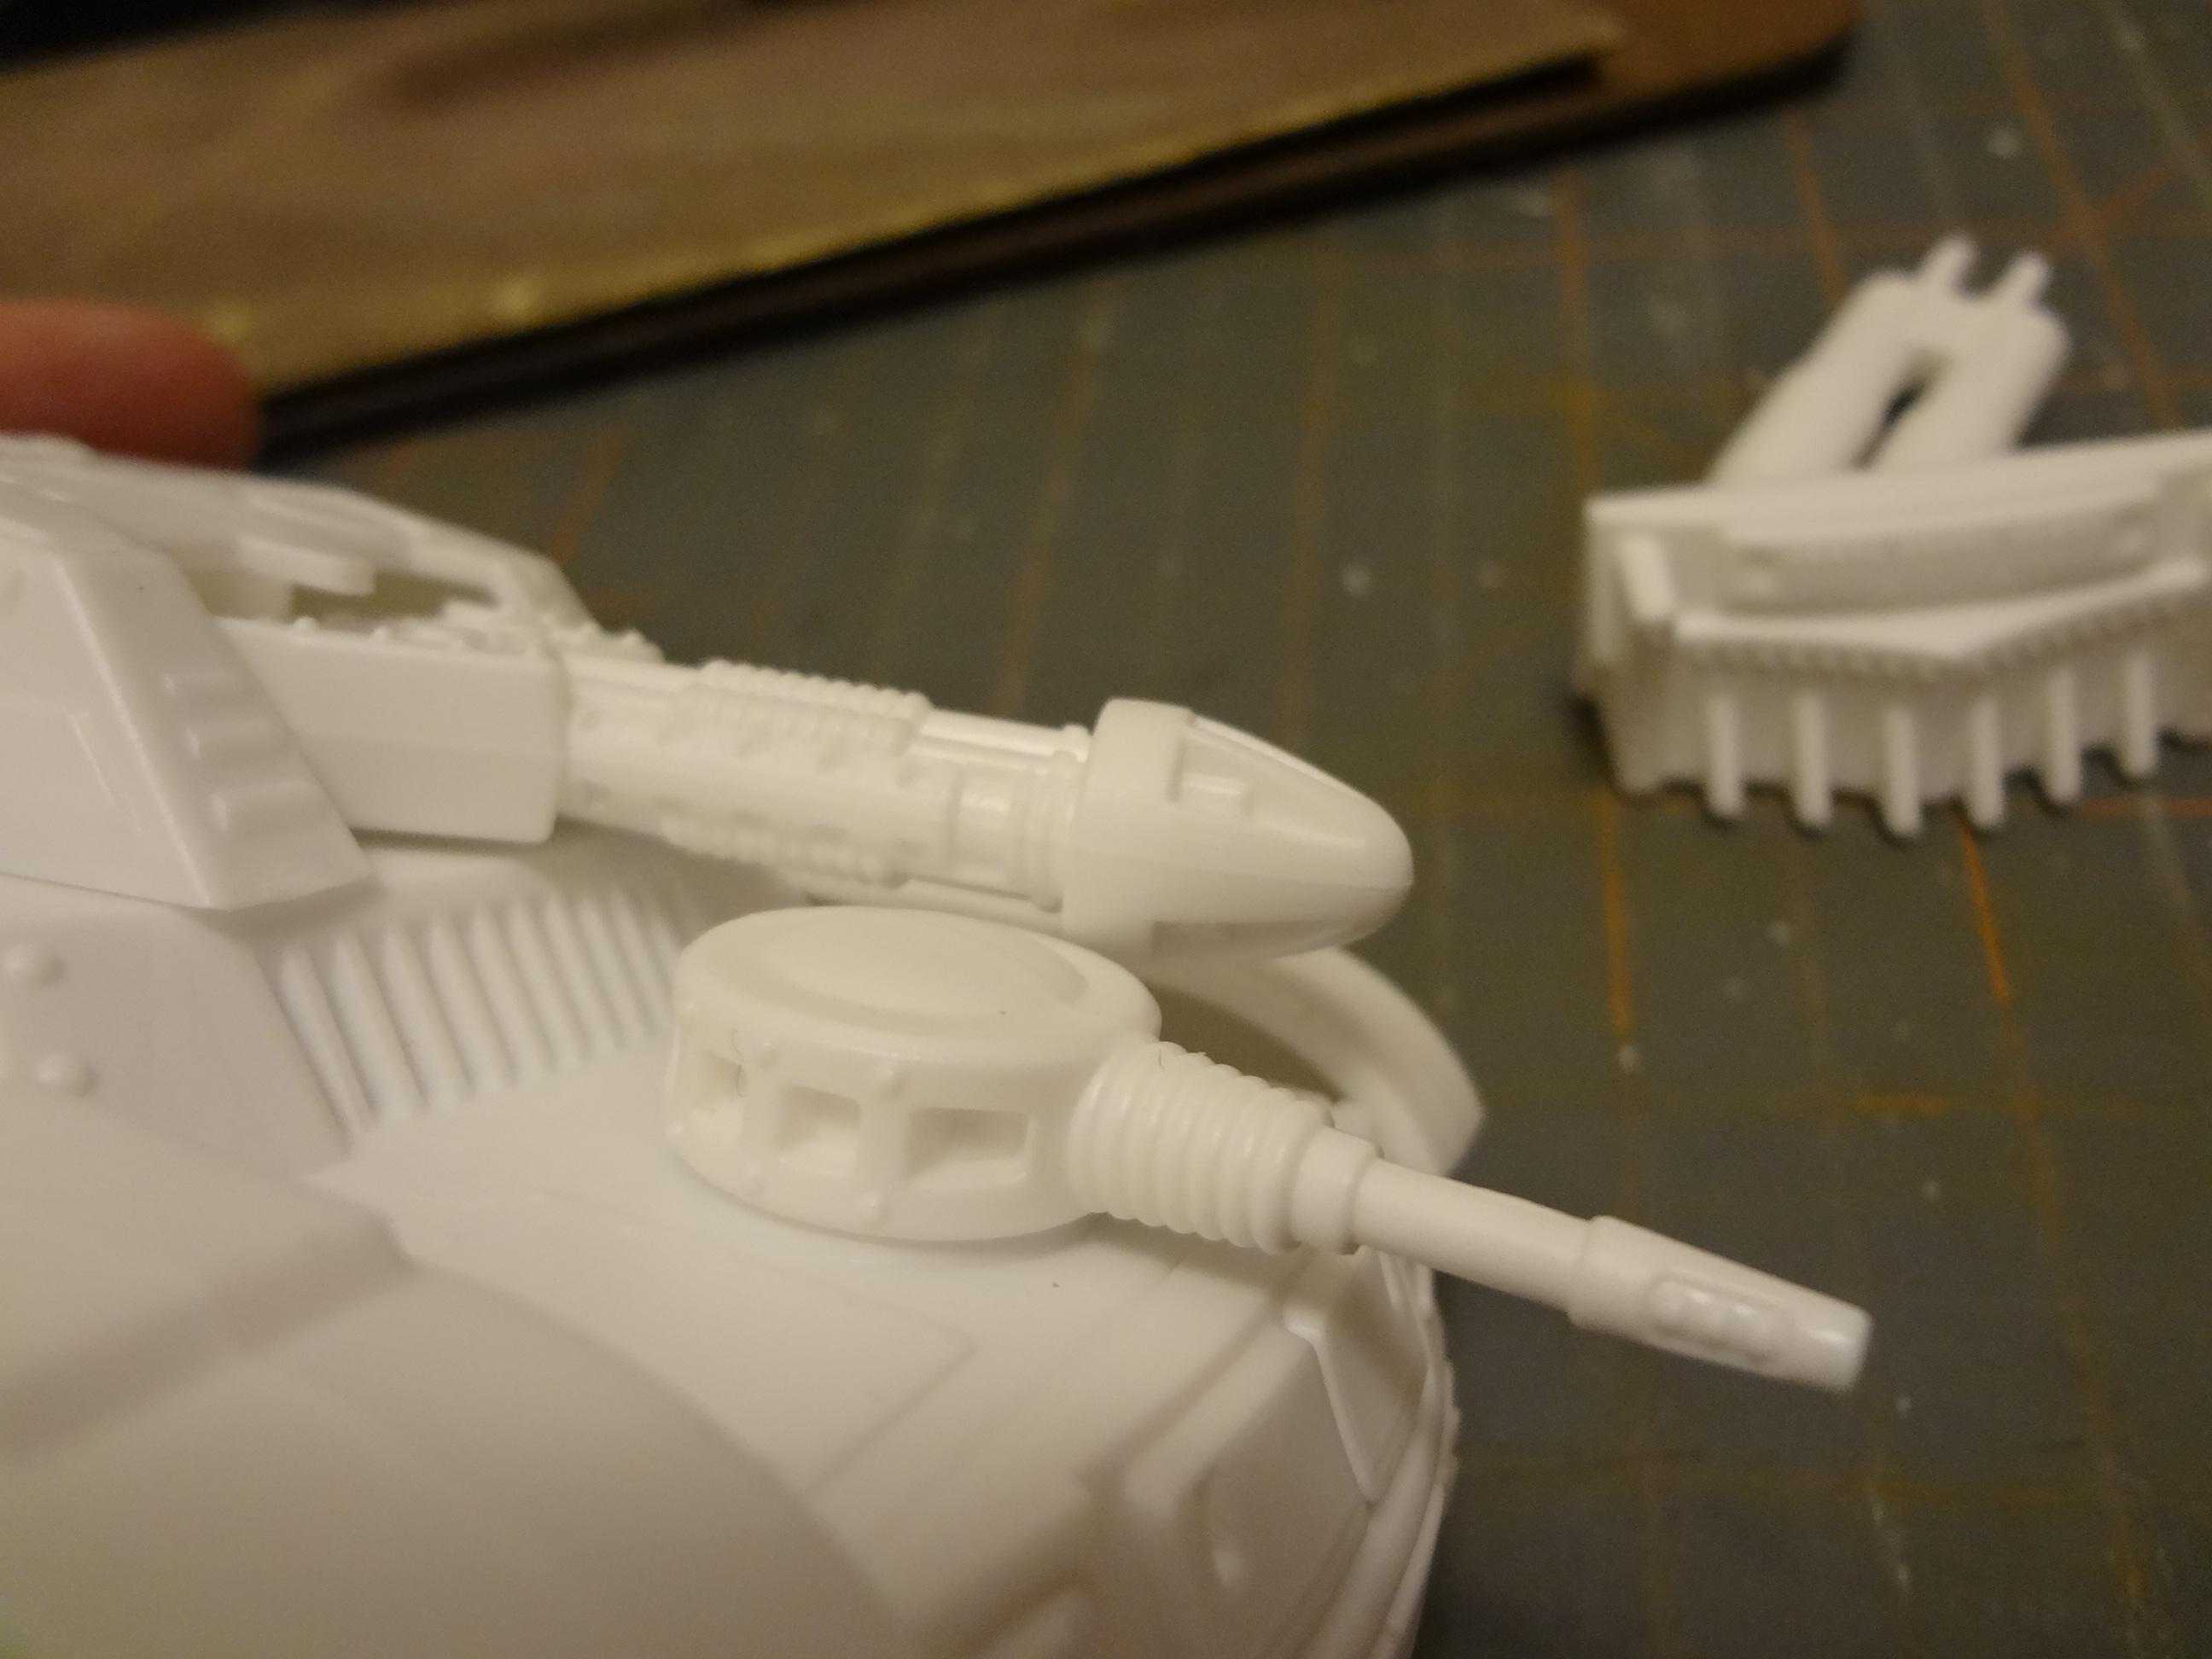
This can be remedied by shaving away the round rim on the lower hull and/or the rim on the mini-turret.
Secondly, and most annoyingly, no matter how you assemble the treads (they can slope forwards or backwards) you end up with a gap between the treads and the lower section of the hull.
This can be remedied by filling the gap with putty or plastic card, or by raising the hull up. It's a small matter to clip away the mounting pegs on the side of the hull and just glue the treads a bit further down the body. Here's what the difference looks like between the raised hull and assembling the model as intended. The figure in the picture is exactly 29mm from sole to eyeline.
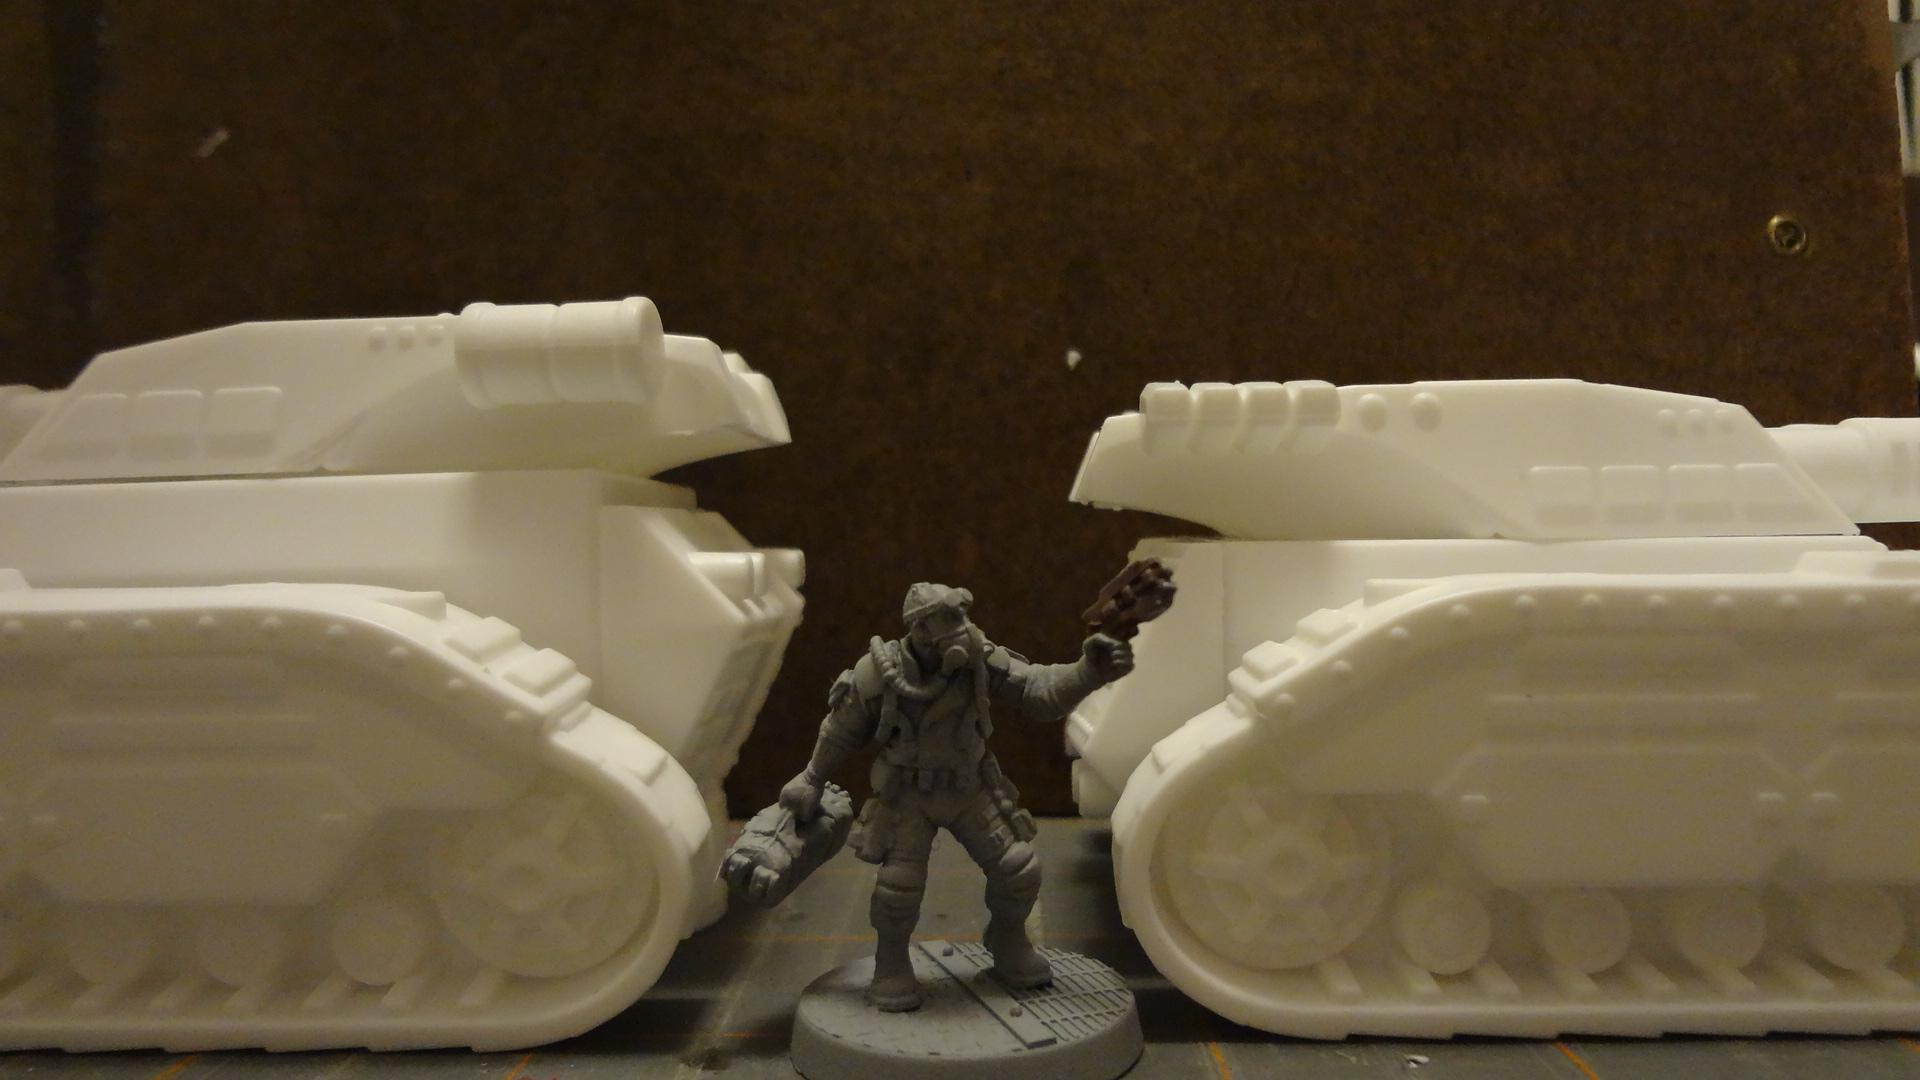
I think the raised hull looks better, though the top edge of the hull side has no detailing whatsoever as the model designers intended for it to be mostly obscured by the treads. Not a major problem, but worth noting.
Lastly, when assembled with the bottom of the front treads overhanging (like most modern tanks) the treads will face the wrong way.
Warhammer 40,000 Comparison
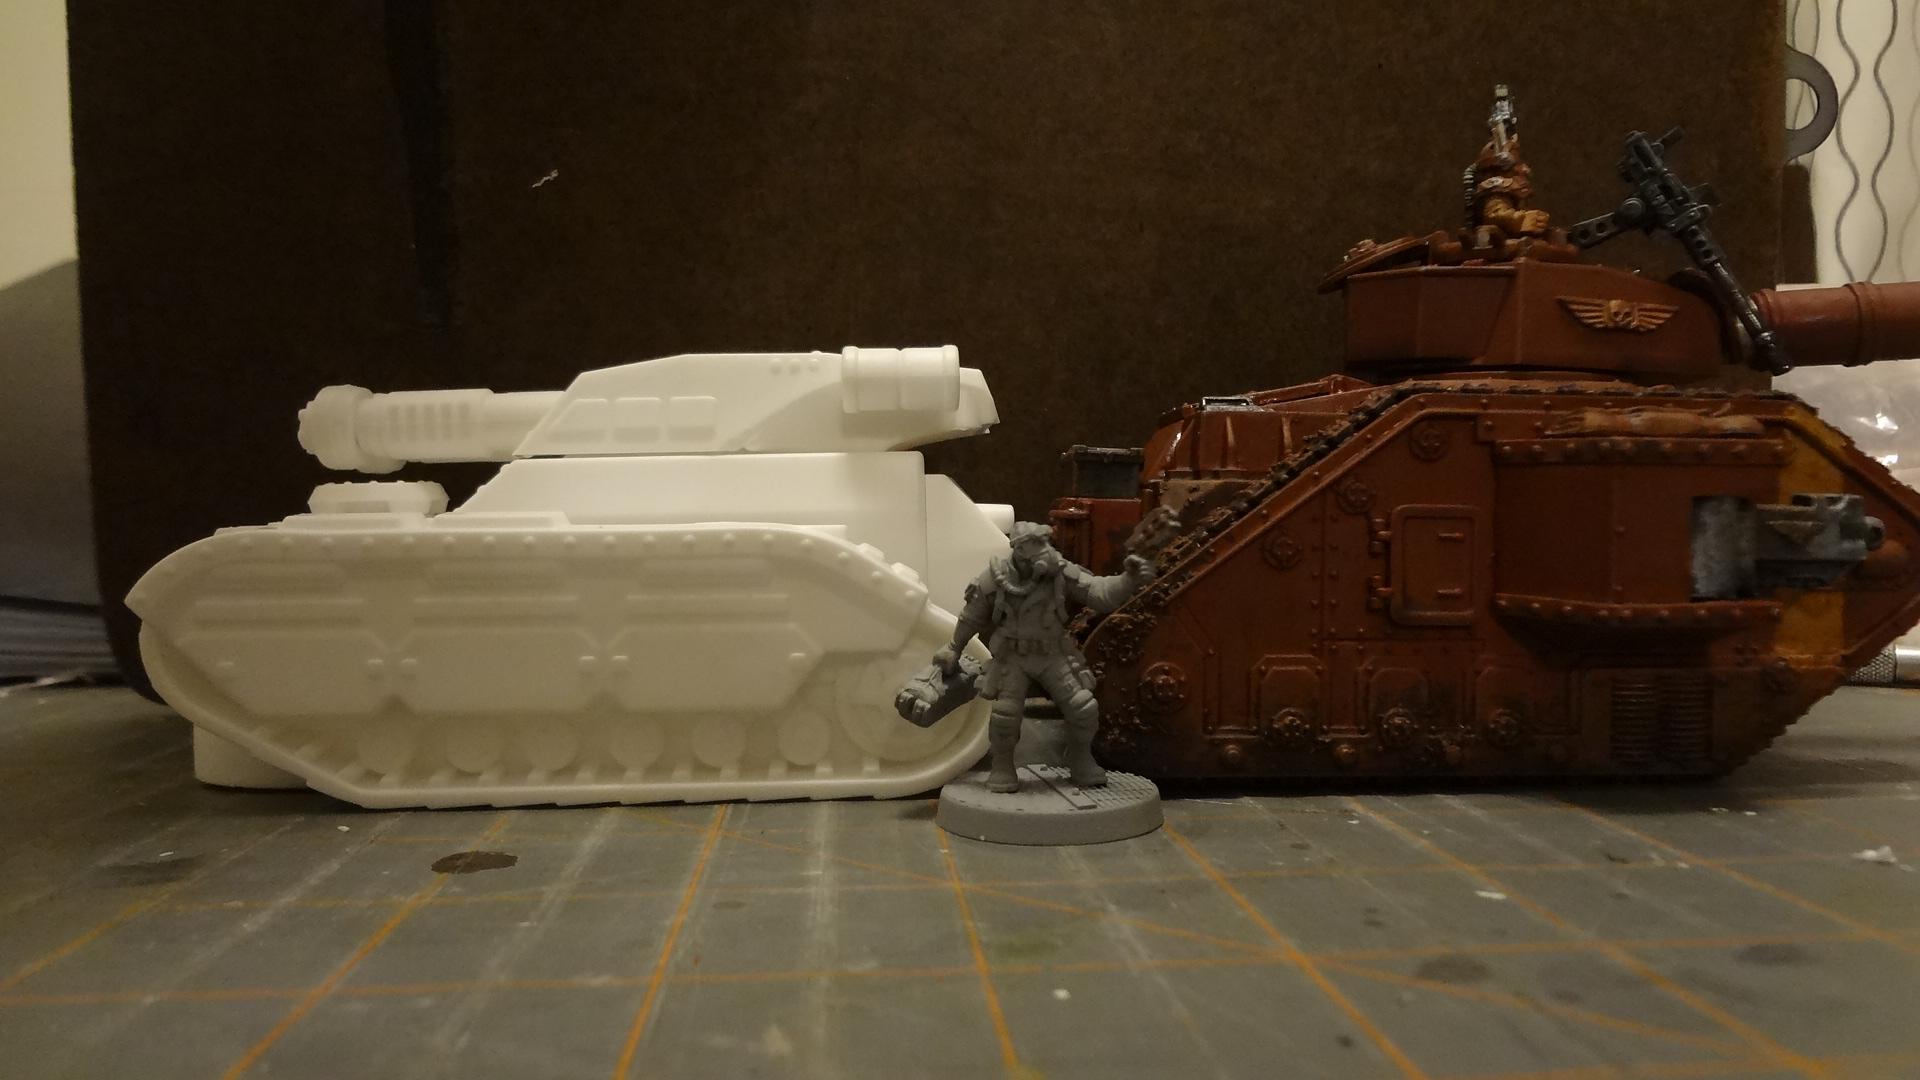
Here's how it compares to an Imperial Guard Leman Russ Battle Tank by Games Workshop. It's quite a bit shorter.
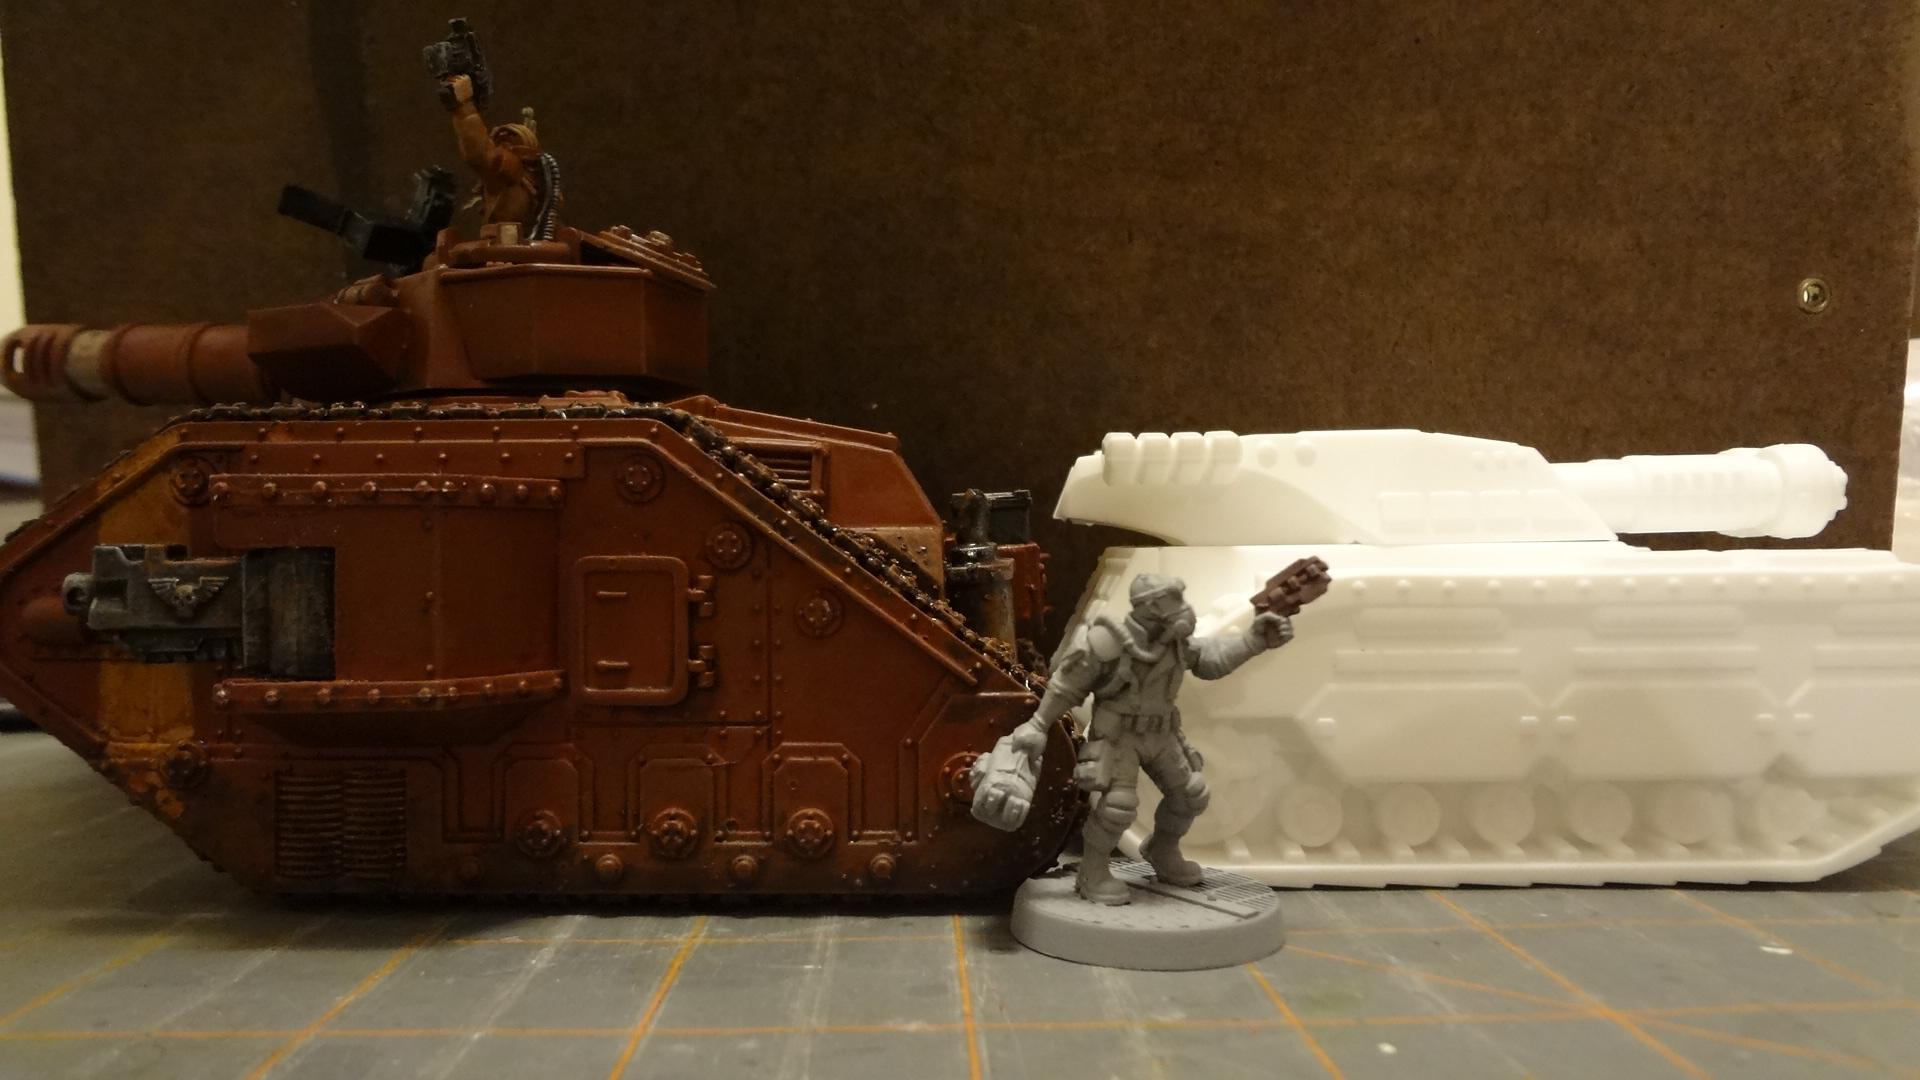
Even my raised version is stunty by comparison.
However, the footprint is actually quite close.
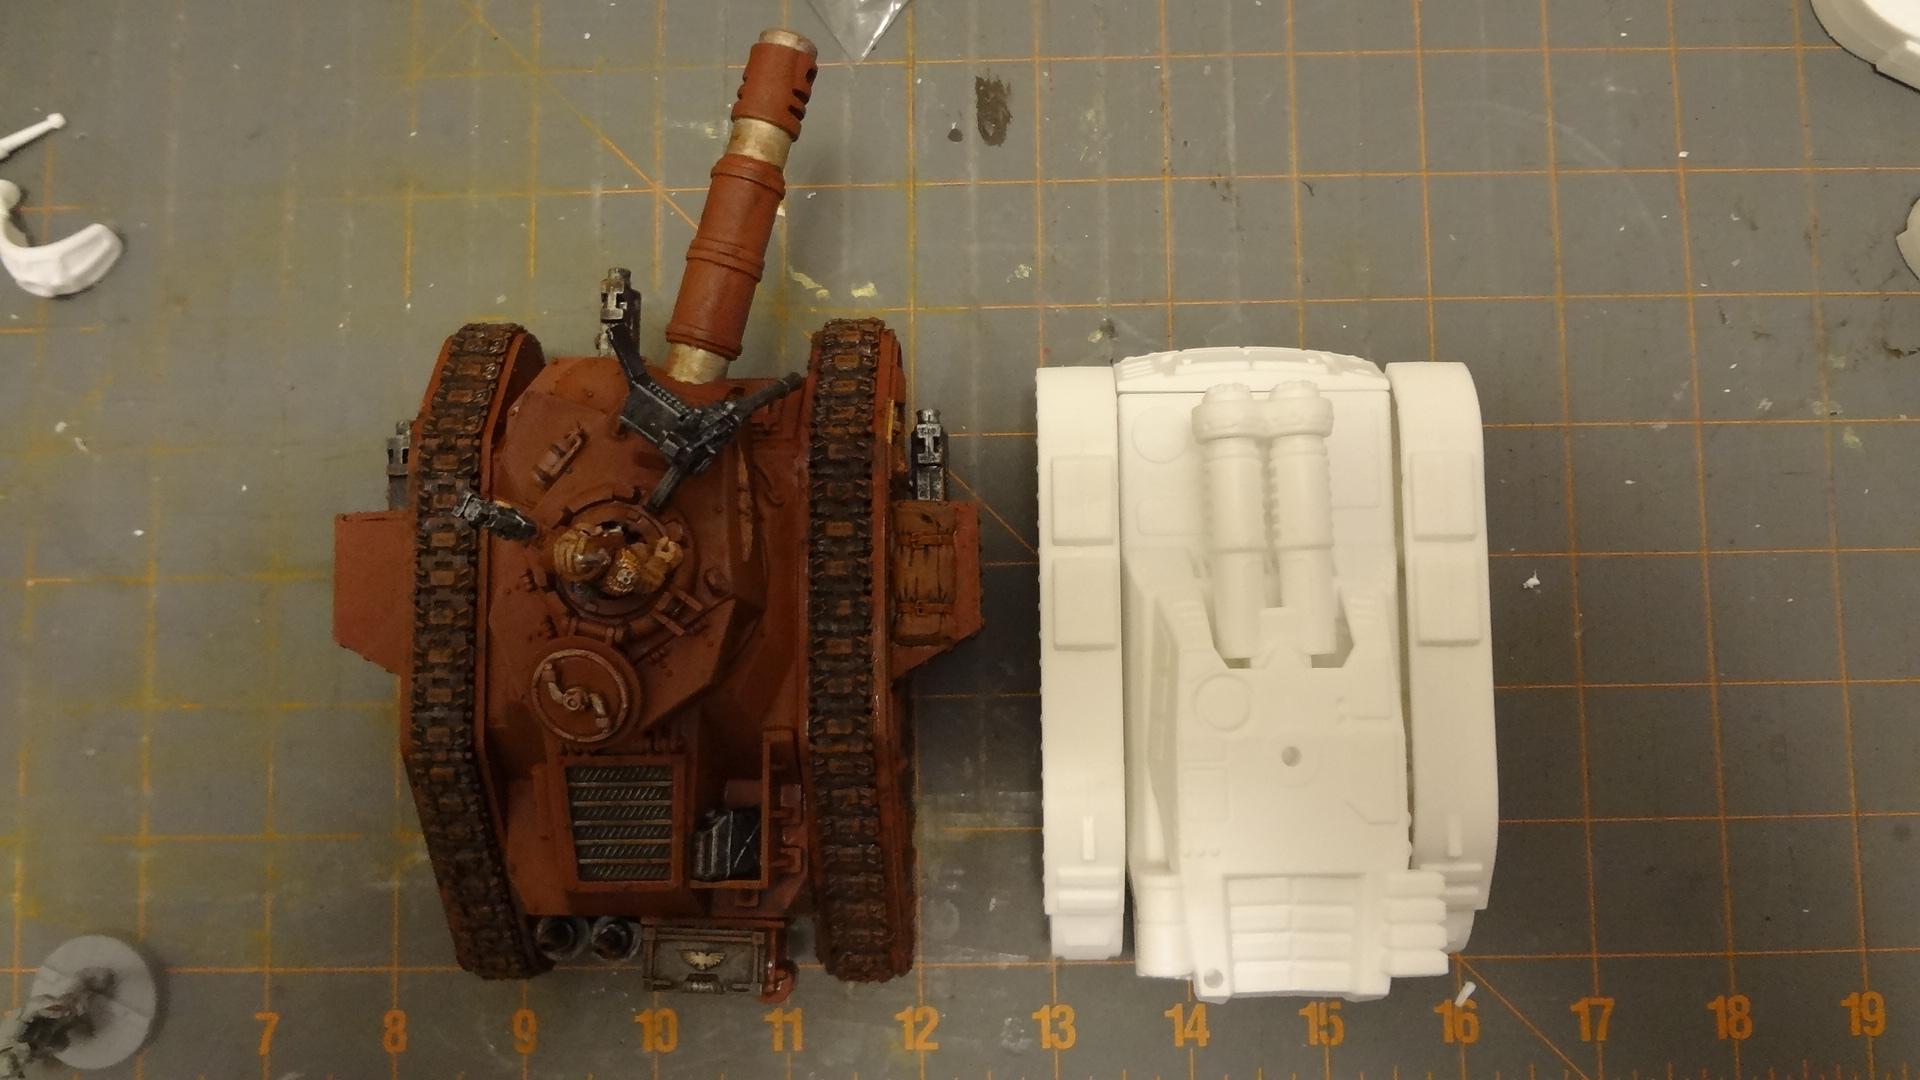
The BroneKorpus is about 1/8th inch shorter in length and 1/4 inch smaller in width, not counting the Leman Russ side sponsons.
Options, Options, Options
One of the best things about this kit is the many ways in which it can be assembled. Here are a few of them.
First up, a sleek, no-frills main battle tank.
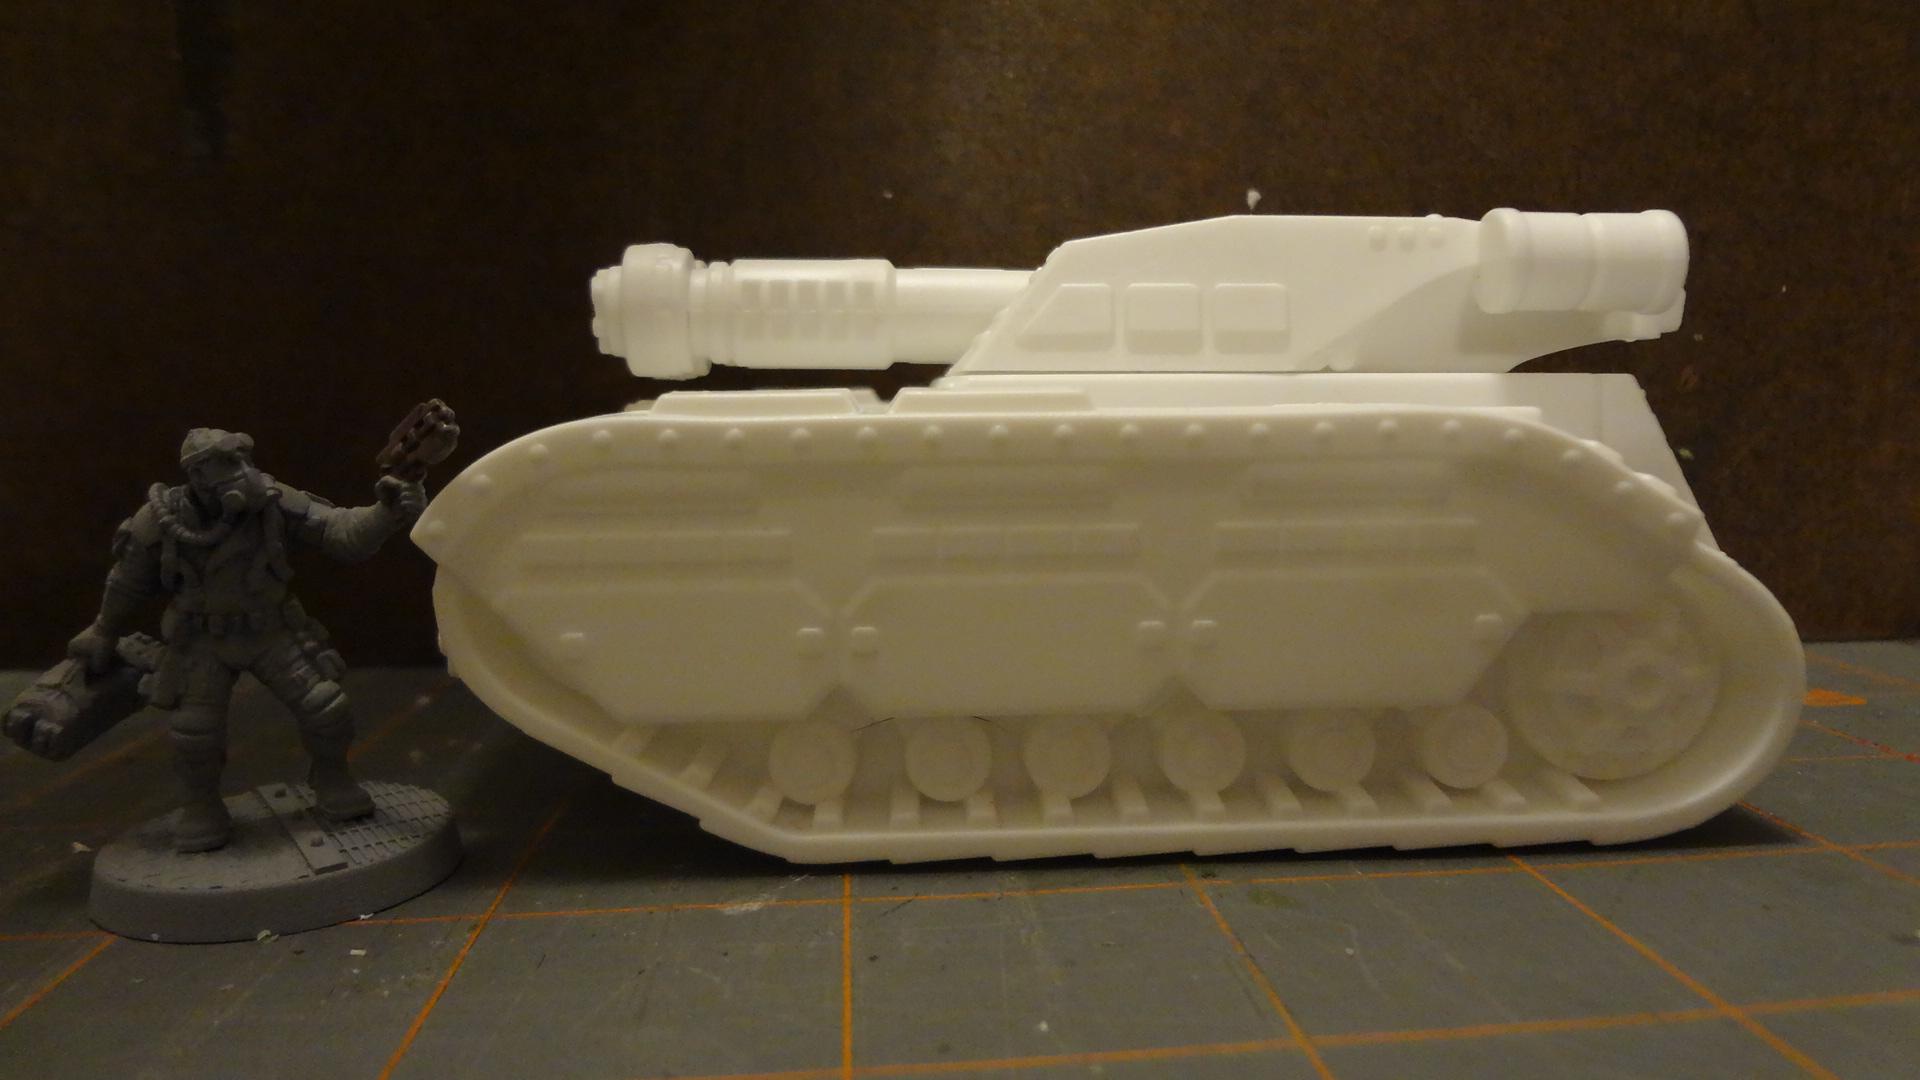
And here's a similar version, but this time with a rack of missiles, some comms gear and the bulldozer front.
Reversing the hull to put the lower section in the rear and the dozer front gives it a bit more of a 40k look.
And don't think that main battle tanks are the only thing this kit does. Lose the main turret and you've got a nice little armored personnel carrier.
Though this isn't bad either.
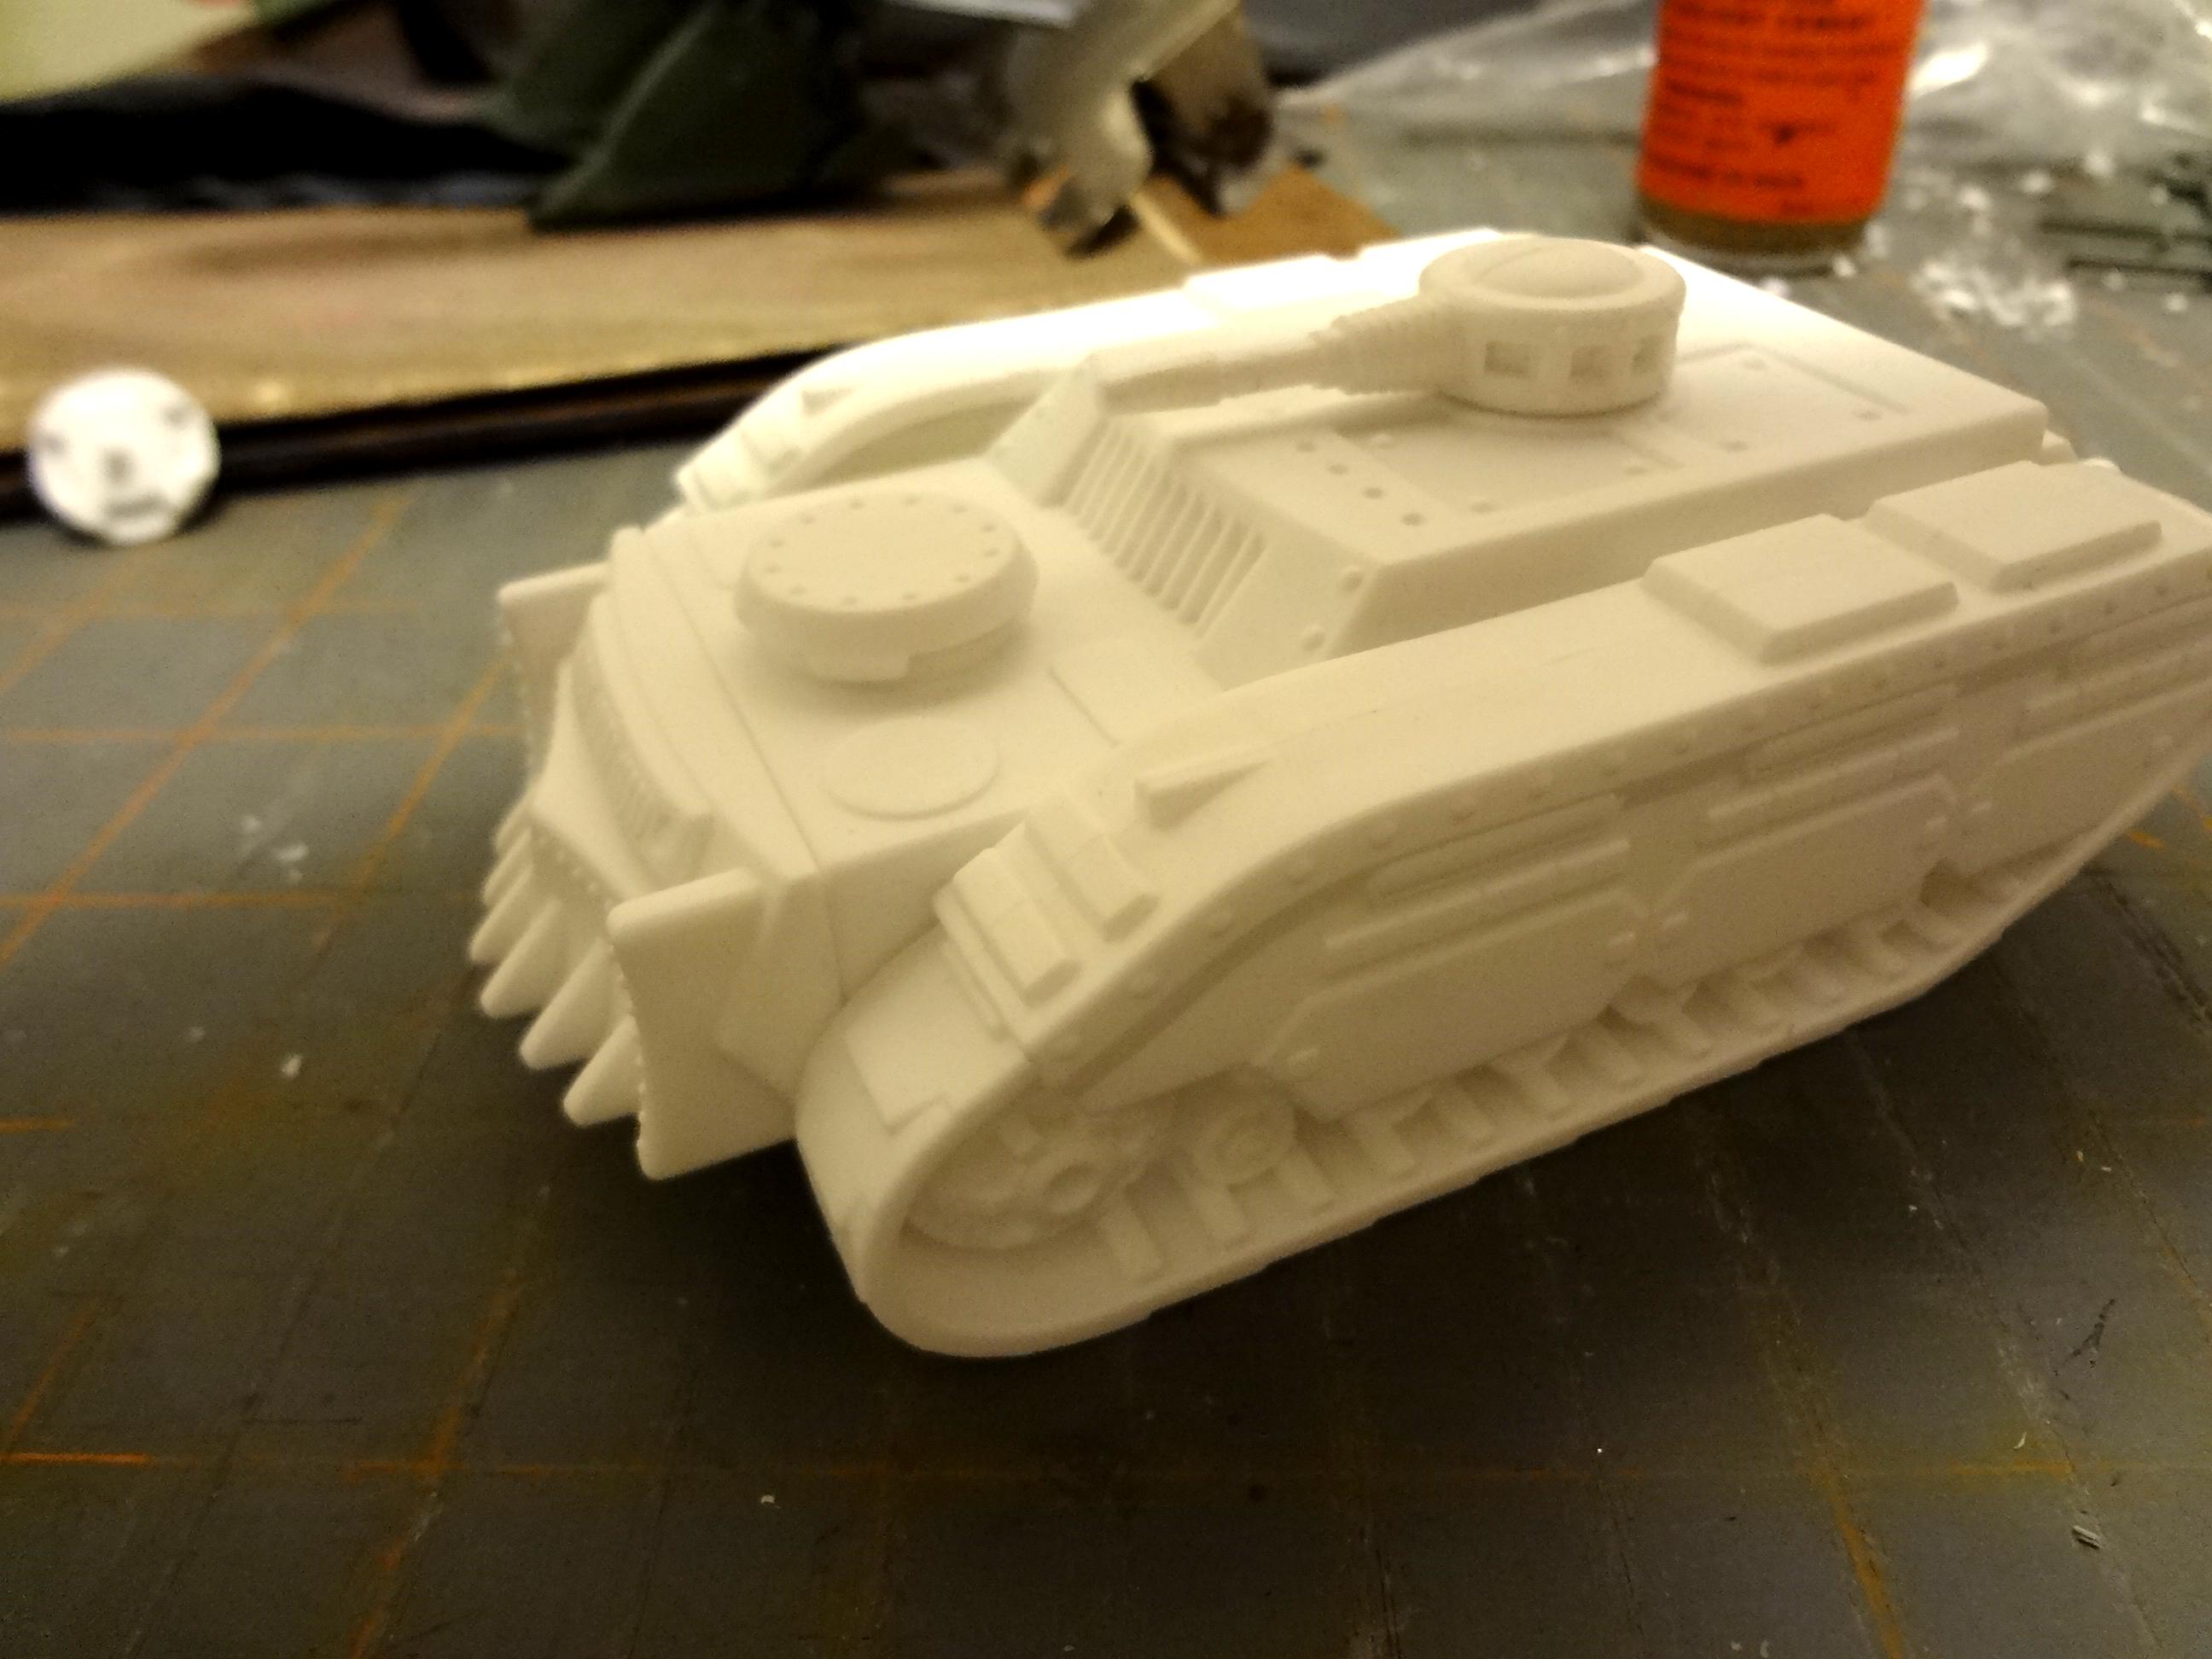
Add the big missiles and you've got a missile carrier.
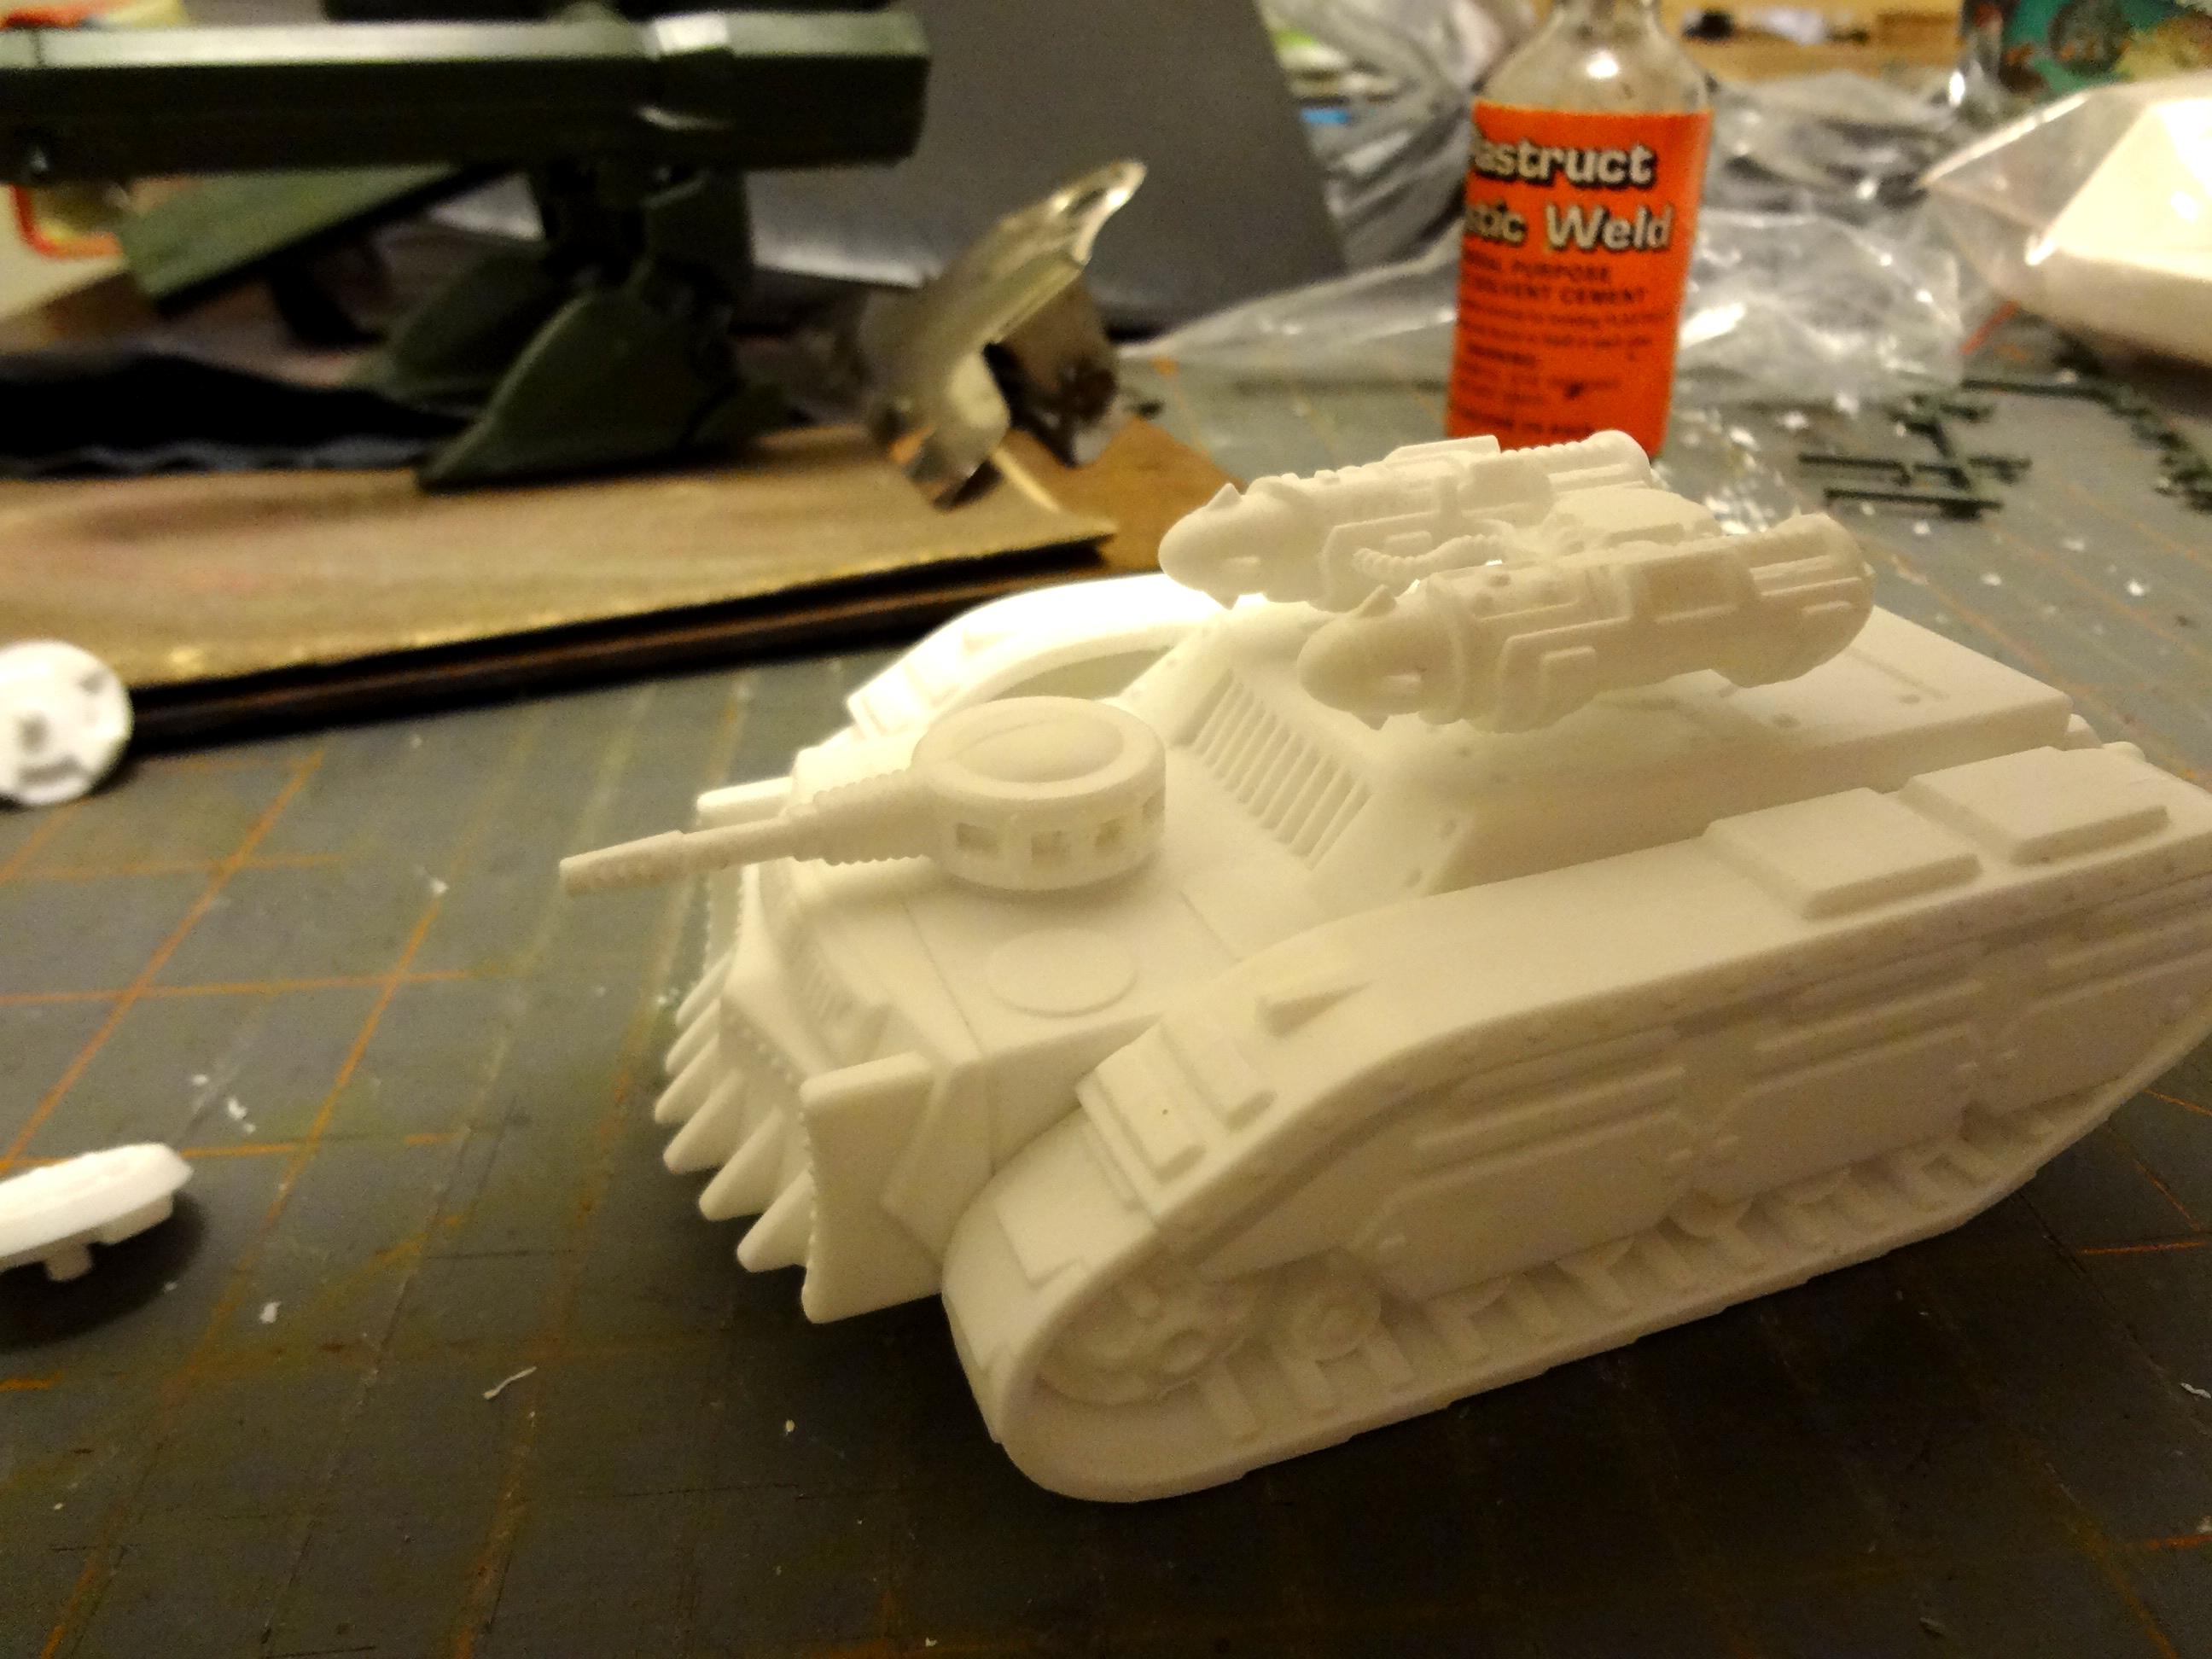
Stacking two of these missile pairs on top of each other could cool too.
For use with my 28mm Mech Attack games, I'll probably go with this simple configuration: raised hull, single main gun.
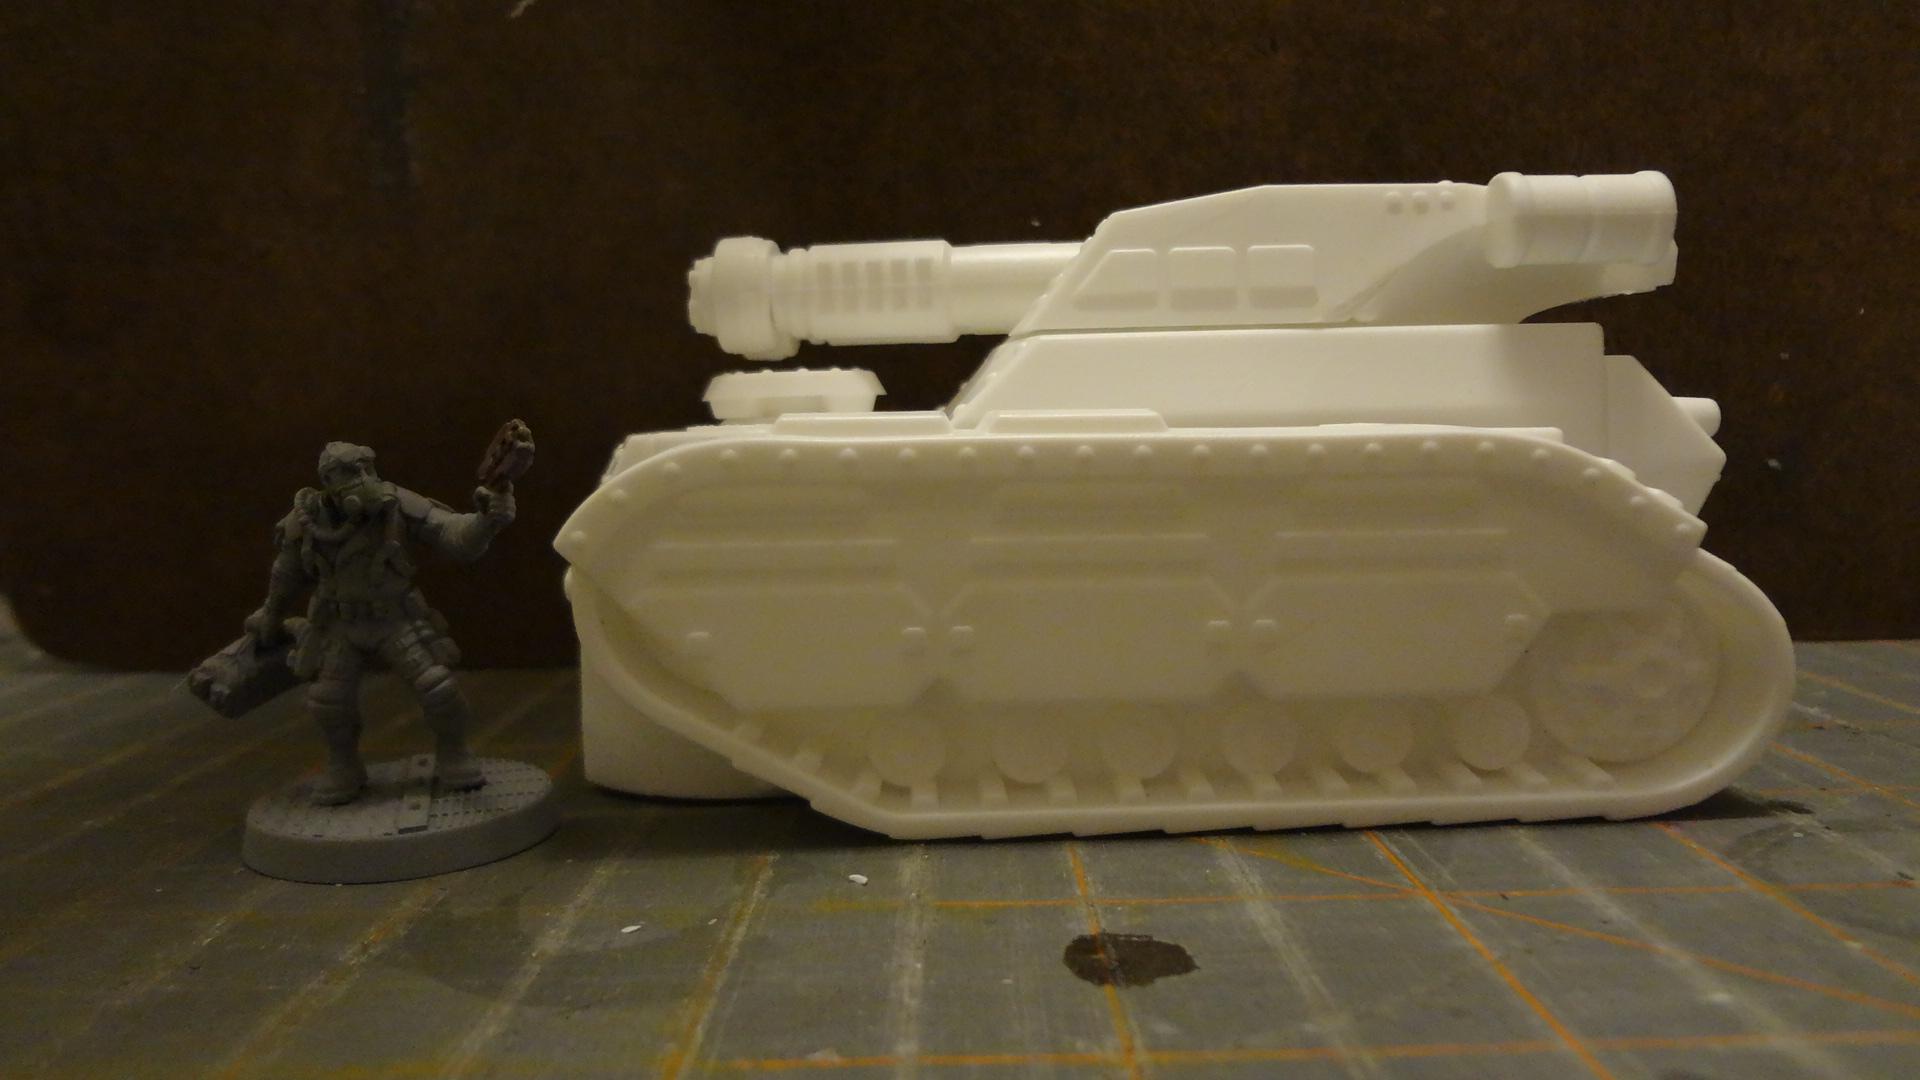
Though not intended for 40k, I'll probably put a Space Marine tank hatch on top of the turret, as it has nice detailing (and I've got a bunch in the bits bin).
No matter how you assemble yours, you'll end up with a batch of great parts for converting other vehicles. Here's a use for the second set of muzzles. They look like rocket pods rather than gun muzzles so that's what I used them for.
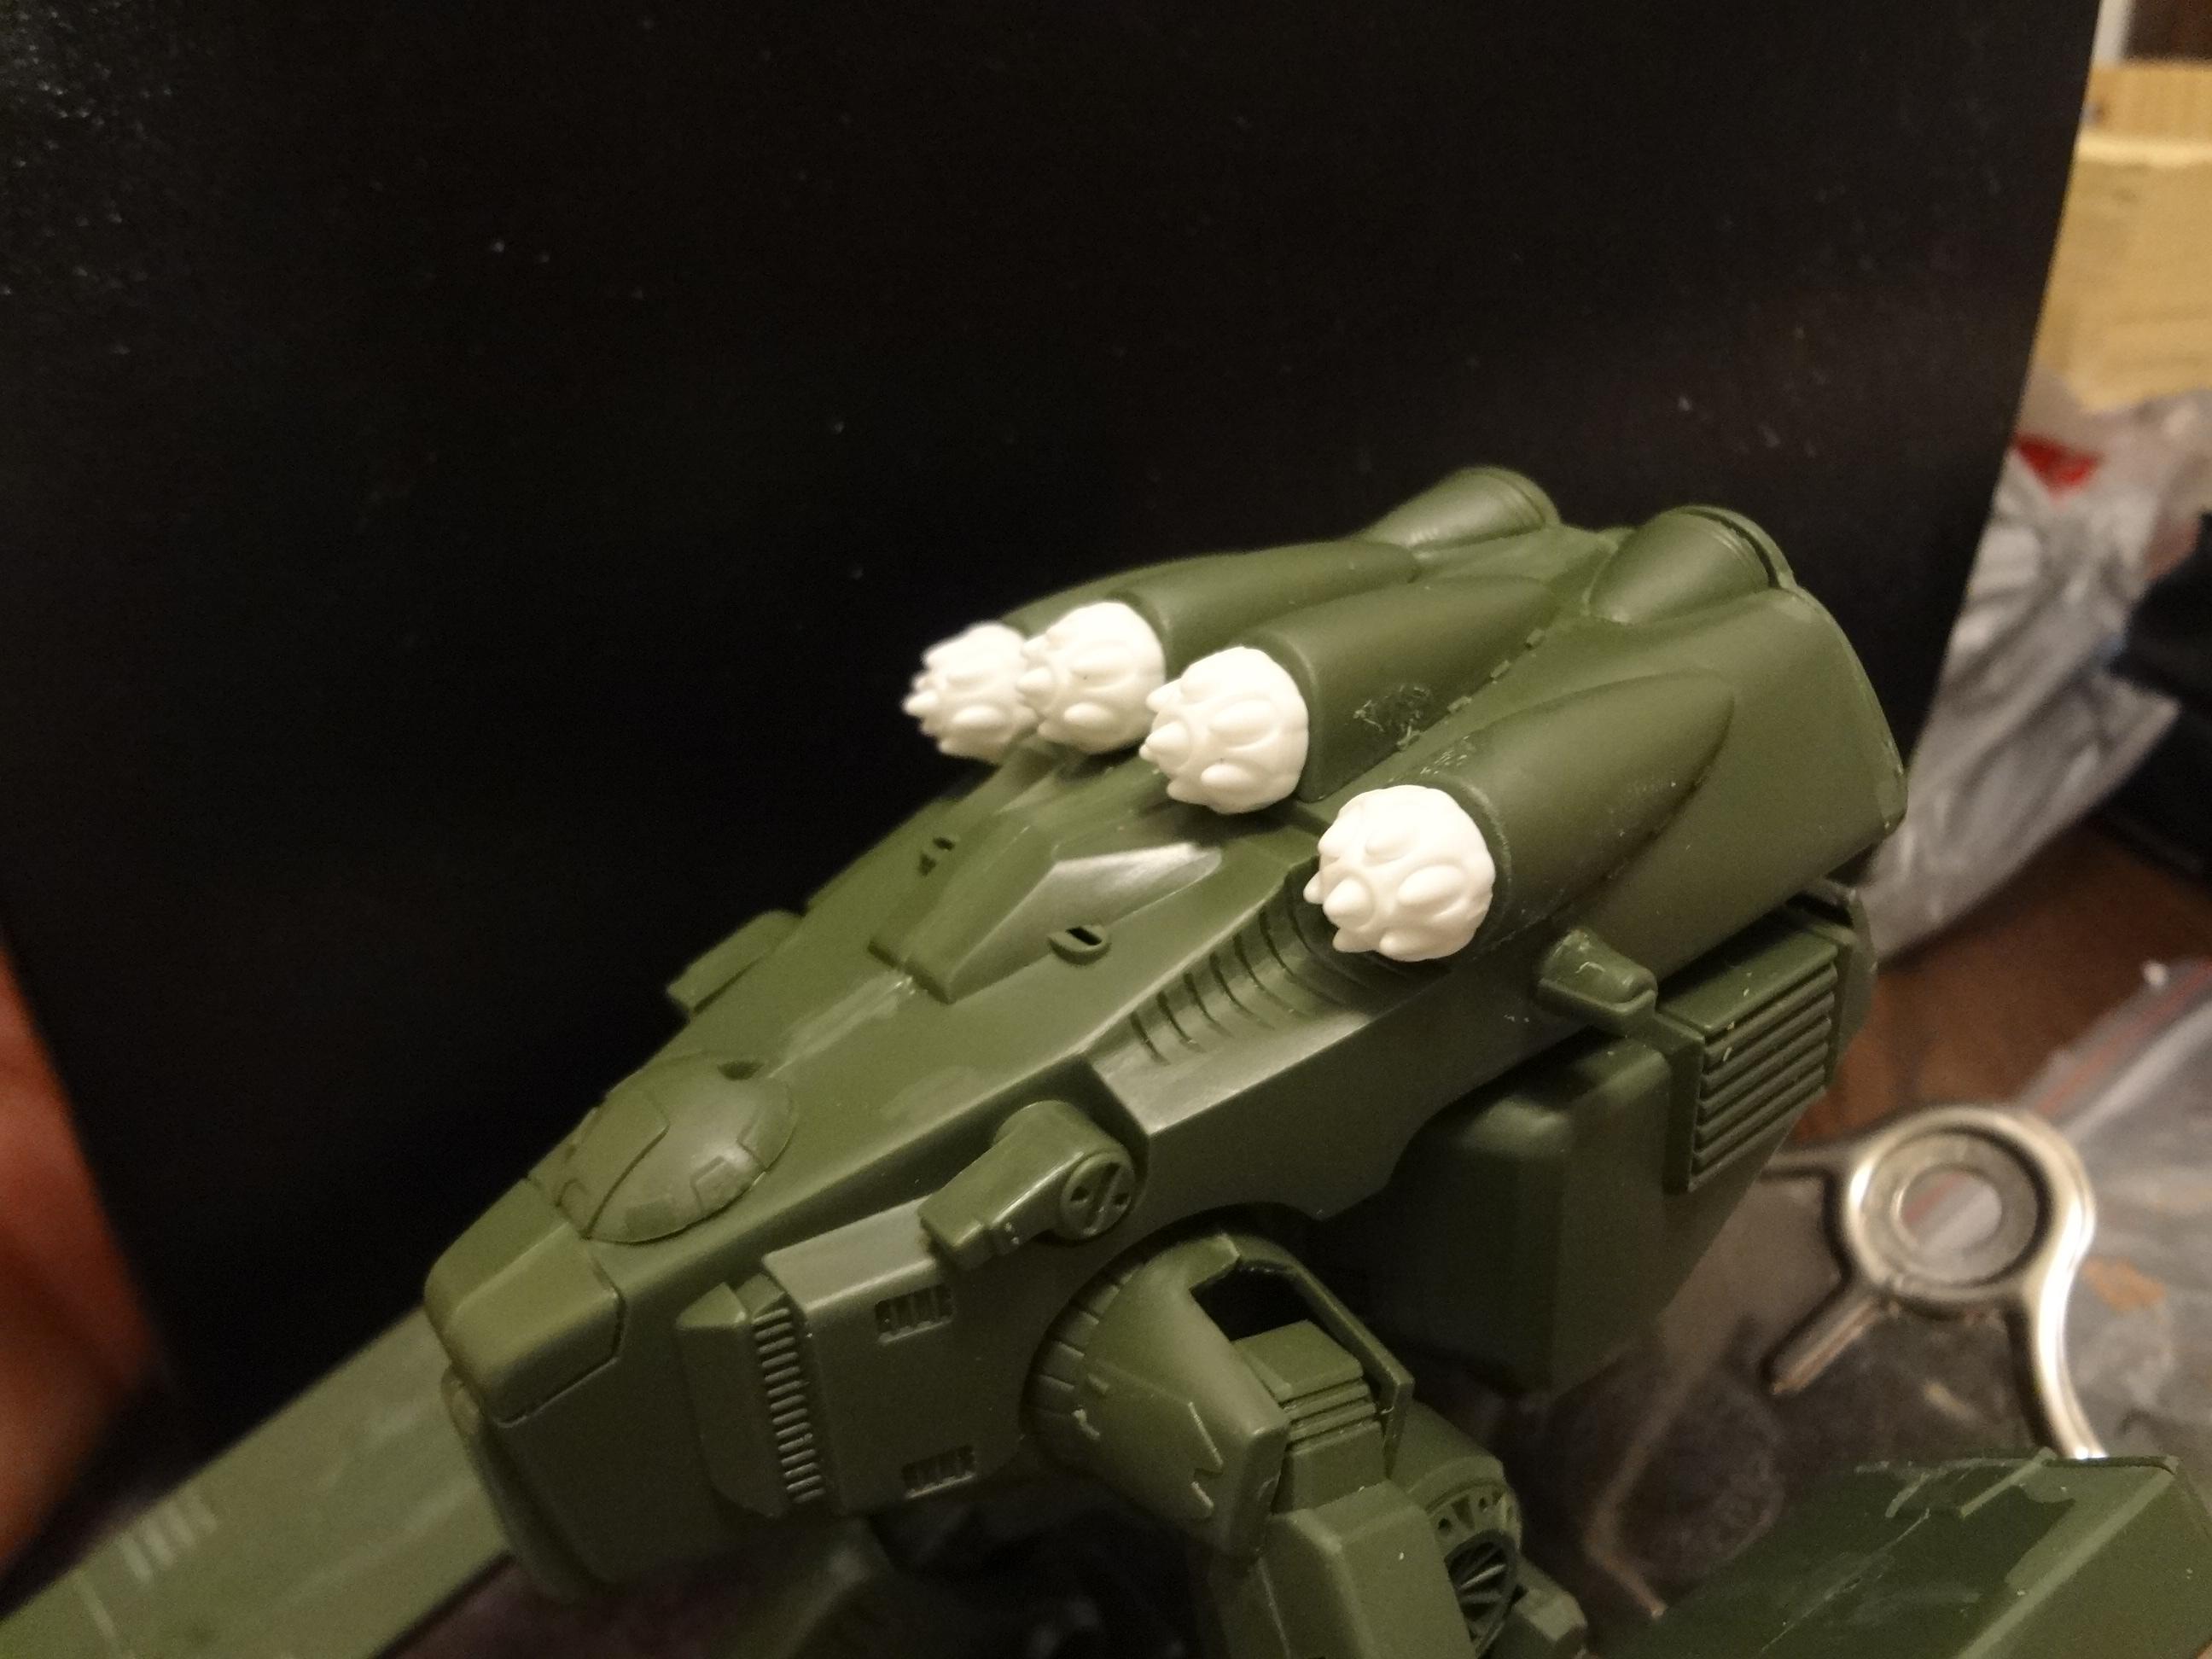
This "Destroid Monster" kit had four ridiculously long cannons, but I removed them and glued the rocket pods in their place. Macross fans will likely disagree, but I think it's an improvement.
Final Assessment
There is no other sci-fi tank kit in this price range with this kind of quality and usefulness. It's not a perfect kit, but the few flaws are easy to remedy or ignore. The sheer number of options in the kit means that gamers of many stripes should be able to find a use for it on their battlefield.
The size of the model suggests a light or medium tank, but who can say how big a tank will have to be in the future? I heartily recommend this kit to anyone who wants some armor and doesn't want to spend a lot of money.
Lastly, I also encourage you to check out this review on Dakka Dakka, which inspired me to write this post. Most notably, it also has comparisons with Space Marine tanks.
-- Karl, Chicago Skirmish Wargames club member
Wednesday, February 18, 2015
Chaos Ratmen, or the Origins of Skaven
Everyone has them: miniatures that for whatever reason, you associate strongly with your hobby origin story.
For me, these old-school Chaos Ratmen are some of those miniatures. Produced in 1986, these guys were a decade old when I arrived in wargaming in 1996. And although I never played Warhammer Fantasy, seeing these awesome figures in the pages of White Dwarf magazine really helped kindle my imagination in those early years. After an adolescence surrounded by the elves and dwarves of Tolkien lore, seeing a completely reimagined fantasy race -- imbued as they were with magic, mystery and lore -- was absolutely exhilarating.
Fast forward 15 years, and I managed to get my hands on a bag of loose, poorly painted Skaven models at the Games Plus gaming auction. At about $1 per figure, I knew it was a good price, but it wasn't until I pawed through the bag that I knew I'd found a real treasure trove.
The bag contained five "Chaos Ratmen" sculpted by Jes Goodwin, from the "C47" release back in 1986. This was before the Skaven were a proper army ... these guys were just another type of Chaos mutant in the Warhammer World. These figures are just completely unique in a way that only old-school Citadel minis can capture. Here's the original sell-sheet.
Anyway, the bag included plenty of mid-1990s Skaven figures too, which are plenty awesome, as well as some Marauder and Harlequin rat-guys...maybe 12 figures in all. Everything went into paint stripper and I forgot about them until last weekend when, in a burst of inspiration, I dredged the Chaos Ratmen out of the depths of my lead mountain and gave them the brushwork they do dearly deserved.
I'm not sure if it's visible in these pics, but I deliberately tried to stick to a simple paint scheme in keeping with the old-school nature of these figures.
Doubtless they'll take to the battlefield soon enough, either in Song of Blades & Heroes or Open Combat!
-- Patrick, Chicago Skirmish Wargames club member
Wednesday, February 11, 2015
40k Gothic Terrain Sprue ... for Fantasy?!
Just last week I completed another brief terrain project. It's a small ruin created from the ubiquitous terrain sprue from the old Warhammer 40,000 3rd edition boxed set.
We've all seen these nifty pieces on tabletop battlefields for the better part of 18 years (has it really been that long?). Ideally they're painted and based, but I've seen plenty of unpainted wall sections rattling around the shelves of many a game store over the years.
Although designed for the far future battlefield, the shattered and pitted gothic walls and windows work just fine in a fantasy setting, too. There are explosions and shrapnel on fantasy battlefields, right?!
When I acquired these two corner sections from Mattias, one of them was missing the second-story ledge. So I fashioned a makeshift floor out of balsa wood, which gave me a great excuse to use a color other than gray on this piece of terrain!
I splashed some brown and green washes on the gray walls to add a little more color, then liberally applied flock and static grass to represent just how long this little ruin has been sitting in the wilderness, untouched and unexplored.
The rubble in the center is composed of broken Hirst Arts pieces, small stones and gravel. I used Gorilla Glue on this area, which expands as it dries to fill gaps between the rubble bits. Pro tip: After you've laid down your Gorilla Glue and arranged your large stone pieces, let it stand for 20 or 30 minutes, then come back. The glue should have expanded and foamed up quite a bit -- now, sprinkle some sand or gravel onto the expanding glue to add more texture. This is a great way of building up volume quickly and easily without having to wait for subsequent glue layers to dry.
The tall pieces of foliage are just plastic aquarium plants I pulled apart and attached with super glue.
I've got quite a collection of fantasy ruins at this point! Time to do a wilderness-style Mordheim game, maybe?
-- Patrick, Chicago Skirmish Wargames club member
Tuesday, February 10, 2015
Taking the Ruined Keep to the Next Level
I finally got some photos of a few terrain pieces I completed over last summer, fall and winter. You've probably spotted them in the background of our fantasy battle reports towards the end of last year!
These pieces started when I acquired the Scotia Grendel Ruined Keep kit, a very nice resin collection of tumbledown walls and ruined turrets. I knew I didn't want to assemble the kit exactly as it appeared in the studio photo (see below), so I decided to try my hand at carving stones and brickwork into blue foam chunks, then attaching the resin pieces on top to create a set of larger, more robust ruined fortress pieces that I could use either individually or grouped together.
It was my first time trying to carve foam by hand, so I just used a ballpoint pen.
This is the biggest piece from the lot: a broken wall capped by two ruined turrets. The whole thing is slowly being overtaken by the wilds, which fits perfectly with my fantasy wilderness setting.
Here's the next piece that came out of that Scotia Grendel kit: a ruined corner turret. This is just the resin piece attached to a larger wedge of blue foam, with stonework carved by hand into the base. The small trees are from a big bag of loose foliage I picked up on ebay for super cheap...I just put a bit of tacky glue on the tree trunks and pushed them into the foam.
The stairs are from one of my Dwarven Forge kits.
And here's the last piece: a corner with two walls and a small ledge for minis. The ledge isn't all that big, and the slope is too steep for most miniatures. Oops! It's still perfectly usable though.
These pieces were not meant to be symmetrical or to fit together in any particular way. I just wanted to make the most of the foam chunks that I had laying around.
It was a good learning experience. In retrospect I don't think the mortared areas between the stones came out quite dark enough to provide good contrast between the gray slabs. Otherwise I'm pretty satisfied.
I still have one circular turret piece and a small archway left from this kit, so there's probably one more terrain piece left in my future. Stay tuned!
-- Patrick, Chicago Skirmish Wargames club member
Monday, February 9, 2015
Fully Painted: Radioactive Space Mutants
After seeing Karl's Sedition Wars Vanguard troops, I decided to paint
up the Strain figures to oppose them. Since I had also split Deadzone
with Karl and had the Plague figures from that waiting for paint, I opted to join these two forces together with a common paint job. Both
sets of figures are slimy space mutants with a love of capri pants, so
they fit together naturally.
I chose a cartoony, radiation-burned, bright, and sloppy paint scheme for these figures to highlight
their relatively soft details. Overall, these are good but not amazing
sculpts. The Sedition Wars figures have more (but shallower) details on
the bodies, but details like faces and hands on both lines tend to melt
into blobs. Like Karl, I ran into a few pieces that did not quite fit together, especially the two halves of the Strain stage 4 body. I was able to fit them together by
softening the smaller piece in hot water and pressing it into place.
The Plague and Strain figures are both split into a series
that get progressively larger and more infected.
Plague stage 3, two Strain phase 1, Plague stage 3, and Strain phase 2
Strain phase 2, Plague stage 2
Plague stage 1, Strain phase 4
I chose not to paint the Scythe Witch and Cthonian sculpts from Sedition Wars at this time, because I do not feel they fit with the rest of these figures.
-- Tim, Chicago Skirmish Wargames club member
Tuesday, February 3, 2015
February 2015 Painting Pledge
Starting this month, Chicago Skirmish Wargames is bringing back the "Monthly Painting Pledge," which we've tried a couple of times in the past.
To participate, any CSW member who has the time and interest provides a photo and brief description of models that he plans complete within the corresponding month. At the end of the month photos are taken and posted of completed models.
For some this provides an extra incentive to set aside some hobby time to meet this deadline. It also provides a great marker for painting progress throughout the year. So without further ado:
Karl's pledge - 3 mecha models
All three are going to be built and based on CDs as additional mechs for our 28mm scale Mech Attack game at Adepticon. If these get built fast, he has some other mech models and toys that he may tackle as well.
Tim's pledge - Panther Moderns
Specifically, his intention is to complete at least half of these this month.
Mattias's pledge
Jon's pledge
Three vehicles slated to be part of a Steiner force for use in a 28mm scale game of Mech Attach or Alpha Strike. Completing the mech and tank are contingent on picking up some suitable basecoat paint, otherwise additional Sedition Wars and Bronze\clay statue Samurai army models will follow instead.
Final results of actual progress will be posted at the end of the month. Cheers!
-- Jon, Chicago Skirmish Wargames club member
To participate, any CSW member who has the time and interest provides a photo and brief description of models that he plans complete within the corresponding month. At the end of the month photos are taken and posted of completed models.
For some this provides an extra incentive to set aside some hobby time to meet this deadline. It also provides a great marker for painting progress throughout the year. So without further ado:
Karl's pledge - 3 mecha models
All three are going to be built and based on CDs as additional mechs for our 28mm scale Mech Attack game at Adepticon. If these get built fast, he has some other mech models and toys that he may tackle as well.
- 1/72 Dougram "Ironfoot" aka Battletech Thunderbolt
- 1/100 Macross "Tactical Pod Glaug" aka Battletech Maurader
- 1/200 Macross "Destroid Monster" (going to need some conversion)
Tim's pledge - Panther Moderns
Specifically, his intention is to complete at least half of these this month.
- 15 Ronin from Rezolution (some will just require touching up the previous owner's very nice paint jobs and basing the models)
- 13 Delaque from Necromunda (because at some unspecified date, we will get in a future game of Necromunda)
- 8 Fusiliers from Confrontation which need some conversion work
Mattias's pledge
- Josh's pirate islands
- Karl's giant
- Tim's five ogres
- A small medley of fantasy figures that have been undercoated for nigh on a year
- 4 statues made from old busted high elves
Jon's pledge
Three vehicles slated to be part of a Steiner force for use in a 28mm scale game of Mech Attach or Alpha Strike. Completing the mech and tank are contingent on picking up some suitable basecoat paint, otherwise additional Sedition Wars and Bronze\clay statue Samurai army models will follow instead.
- 10 Sedition wars troops
- Fusco Construction Yards (FCY) Dervish Mech
- Antenociti's Workshop hover tank
- Finishing details on a customized chariot with riders converted from a Chronopia Sons of Kronos Chariot and a Malifaux "Izamu" model
Final results of actual progress will be posted at the end of the month. Cheers!
-- Jon, Chicago Skirmish Wargames club member
Monday, January 26, 2015
Star Wars: Imperial Assault Minis with Flory Model Wash
I recently picked up Fantasy Flight's new Star Wars: Imperial Assault board game. It is full of little Star Wars mans. I usually avoid painting board game minis -- with the internal argument that they are "pieces" and not miniatures -- but these inspired me to start right away!
My goal was to get these painted up quickly. Near my house, there is a fantastic model shop called M&Models. They are an "armor" shop, and carry mostly military models. As such they have a fantastic selection of products that gamers don't often see at our local haunts. The owner recommended a new wash by Flory Models; it is designed for doing panel lines and detailing on vehicles. It is clay based, and has some really neat properties. I thought the stormtroopers would be a great way to try this out.
These are the Imperial probe droids. They each have different lens colors to differentiate them on the game board.
The Imperial Officers have different medal colors to differentiate them.
I painted the stormtroopers differently than my usual process, and I used a cool new product, so I wanted to show some in process shots.
I started with a white primer, then painted all the solid black areas with a very dark grey. I added color to shoulder pads to differentiate squads. At this point, I gave them a heavy gloss coat, and let them dry overnight.
After the gloss coat was dry, I slopped the Flory Models black wash all over the minis. It doesn't matter if it gets all over the white areas. Once this dries overnight, you can use a barely moistened cotton swab to wipe the wash off the raised areas, leaving it in the recesses and details. It wipes up cleanly with no work.
It took seconds to clean up each trooper. This is much like an oil wash, but is much easier, and safer. You have all the time you want to do the cleaning step. The wash never dries out until you seal it with a matte varnish spray.
Here are the finished stormtrooper scout gunners. After the matte varnish, I did some spot touch-ups with the white paint, painted the bases, and matte varnished them again.
After the matte coat, I went back with a 50/50 mix of satin and gloss varnish over the armor plates to give them some shine.
I was really impressed with the Flory Wash. I'm going to pick up the brown version also. One neat thing about it is that you can adjust how much will stick to surfaces just by using different varnish layers underneath. If you want a dirtier final product, you can use a matte varnish, which has more texture for the wash to adhere to.
I am really happy with these minis. They are very difficult to clean, but were really fun to paint. Expect to see more Star Wars minis as I work through the rest of the game box!
-- Josh, Chicago Skirmish Wargames club member


