Thursday, November 20, 2014
More Reinforcements: Knights and Warjacks for Kings of War
Recently I added two new units to my Kings of War chaos army: a unit of warjacks and a block of chaos knights. Now, I know what you're thinking: "Wait, what? Warjacks in Kings of War? I thought you could only use them in that other game?"
Well, if you're a regular reader of this blog, you'll know that Chicago Skirmish Wargames generally scoffs at games that limit the models you can use in your army. If something looks cool, we'll find a way to get it onto the battlefield! In this case, I'm using the warjacks as "Lesser Obsidian Golems" in Kings of War. I've always wanted to paint a warjack, and when this opportunity arose, I figured "Why not paint six of them!"
Thanks to fellow club members Tim and Mattias, who helped me source these figures at the bargain basement prices, which in turn made this project possible. There's no way I'd be able to do a unit of warjacks at anything near MSRP.
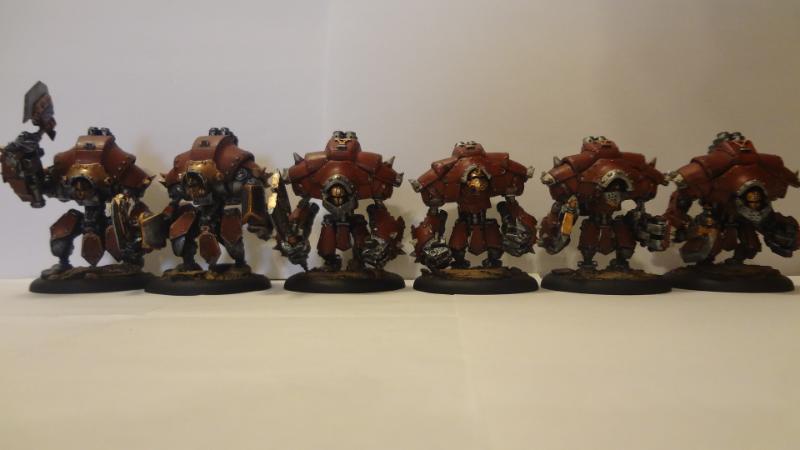
My chaos army is mostly drawn from the Kingdoms of Man army list, with allies from Undead and Abyssal Dwarves lists. Golems are a hard-hitting (if slow-moving) unit of soulless automatons. The official Mantic miniatures are fine figures, but the Khador warjacks are a better visual fit with my army's style. With their axes and large armored shoulders, they look a lot like mechanical versions of the chaos warriors and knights that make up the core of my force.
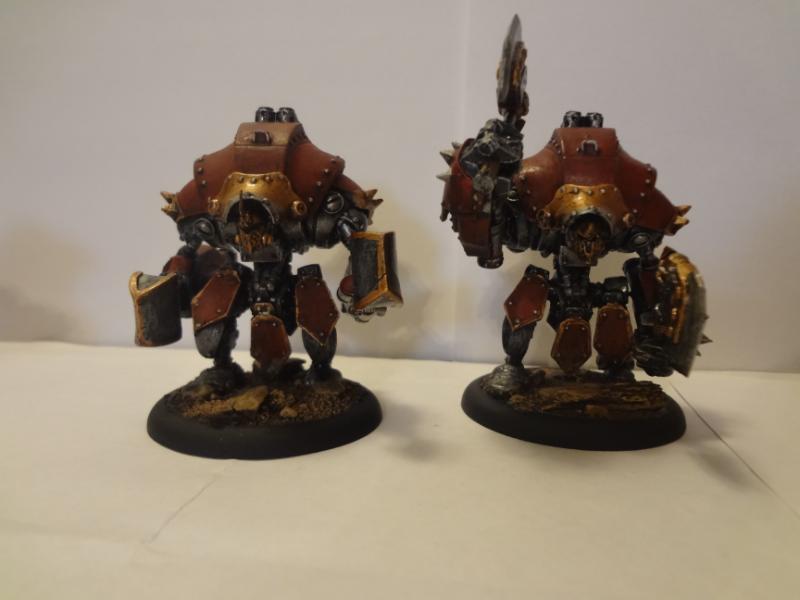
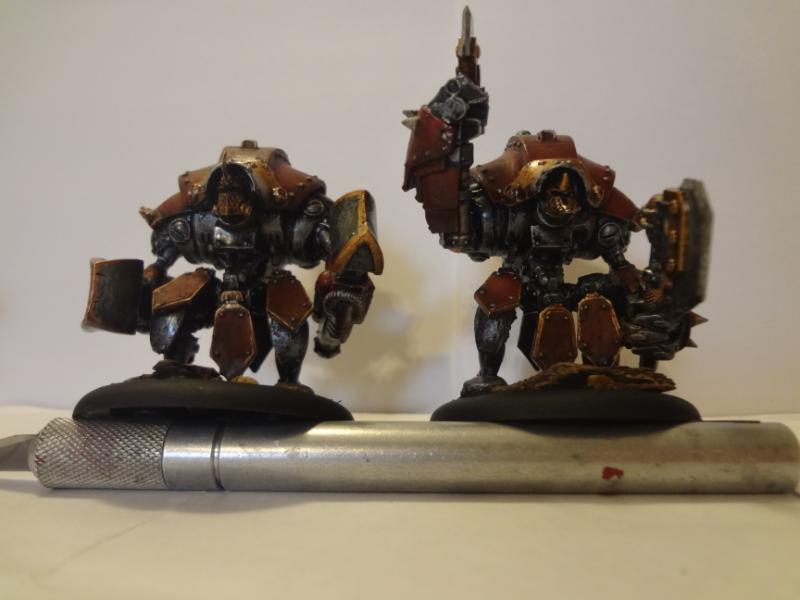
The pic below shows the difference in height between shorter original metal models and the taller current plastic models.
The two plastic jacks below are the leader models for the group. The jack on the left is stock. On the right, I modified the legs for a more dynamic pose and converted a left arm to arm it with two axes.
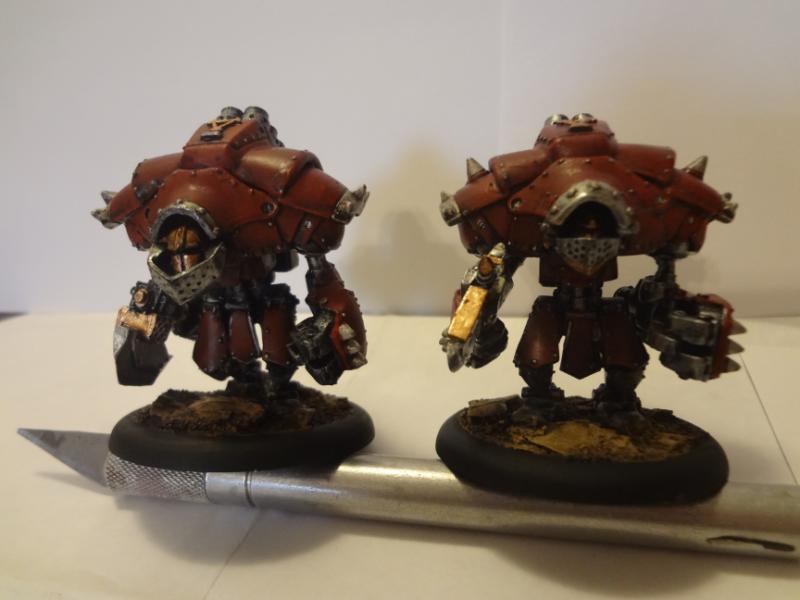
Except for a plastic head on the right, the two metal jacks below are built from stock metal parts. However, I think in Warmachine one of them would have a gun arm. Kings of War golems don't have ranged weapons, so I did a lot of mixing and matching in order to make them all armed with different variations of hand weapons.
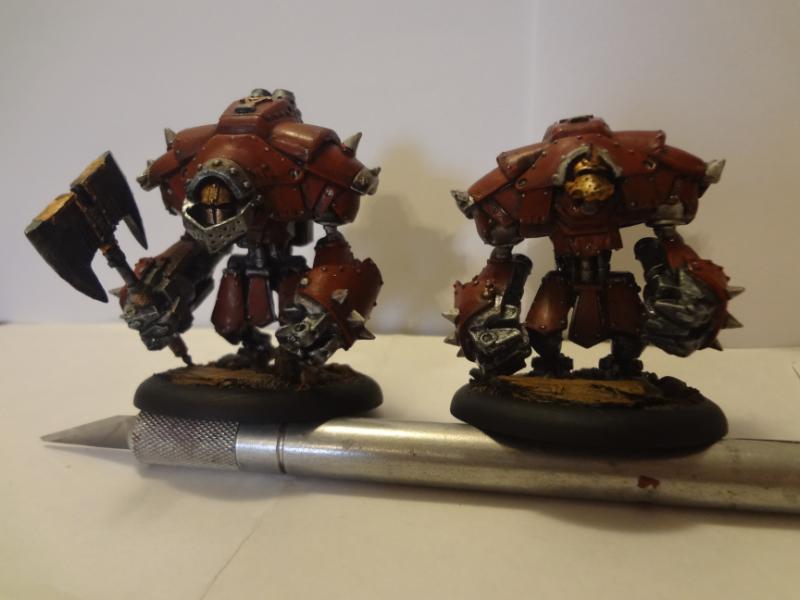
The two metal warjacks below benefited from a bag of Khador warjack spare parts that Tim found, which yielded some alternate heads to give a bit more variation to the unit. The one on the right I call "The Boxer." He has two plastic fists and a face with a jaw that juts out. The one on the left has a plastic fist and I converted a double-bladed axe for his right hand.
These guys were painted quickly with base colors and a dip. I matte varnished the red areas, but left most of the metalic areas a bit glossy. They've only got about four colors anyway, so it was an easy job. The bases are just bits of pine bark with sand and gravel.
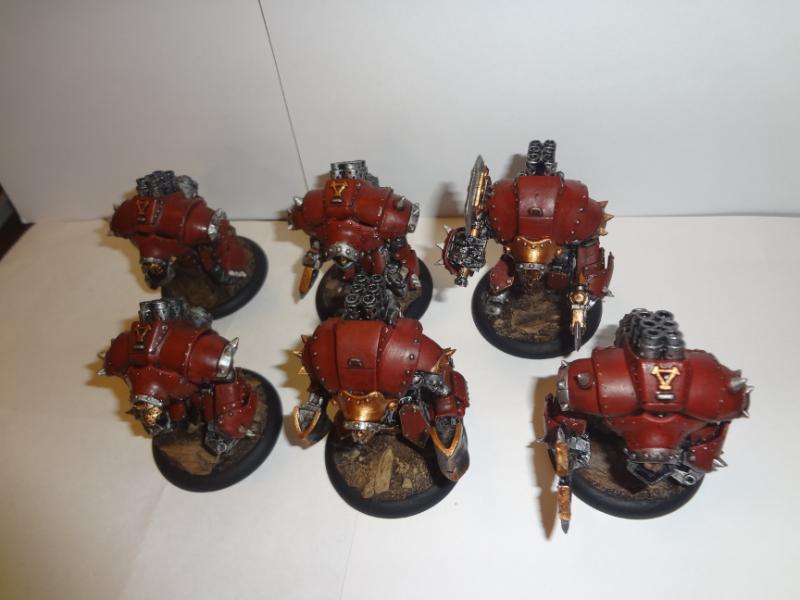
It's lucky that Lesser Obsidian Golems are the only infantry unit in KoW that are on 50mm bases, because these guys are just barely able to rank up on the tabletop with the 50mm round bases that they come with. The 40mm bases used by most large infantry in the game would have been unworkable.
Also, I recently took possession of these six chaos knights, straight from Mattias's workbench.
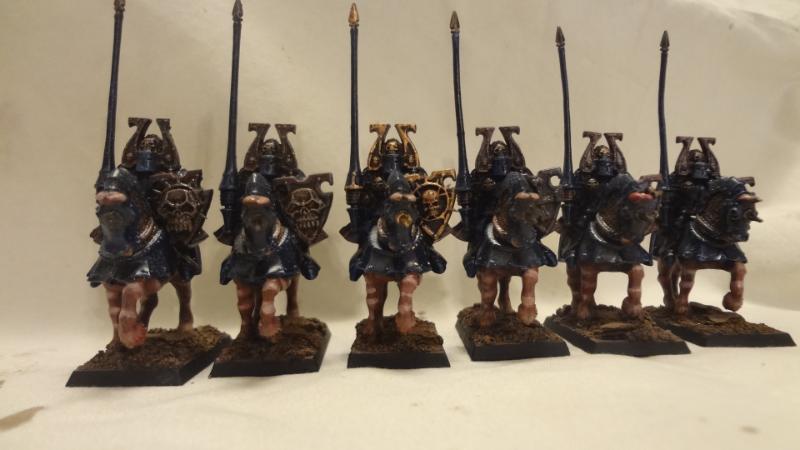
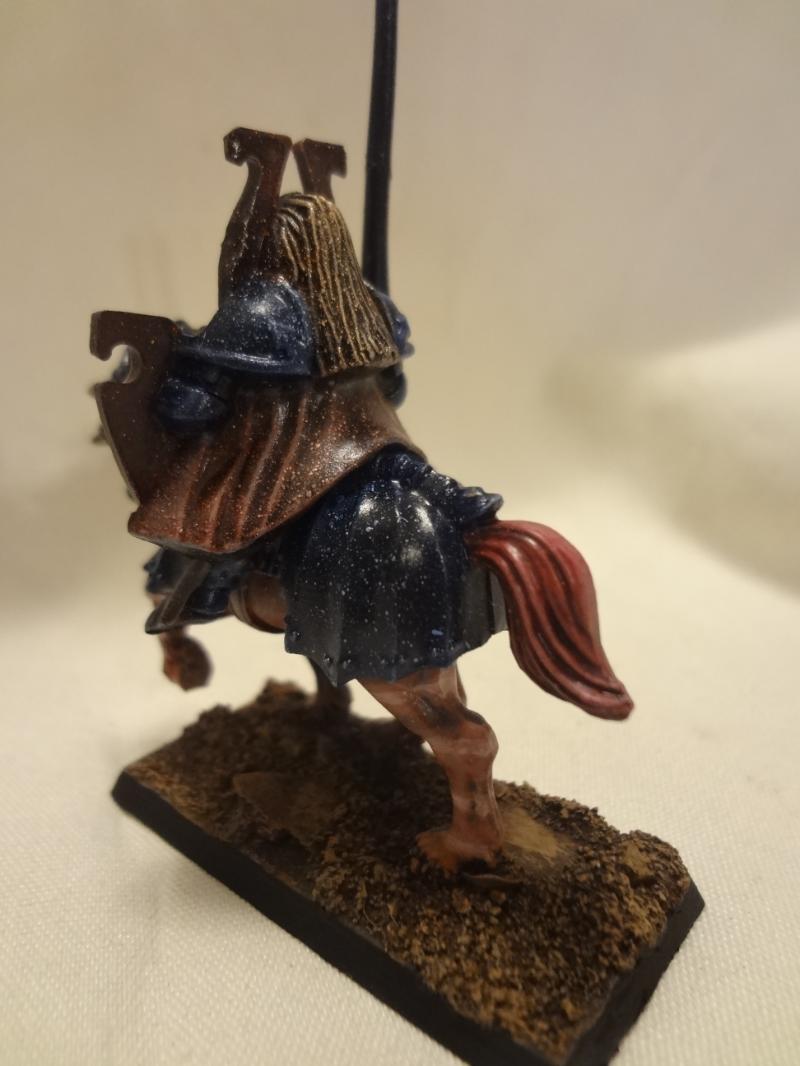
You might recognize them -- they are actually just the plastic chaos knights from Battlemasters, the 1990s board game from Games Workshop and Milton Bradley. The figures don't have much fine details, but they're workable. I think you'll agree that Mattias has taken them to a whole new level with his painting. All I did was clean them up and glue some skully-bits to their shields and then give them the rocky basing style to match the rest of the army.
For our Song of Blades and Heroes games, I created a bit of background, calling them the "Night Herons of the Black Crown." Mattias took that literally and gave them a starscape motif on their armor, bringing real visual interest to figures that don't possess an abundance of detail.
I chose one knight and overbrushed various decorative elements and rivets in bronze, though I probably should have been a bit more thorough. He may serve as a mounted general for the army.
Thanks Mattias! The addition of these two units brings my Kings of War army close to a solid 2,000 points. I've got a few more units on the way, but for now I can slow down a bit knowing that the army is almost big enough for most any game that we would play. In case you missed it, both units took part in a huge Kings of War battle earlier this month, though I didn't finish basing them until afterwards.
-- Karl, Chicago Skirmish Wargames club member
Monday, November 10, 2014
Reinforcements on the way: Dwarf Bear Cavalry
When I first decided last year that I wanted to build a dwarf army for Kings of War, Song of Blades & Heroes and other similar fantasy rulesets, I didn't drool over photos of cannons, flamethrowers or organ guns. No, my tastes tended toward the more wild and primeval parts of dwarven mythology. I wanted a bear rider.
After a year of working on my dwarf army (and consistently forgetting about my cavalry needs when shopping at the game store), I've been able to achieve that dream. Last weekend I painted up Thorvald, Dwarf Bear Rider (14136) from Reaper's Warlord line.
It's a fairly simple paintjob -- lots of dark, smoky armor, with the whiteness of the polar bear fur to provide contrast. I'm planning to get this guy on the table later this month as we try out Open Combat, the generic medieval/fantasy ruleset developed by Second Thunder.
Here's a peek at my dwarf army as it appeared before Thorvald arrived to claim his rightful place at the head of the vanguard. I think I can muster about 1500 points for Kings of War by this point. Not a huge force, but a good start toward some truly epic dwarven shenanigans.
Check back in a week or two for a closer look at Open Combat!
-- Patrick, Chicago Skirmish Wargames club member
Friday, November 7, 2014
Kings of War: The Killing Fields of the Agamin Desert
Last week the club gathered at Games Plus for another game of Kings of War. At 4,000 points per side, this 5-player battle was our largest game yet of KOW, and I'm pleased to report that the fast-playing ruleset once again gave a satisfying game replete with epic charges, heroic stands, brutal artillery barrages and deadly magical attacks.
A note about our armies: If you're a regular Chicago Skirmish Wargames reader, you'll know that we love games that don't put any limits on the models that we use. King of War embraces that ethos, which is why our armies are composed of miniatures from a dozen or more manufacturers, everything from Citadel to Reaper to RAFM to Mantic to old school Battlemasters to D&D prepaints and everything in between. If you're curious about the origin of a particular miniature, just ask in the comments section.
The game took place in the Agamin Boneyard, a vast windswept desert in the southern reaches of Qaarra. Mike and Alex commanded two detachments of stout dwarves, which allied with Tim's heroic defenders of the wilderness (hobbits, fairies and elementals). Here is their immense battle line, starting with Mike's dwarves, then on to Tim's nature warriors, then finally (barely glimpsed) are the dwarves commanded by Alex.
Here's the same battle line, looking from the opposite direction. Dwarves riding pigs!
On the other side of the battlefield, Karl and I mustered our forces: 2,000 points of undead for me, and 2,000 points of chaos warriors for Karl. Here is our battle line, starting with the undead army (dominated by Nethyrmaul the zombie dragon) and continuing on to Karl's red-armored chaos hordes (and the master tactician himself consulting a rulebook in the background).
Here's a closer look at Karl's battle line, which stretched off our felt battle mat and onto another makeshift battfield extension we had put together. We had immense 6 by 10 foot playing area at our disposal, which really allowed for an epic battle (as you'll see in the photos).
We played a variation on the "Kill and Pillage" scenario and placed 8 objective markers on the battlefield to fight over. At the end of six turns, victory points would be tallied based on objective markers held and casualties inflicted.
With that, we were off! Karl and I got the first turn. With creaking bones and clanking armor, the undead and chaos legions advanced ... slowly. Most of my undead guys had the "shambling" special rule, which meant they couldn't move very quickly. Karl's advance was a little better. A few of our units were quite fast, which enabled them to quickly outpace the bulk of our infantry. As we'd learn later in the game, this was both a blessing and a curse...
I don't know who the guy is in the background of this pic...
The turn passed to Mike, Tim and Alex, who surged forward toward the objectives scattered across the battlefield. Here's a closer look at Tim's hobbit horde -- literally 40 hobbits on a movement tray, backed up by an assortment of earth, water and fire elementals.
Mike's beautifully painted dwarves advanced in lockstep, hauling their artillery weapons as they came.
Nethyrmaul and his lesser bone dragon minion seized the small farm in the center of the table, from whence they would spew frightful magic attacks for the rest of the game. In the background, Karl looks on approvingly.
On the flank, Karl's fast-moving chaos cavalry crashed into a troop of dwarf boar riders commanded by Alex. This initial fight was just a harbinger of the slaughter to come as the armies moved ever closer.
Finally the vanguards of each army clashed near the center of the table. This big scrum included Tim's elementals, fairies and hobbits, as well as my wraiths and undead cavalry, plus Karl's red dragon, werewolves and chaos warriors, all gleefully smashing each other.
First blood came when Tim's fire elementals succeeding in routing Karl's unit of beastmen berzerkers. The cloven-hoofed fighters fled in terror and were removed from the battlefield.
On the flank, a troop of dwarf warriors commanded by Alex found themselves in a desperate predicament, as they received a charge by a horde of chaos warriors. Yes, that is a block of 40 old Battlemasters chaos warriors, all ranked up and ready to kill. Woe to the 10 dwarves standing in their path!
Even as this butchery unfolded, Alex kept up a steady stream of marginally accurate fire from his cannon. This is a rebased siege cannon from a prepainted MageKnight kit.
As quickly as he could, Karl rallied and charged in with his remaining chaos regiments. More slaughter ensued on both sides.
Back in the center of the battle, Tim's fairies and elementals had cut a swathe through Karl's elite units and were threatening his flank. Luckily he had a few more units in reserve to plug the gap. Tim's flying fairies are actually Epic 40k Eldar with butterfly wings!
On the far left flank, a grudge match was developing between Mike's dwarves and my skeleton regiments, which were both inching closer to each other under a barrage of crossbow and catapult fire.
Here's a more expansive look at the center of the battlefield, where Nethyrmaul held court with his ghastly breath attack and Tim's elementals rampaged through the smoke and flames.
By this point, many of Karl's chaos units were in full rout, having collapsed under the onslaught of Alex's dwarves and Tim's elementals and fairies.
The brutal frost giant himself joined the battle, helping to defeat Karl's cavalry.
Around this point, we reached our time limit and called the game. We had played five very satisfying turns (the scenario ends at 6 turns, so we basically played it to completion).
After tallying the results and quibbling over my questionable mental math, we concluded that the forces of good had prevailed over the armies of woe. Tim, Mike and Alex shared the victory while Karl and I cheered ourselves up in the knowledge that my undead army would be twice as big next time, once I raised all his slain chaos warriors from the grave.
Once again Kings of War gave us a great, visually stunning game. The glorious spectacle of 8,000 points of 28mm fantasy figures clashing across a 10-foot-long battlefield was truly something to behold. I hope my photos did the game justice.
Even though this was the first game for Alex and Mike (and only the second for me) we quickly got into the flow of the game and needed only minimal rulebook flipping to resolve most situations. I was using an army builder on my iPad, which presented all my stats and rules in a single screen.
I'd like to play the game again soon, though perhaps on a slightly smaller scale, since we don't regularly have access to a 6 by 10 foot table!
-- Patrick, Chicago Skirmish Wargames club member
Tuesday, November 4, 2014
Night Shift in New Chicago: Our 4th Annual Halloween Zombie Game
The club gathered last week for what has become an annual event: our Halloween zombie apocalypse game! This session continued the narrative that began in our first three games. First, our survivors escaped from the chaos and carnage of New Chicago and fled into the relative safety of rural Illinois. But last year, the dead came a-knockin', and the survivors were driven from their idyllic trailer park by hordes of slavering zombies.
After many months on the road, the survivors arrived at an industrial area on the outskirts of New Chicago. Yes, they were heading back into the stewing cauldron of urban decay in search of supplies and, perhaps, allies. But they were not alone: a group of inept, trigger-happy security guards were poised to blast away at anything that moved in the shadowy terrain. Meanwhile, a squad of military soldiers, part of the ill-fated Operation Sign Post, was also combing through the warehouses, searching for ... something ...
Tim's scenario gave each faction its own set of victory conditions. The survivors were tasked with recovering supplies and/or hotwiring vehicles to escape. Operation Sign Post was escorting a scientists who was trying to extract samples from zombie screamers scattered across the board. Turvaton Solutions wanted only to secure the three bunkers on the battlefield.
We were using Nuclear Renaissance, a fairly versatile ruleset that we've enjoyed recently, to play out this game.
Here's how the battlefield looked at the beginning of the game.
Operation Sign Post (the military detachment) deployed in the foreground, near those tire piles. The survivors arrived in the car park toward the rear left, and the bumbling security guards deployed from a bunker located behind the big tall parking garage in the back.
On the streets, the dead roamed...
The three factions crept cautiously into the city, each trying to secure their own victory conditions. If that brought them into contact with the other survivor groups, oh well ...
A detachment of security guards mobilized quickly by hotwiring a Chicago Police Department cruiser. Of course, the noise from the engine starting up brought even more zombies into the area. We found that, much like in real life, exploring the battlefield with a vehicle is much, much safer than traversing the zombie-infested streets by foot.
Operation Sign Post took a similar tack, motoring through the streets packed into their humvee in search of zombie screamers. The real danger came when they actually located one of these slavering, mindless creatures, because then the squad had to deploy quickly, neutralize any nearby zombies, and then guard the area while the scientist performed her extraction. Here's how it all went down.
The zombies charged the humvee and managed to drag the driver out into the street and dismember him, but the frosty soldiers reacted professionally by pouring firepower out the vehicle windows and into the massed hordes.
The first snatch & grab went well, but as Operation Sign Post cruised through the silent streets, they came upon Turvaton Solutions, the site's security detail. The terrified rent-a-cops, tired, dirty, barely holding it together after weeks spent cut off from the rest of the world, looked a whole lot like zombies, which is why the Sign Post soldiers identified them as threats and opened fire. Oops!
Lots of shouting and swearing ensued, as each side tried to convince the other that they should be focusing on the undead threat. Meanwhile, of course, the gunshots brought still more zombies shuffling over.
In the end, they worked out their differences, and Turvaton even offered to provide covering fire for the Sign Post soldiers as they carried out another field extraction.
Across the battlefield, the survivors were driving through the city, taking out zombies and moving ever closer to the other two factions.
Toward the end of the evening, the three factions rendezvoused near the abandoned semi truck and considered their options.Though easily dispatched, the walking dead were converging on their location and would surely be there within minutes. The fatalistic officer in charge of Operation Sign Post suggested calling in an air strike on their location -- sure to kill all the survivors, but sure to wreak havoc on the zombies too. That plan was quickly nixed in favor of an all-out retreat aboard whatever vehicles still functioned.
As the undead closed in, the convoy moved out, with the Operation Sign Post humvee in the lead, and with Burt, the crazed, maniacal biker (survivor of our very first game) covering their rear with his sawed-off shotgun. Here is the convoy as it accelerated through the streets.
Did the scrappy survivors break through the cordon of rotting corpses and survive? Where will their next adventures take them? Find out all that and more in next year's installment of this epic campaign series!
-- Patrick, Chicago Skirmish Wargames club member